What's new

Johnny's Goatbuilt JHF buggy build

JohnnyJ

Low Range Drifter
Joined
May 19, 2020
Member Number
169
Messages
674
Loc
SE Michigan
I have been documenting this build on my local forum, but there is very little traffic left there and the syrup suckers are just keeping it on life support to get their ad revenue. I have thought about moving this over here for a while, and after consistently coming here to ask tech questions, I figured I might as well.

For some background on the build, in Summer 2016 I sold out of my part of a 4500 race car and was looking to get back into rec wheeling and rockcrawling. For a year or so I was bouncing around ideas of what build. I went and found the drivetrain out of 2001 Yukon XL with a broken frame. I had some drivetrain parts on my table thinking about building a rockbuggy when I saw that Goatbuilt was going to start making the JHF chassis. I had some pictures of various buggies that I was using for inspiration, and a few JHF buggies were what I was going to use for "inspiration". By January 2018 I ordered the chassis and got to work. I took most of 2020 off after getting burned out and having other stuff going on. I got back at it in 2021 to join a trip to Colorado.

Here's some details on the build, and some part numbers that I've been saving for reference.

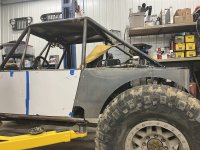
GoatBuilt JHF Chassis, 108" wheelbase, "jeep" hood and grille
2007 Ford F250 Dana 60, 5.38, Sparty locker, JHF high-steer
- narrowed 4" to use 78 F250 axleshaft on the long side, using factory 1550 shafts
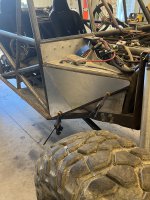
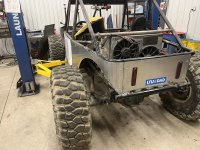
1998 Chevy K3500 14-bolt, shaved, 5.38, Detroit, 1/2t chevy disc brakes
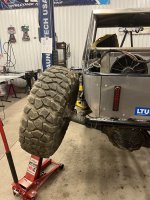
39" BFG Krawler Red labels on KMC Machete Beadlocks
2001 GMC Yukon XL 6.0L LQ4
  • Holley TerminatorX EFI
  • Champ oil pan (high-ish clearance, baffled, steel)
  • Dorman LS2 car intake and stock cable throttle body
  • Holley fuel rails with late-model 6.0 truck injectors (EV6, E85 flow rates, 12613412)
  • Goatbuilt accessory brackets, TC pump on driver's side, alt on passenger
  • Truck Norris cam, 706 heads (stock 5.3)
TH400 built by Tranny Tom, Reverse Manual with Winters/WOD shifter
Atlas transfer case, 3.0 low range
Fox 2.5 air shocks
PSC Full Hydro, 2.5x10" ram, TC-pump
Mastercraft cheap seats with Impact 5-point harnesses
Griffin 31x19 radiator, Derale 16927 shroud and twin fans
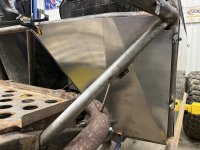
Goatbuilt fuel tank and factory fuel pump
Magnaflow muffler mpe-12649

Spring 2022 at Sand Hollow:
Screen Shot 2022-04-28 at 12.09.47 PM.png
 
Last edited:
2007 Ford F250 Dana 60, 5.38, Sparty locker, JHF high-steer
- narrowed 4" to use 78 F250 axleshaft on the long side, using factory 1550 shafts
I don't get that.

How do you get 78 F250 factory axleshafts with 1550 ?

Also :

We need pics !
 
Before I had the chassis, I had wanted to keep the axle narrower than fenders on my trailer and I knew I was going to run a 05+ Ford Dana 60. This unit came out of a local-ish yard for a few hundred bucks. I stripped it down, trimmed the casting on driver's side, and after talking with a friend, decided to go with a 78 Ford D60 long side shaft to narrow it 4" from stock. A local machinist re-drilled 6 unit bearings (4 used, 2 new) and new rotors to 8x6.5 so I could use more common wheels.


front axle bare.jpeg


Later when I had the chassis, I worked with Offroad Anonymous (ORA) and he cut a narrowed truss for me. They are on the other side of Michigan from me, but knew them from racing.
front axle truss.jpeg


To get link separation where i wanted it, i frenched the upper link into the truss.
front axle upper link.jpeg


Lower links were modified Barnes4x4 mounts. Shock mounts are also Barnes and I worked to push them wide but not in the way of knuckles. Links are twisted to allow bolts to slip under shock mount.
front axle lower link.jpeg


And a final pic of axle with JHF steering welding to knuckles, upper link mount in place. Ram mount is 1.5x0.25 from axle to 2x0.375 cross bar. 1/4" plate is under the crossbar and the 2.5x10" ram is mounted on that. I eventually moved from PVC steering links to DOM.
front axle nearly done.jpeg
 
Last edited:
I don't get that.

How do you get 78 F250 factory axleshafts with 1550 ?

Also :

We need pics !

During mockup I picked up a 78 F250 d60 yukon chromo and the rest was stock stuff that came with it. When I found how cheap the stock 1550 stuff was, I bought some and sent the long side to Branik to be narrowed to 78 F250 length. I have the 1480 stuff in my spare parts box in the case the 1550 stuff breaks.

On my long list of upgrades is chromo 1550 stuff, but the OEM stuff is holding up.
 
So I was shooting for 67" WMS to WMS up front, and I wanted 65 to 65.5" for the rear. After some research, I found out the ribbed for pleasure 14-bolts had a variant. This was a craigslist find from a 1998 Chevy K3500.
rear axle bare.png


I went with a Ballistic 14-bolt shave and a Barnes narrow truss. I couldn't find any references for my oddball 14-bolt, so I went with the Barnes truss and just had to tweak it a little to center it on the axle.
rear shave.jpeg
rear barnes.jpeg


And now with brackets. Ended up having to clearance the pinion guard to make room for link clearance at full stuff. Rear brakes are lugnut 4x4 brackets, 2003 3/4t yukon xl rotors, and 1/2t chevy calipers.
rear mostly complete.jpeg
 
I found a rotten 2001 Yukon XL 2500 with a broken frame for $1300 on craigslist. I drove it up and down the street, it had oil pressure and a flashing check engine light. I bought it, did some tests to make sure it was reasonable and pulled the LQ4 engine and 4L80E, electrical, and a few other things and sold the remaining.
donor.jpeg


Then it got the craigslist rebuild before final install in the chassis. To fit in the chassis it has a Champ oil pan that has baffles and seems to hold oil pressure well. The intake is a Dorman LS2 intake from back when they were $400 (sadly I didn't jump on it when it was $300).
engine craiglist rebuild.png


The TH400 was picked up locally and then rebuilt by Tranny Tom (former local, now in Texas and does transmissions for 618 Gilbert and others). The Atlas is 3.0 low range. I did swap the chrome trans pan back to a stock unit since the cheap chrome is known for leaking.
th400 atlas.png
 
There are other pics of other JHF chassis getting built up out there, so here's what it looked like all tacked together. I had picked up the table earlier, and it was a huge help to the first section of chassis building. I received the kit at the end of Feb 2018 and had it to this point around April 2018.

chassis tacked.jpeg


My original plan was to save money and run a Ford 205, but after test fitting I realized I'd be sitting on top of it.
first drivetrain .jpeg


I borrowed an Atlas from a friend with a stalled project and ordered mine. I decided to poly mount the drivetrain, which in hindsight was probably more of a PITA than it was worth. I'm 6'1" and long in the torso, so I needed all the extra headroom I could get. With the seat nearly on the shift rail I can fit. The shape of the Atlas allowed a lot more room under my ass.

seat clearance.jpeg


Here's the trans mount. It was a PITA, but seems to be working well.

trans mount.jpeg
 
Why isn't this in General 4x4? :confused:

Thanks for sharing it here. Do you ever wish you went with lower gears in the transfer case?
 
I had the drivetrain where I wanted, but I was also making sure the front suspension didn't interfere. I bounced back and forth tweaking both to work as the packaging is tight. I wanted the hood low, so I was working to keep the drivetrain low. On the suspension side, I was working to get the shocks mounted and realized my 14" fox 2.5 air shocks had pretty long bodies compared to what others had built to that point. I worked to get the axle side shocks low, but it was still above the JHF front shock hoops. After much thought, I decided to grab some shock mounts meant for frenching in the rear of a wrangler and used them up front. This allowed the shocks to get the necessary swing around the frame and I didn't have to make tall mounts above the JHF hoops.

chassis shock mounts.jpeg


So after a lot of head scratching, it did all fit in. There's just enough room between the alternator and shock mount. The links fit around the engine. I have Goatbuilt alternator and TC-pump brackets. Water pump is F-body with spacers. I ended up scrapping the factory fuel rail and going with a holley fuel rail as it was easier to mount. I just recently put the Warr throttle body on the shelf and went back to the stock LQ4 cable throttle body with an adapter. I did notice a little better throttle control at low throttle positions with the smaller throttle body, it also doesn't whistle.
engine in chassis.jpeg
 
Why isn't this in General 4x4? :confused:

Thanks for sharing it here. Do you ever wish you went with lower gears in the transfer case?

I thought other was for unbranded or non-4x4. I saw another buggy build here, so I figured it would work. Mods can move if they like.

Not really. My TJ had 4.3 low range with a manual, and a friend had 3.8 and th400 in a buggy. I felt like both were great at crawling, but suffered when trying to hit climbs with more wheel speed. Also found that I had to go between hi and lo range between trails/obstacles or listen to the engine rev. With 39s, 5.38s and 2300rpm stall, I feel like I can move reasonably slow for what I do, but can still enjoy big wheel speed hill climbs that we have some locally.
 
After I had the front end suspension in place and the drivetrain mounted, I moved on to the rear 4-link. For mocking up suspension I usually start with PVC since it's cheap and easy to work with. The lower frame side mounts are the standard setup with the chassis. The upper mounts have a tube frenched into the frame.

chassis 4-link.jpeg


So around April 2019 it was a rolling chassis. I pulled it off the table and was putting in the interior panels. Then it pretty much went into hibernation due to being burned out and being busy with kids. At the end of the year 2020 I got rolling on it again, and one of the first jobs was mounting the radiator and gas tank. I decided to put the gas tank behind the seat, and go with as big of a radiator as I could fit behind that. That would leave some storage space behind the radiator.

chassis rear.jpeg


Jumping way ahead to my most recent project, I finally made the storage space behind the radiator. The primary fan is on the left, the other will only kick on if I'm really warm (>210*). It was around 80*F both days at AOAA last weekend and I don't think I ever had the 2nd fan turn on.

chassis rear storage.png


And pics of the side and rear of the "trunk". The bracket on the trunk floor above is a Milwaukee pack-out bracket from ORA. I have box for tools and a cooler. Worked well, but the cooler will be f'd if I roll. I don't have room for both side by side.

chassis rear near done.png
 
After it was a roller and I reinstalled the drivetrain, I got to work on exhaust. Ebay "stainless" headers, 2.5" crossover into 2:1 with 3" outlet to the Magnaflow muffler and out. I was worried about noise level as both Silver Lake Sand Dunes and our local park Holly Oaks do sound testing to enter. It works, I pass right through and it's not obnoxious on the trail.

exhaust driver.png
exhaust drinker.png
exhaust back.png
 
So after I had exhaust run, I wanted to get the underhood work done. But I needed to know where I could fit things around the grille, hood, and headlights. So I worked on that next. I went with a 4 hood pin setup and it totally lifts off. The hood had some indents where stock hood latches would go, so I used some scrap aluminum to make a plate that looked like the hinge. I wanted the hood low, so I decided to punch the shock towers through the hood. Later I had to make a hole for the steering reservoir.

headlights.png


Now I knew where my ebay headlights would go, just needed mounts. I also wanted a support between the shock hoops. So I built this out of 1" DOM to fit under the hood, and then built off it for the headlight mounts. Also can see the rear hoodpins in this pic.
shock support.png


I made a mount to hang the ebay lights, and I can adjust side to side and up and down. They were cheap and not very deep. They do provide some light and have low and high beams. From that 1" frame I was able to make upper grill mounts, hang the headlights, and also front hood pins.

headlight mount.png
 
Up next was to start filling in under the hood. I wanted to fit the battery, trans cooler, steering cooler, steering valve, PS reservoir, and engine air filter. So first up was to try an idea I had to use a 2001 Camaro LS1 air filter and take advantage of the hood scoop. I mocked up an air box out of cardboard and then made it out of aluminum.

air filter.png


and the box, which allows me to stack stuff underneath it. It has done a reasonable job of keeping intake air temps down. The worst I've seen is mid-140*F.

air box.png


I shuffled everything around under the air box for quite a while, and figured out this could fit everything. I ran a lower shock brace out of 1.5x0.120 across the bottom. I then laid down a piece of 0.100" steel with tabs off the brace and to the winch mount. From top I have the trans cooler, steering cooler, the lower frame for battery box, and steering valve mount.

underhood.png


The battery has the front mount to the 1" DOM frame, and a bolt from the battery box top down through the 1.5" DOM cross bar.
underhood package.png
 
Up next was power steering reservoir. It didn't fit anywhere, so I decided to cut open the shock tower and run the hose there. I flexed the shock and verified no clearance issues and then boxed that area back in.

ps reservoir.png


I had wanted the steering valve up under the hood to have the plumbing up front, and to no have the valve over my feet or legs. I picked up an aluminum steering column mount and then ran the steering shaft up with two CV joints and a support steering rod end. Also down below you can see the panel trimmed to fit the Atlas shifters. I wish it came out that clean in the end.

steer n shift.png
 
As I did plumbing and wiring, I was up against a deadline. In early August 2021, I needed to be done to go wheeling for a week in Colorado. I started plumbing and wiring in mid-June, and I had wanted to have a test run in early July. Yeah, that didn't happen.

I wanted the Holley terminator as protected as possible. I decided to make a box under the dash that could fit it. Later I came through and put heat shield around it, but I'm sure it's still warm with the wrapped crossover exhaust pipe just under it. I knew I was putting switches on the panel, so I ran my wires there in preparation. I had a few pieces of paper with my wiring plan. All of my wire came from wirebarn.com since they seal multicolor GXL wire packs for reasonable cost.

ecm mount.png


I also made a panel to mount the fuse panel and relays (2 engine radiator fans, trans cooler fan, fuel pump). I had done some plumbing before wiring, so I had the radiator plumbed with 1.25" silicon hose, and all steering done.

wire bomb.png


I punched a hole for the switch panel. Switches for ignition (red), starter, lights, hi/lo light, 2x spare, and winch arm and in/out. It's in reach when I'm belted in. All switches are K4 triple sealed, which have worked great on previous projects. I also added a cigarette lighter and double USB charger.

switch panel.png
 
Last edited:
After mocking up a CNC dual master setup and not liking how it fit, I pivoted and went to the Busted Knuckle reverse pedal and Wilwood 1.125 master cylinder. In the 4500 car, we had plumbed in brake shutoffs for front and rear so if you tore a brake line you could isolate that circuit. I decided to do the same and fit the brake switch there, too.
brake lines.png


I like the location of the pedal and master because it's well protected. But it's like to get swapped out for a remote hydroboost setup.

brake master.png


I can't find pics, but nothing too exciting for the rest of the brakes. I ran hard lines from the cut off valve to the driver's upper link mounts for front and rear. I then ran AN3 kevlar braided lines down the upper link to a tee on the axle. Hardline from the tee to the corner, and kevlar braided lines out to the stock brakes up front and 1/2t chevy calipers in back.
 
Pictures of the initial build start getting sparse. Here's the front driveshaft with carrier bearing. I believe the carrier is from Busted Knuckle, but I think the driveshaft kits are Wide Open Design. Why? I'm guessing parts availability. I dunno. I was busy as hell.

front driveshaft.png


I also switched from the recommended goatbuilt pump over to a later truck with the returnless system. A friend cut this from hydrodynamic's file he posted here. Been very happy with the setup.

fuel pump.png


And the last pic of the original build. July 30, 2021 I took it to the local ORV park and ran it for a few hours. Did some climbing and making sure it didn't have any major issues. First day of wheeling trip in Montrose, Colorado was August 8th. I know I buttoned up some stuff before leaving including some heat wraps and installing the engine skid.

shakedown.png


Plans for Winter 2022/2023 are to tab it out for panels, convert to hydroboost, and then strip and paint. I'm sure that list will grow. Many upgrades are planned like better axles shafts, or aluminum links, or or a better winch. Oh, and I need new winch rope before next season.
 
Very cool !

Up next was to start filling in under the hood. I wanted to fit the battery, trans cooler, steering cooler, steering valve, PS reservoir, and engine air filter. So first up was to try an idea I had to use a 2001 Camaro LS1 air filter and take advantage of the hood scoop. I mocked up an air box out of cardboard and then made it out of aluminum.

air filter.png


and the box, which allows me to stack stuff underneath it. It has done a reasonable job of keeping intake air temps down. The worst I've seen is mid-140*F.

air box.png
This is MEGA-badass !!!!
I love it !!!!

Soooo smart and so clean !

That's why I love this community. The ideas are amazing !!!

Good job !!


After mocking up a CNC dual master setup and not liking how it fit, I pivoted and went to the Busted Knuckle reverse pedal and Wilwood 1.125 master cylinder. In the 4500 car, we had plumbed in brake shutoffs for front and rear so if you tore a brake line you could isolate that circuit. I decided to do the same and fit the brake switch there, too.
brake lines.png

On mine I used valves that threaded directly on the MC and I also put the brake pressure switch on one of the ports on the other side of the MC.

Removed a lot of fittings / connections.

Also, I have installed a BKOR HB setup with this exact master, Dana 60 dual piston calipers up front, single piston calipers out back (basically the same setup you have) and it works amazing.

First test, not even slamming the pedal. See how it upsets the chassis ? :smokin:

 
Last edited:
Started working on panels. Likely only run them when weather is crap.
 

Attachments

  • 4D82DBFF-500B-43B3-AEBE-ECA1761663E2.jpeg
    4D82DBFF-500B-43B3-AEBE-ECA1761663E2.jpeg
    4.2 MB · Views: 69
  • 5FFEC5CD-0942-463D-B9E7-F9D3D5310AA3.jpeg
    5FFEC5CD-0942-463D-B9E7-F9D3D5310AA3.jpeg
    1.8 MB · Views: 69
  • 9BDC8FF6-3806-4579-854C-3DFE9C9297F7.jpeg
    9BDC8FF6-3806-4579-854C-3DFE9C9297F7.jpeg
    4.1 MB · Views: 69
I've been messing with this kicker panel on and off for a few weeks. I need to add a couple more fasteners and then I'll call it good. Also need to clean up the door panel and get it sitting flush.

kicker panel.png
 
Top Back Refresh