What's new

Johnny's Goatbuilt JHF buggy build

Is that the extruded type fuel rail? That's an interesting idea. This makes me wonder if I might go with a stock LS2 set of fuel rails.

Yeah, at that point we were using the extruded aluminum rails. We later changed from a Camaro intake to a truck intake and changed to modified stock truck rails. We welded AN fittings to the stock truck rails.
 
I may have an answer for your question but need to see your last tune and learn data first. Do you feel like sending me your ECU ?

Also the factory fuel rail doesn’t fail like that. Would be a cheap replacement for you.
 
Holley shows my new setup is getting mailed. Hopefully by the weekend I can wire up enough to make a bench harness and pull the data. Not really sure if the old computer will power up. It was next to the fire inside an aluminum box. I can pull the last tune off the laptop when I get a chance, but obviously won't have the learn data in it. I'm hoping the old computer works so I have a backup computer.

I picked up the cheapest smoke machine I could find and checked the intake for leaks. The AutoLine Pro Automotive Smoke Machine Leak Detector from amazon was $64 for anybody needing something. I doubt it'd stand up to constant use, but it should be handy for random jobs now that I have it. Good news is that I only have one leak off the back where the brake booster vacuum port was. The cap melted off, so I plugged it off and everything else is looking good, so I'll clean up this intake and reinstall.

Next up is fitting up a factory LS2 fuel rail. The Dorman mounts are in the wrong spot (low and offset), and one is broken anyway. So I need to make up an alternate hold down method. Also need to find the injector clips.
IMG_0863.jpeg
 
Last edited:
Here's my list of carnage so far.

  • Terminator engine harness, can splitter, can-usb cable, 3.5" screen cable
  • Front half of chassis harness and some under hood hoses
  • Driver's side coil pack harness and 2 melty coils
  • MAT, CTS
  • seats
  • throttle cable
  • front rock lights
  • shutoff switch seems a little crusty, will replace just to be sure

I still have more to inspect, so I could find more.

Last night I was able to get a few lights on the old ECM, and I plan to head out in a bit to see if I can download data from it.

Since so much of the wiring was melted, I've been thinking of changing up some things. I think I'm going with the 35 amp per channel MSD solid state relay block for engine and trans cooling fans and the fuel pump. I'm going to borrow white-rhino 3D printer eBooster to see if could fit, if it does that may take a channel on the relay block.

I'd like to add turn signals and I'm thinking of changing up some fluid routing for radiator and fuel pump. I think I'm going to change up how the ECM is mounted, as it's a bit of a PITA to service.

update: Just looked over Cam, oil pressure, IAC, and TPS and all seem to be fine. Just had melted plastic on them. I think the factory sensors use better plastic than the Holley harness.
 
Last edited:
Here's the fuel learn map. Bebop or others, if you want to look at anything, DM an email address and I'll pass it along.

HolleyAfterFire.JPG


I thought I had clamped these down to 5, but apparently not.

Learn Limits.JPG
 
I don't see any cells in idle box or where I normally operate that are out to lunch. Looks like I could pull some fuel from heavy throttle area. I'm guessing I visit the red box mostly hill climbing, and I've spent the least amount of time refining that area.

Brown box with most green is where it runs most driving to and from trail and crawling.


Fuel Map.jpg
 
It’s actually pretty clean.
You already had your limits pretty low and don’t appear to be pegged on it anywhere.

Is your wideband on a single bank or downstream to all 8?
 
if you melted/ shorted cts it would explain why learn tagle doesnt show rich condition
 
Single O2 on passenger bank. The bung is part of a collector extension before the v-band on the header.
exhaust-drinker-png.580592


It ran poorly then caught fire and melted the harness. It ran as long as it took for me to hit shutoff after the fireball. But that does make sense.
 
Last edited:
Pulled the intake to make it easier to figure out a clamping setup for the factory fuel rails. One of the pedestals is broken, so I'm making some clamps off the intake bolts. First step was to create pieces that captured all the intake bolts. I integrated the throttle bracket into my piece. I had some 1/8" stainless on the shelf, so I decided to go with it.


IMG_0891.jpeg
 
Nice !

Looking forward on hearing how you like it.
 
Hi, just starting my first real buggy build.. was look for info on the iBooster and found the main thread & yours. What calliper's are you using ? I was planning on 99-04 rears all round on my 609 axles as reading the other threads they seems to be a good candidate for the stock MC that comes on the iBooster. Thanks !
 
iBooster fits. I have to move the steering support to adjust where my steering sits. But my foot is comfortable on the gas pedal. There is hood clearance. Might need to modify the firewall panel. Definitely needs more gussets.

IMG_0938.jpeg
IMG_0939.jpeg
 
Last edited:
Hi, just starting my first real buggy build.. was look for info on the iBooster and found the main thread & yours. What calliper's are you using ? I was planning on 99-04 rears all round on my 609 axles as reading the other threads they seems to be a good candidate for the stock MC that comes on the iBooster. Thanks !

99-04 rears all around, but snivilous says he has good pedal with 99-04 fronts & rears.
 
99-04 rears all around, but snivilous says he has good pedal with 99-04 fronts & rears.

Thanks for getting back to us, decided to go with the rears all round... have a rear rotor skimmed out & just need a caliper to get some brackets drawn up next.

BTW, do you have your pinions horizontal, couldn't quite tell from the pictures. Want to weld my axles out fully so I can have the frame rails / belly subframe as a roller before I build the full cage out... need to be able to move it around the shop. Cheers !
 
Last edited:
Pinions aren't horizontal. Front is whatever it's at with I think +6* caster. Rear is something, no idea. I think it was close to parallel with t-case output at some point, but I think it's pointed up a bit more now. It's a trail only rig so I wasn't as concerned as I would be with a streetable rig.

I did some digging on caliper alternatives to match up with the iBooster. I converted to 8x6.5 with my 2007 SD60, and it looks like easiest rotor to move to is the 1999 E350 rear, which is 1.19" thickness. I did some looking for other vehicles that ran the same thickness rotor to see what might be a good match. Here's what I came up with, first is what the Accord brakes are capable of, then my current setup, and then some choices to go with the 1.19" rotor.

Caliper, area, hydraulic ratio, brake torque
1999 Accord Front, 8.16 in^2, 10:1, 26799 in#
2007 F250 D60, 17.49in^2, 18:1, 30210 in#
2004 F250 Rear, 9.62 in^2, 12:1, 34975 in#
2000 Ford Explorer, 10.29 in^2, 13:1, 37212 in#
2009 Ford Flex, 10.98 in^2, 13:1, 39504 in#
2019 Buick Enclave, 10.98 in^2, 13:1, 39504 in#

So I think I'll look to see if Flex or Enclave calipers are cheaper, and likely go that route. I think the 13:1 pedal will be livable after my 18:1 current setup I've had. All of the options are fixed dual piston calipers.
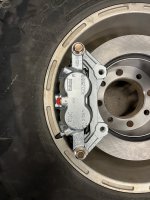
Just to give you some info for what its worth. Busted knuckles lighterweight kit...the one that used stock looking rotors, use a 99-04 f250/excursion rear rotor, and wilwood calipers.

Amazon.com

Amazon.com


You just have to open up the inside of the rotor opening to fit the front axle.
 
That's cool, the 99-04 excursion rear rotor specs match up with the 1999 E350 rotor that I have on order. I just ordered those and some 2009 Ford Flex calipers off rock auto last night. Local junkyard shows caliper for $15/ea, so I'll grab some, clean off the junkyard paint, and ship'em back for cores. Hoping it shows by the weekend, but knowing my luck I'll get them next Monday..
 
That's cool, the 99-04 excursion rear rotor specs match up with the 1999 E350 rotor that I have on order. I just ordered those and some 2009 Ford Flex calipers off rock auto last night. Local junkyard shows caliper for $15/ea, so I'll grab some, clean off the junkyard paint, and ship'em back for cores. Hoping it shows by the weekend, but knowing my luck I'll get them next Monday..

Those are what I'm using, had one turned out to fit the UB already... post a picture up of how they sit in the knuckle once you have them.

Your lucky you have junk yards locally... my nearest one is 3hrs away ☹️

My frame will be based on the JHF as you have, anything that really annoys you about it ?
 
fffffffffuck. I had looked at pad size vs the rotor but didn't think about the caliper bracket hanging down.
IMG_0956.jpeg
IMG_0957.jpeg
IMG_0949.gif


Vs bracket for a 2004 F250 rear caliper. I'm gonna have a beer and think about modifying the frame to look more like this:
img_4021-jpg.2180
 
Assuming I can modify the bracket and lower it 1/2” then I will have just over 1/2” clearance.
 

Attachments

  • IMG_0958.jpeg
    IMG_0958.jpeg
    2.5 MB · Views: 7
So the unit bearing drops in. I thought I might need to trim the parking brake surface, but that seems fine.
IMG_0959.jpeg


but looks like the center bore needs a little loving to drop down the final 3/8".
IMG_0960.jpeg
 
Top Back Refresh