What's new

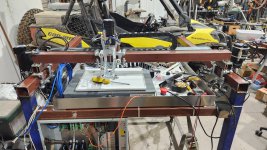
First plasma table build

So do you think it would be worth being able to use OEM Hypertherm torch parts?

From a $/hour price is it worth buying Hypertherm?
you will be hard pressed to find a post any where from people regretting buying their HT
I have had both HT and TD, the HT is head and shoulders better

for example, find your plate/amperage settings in the book and push the button.

worth the extra money? That is up to you. I make a living cutting/welding so maybe it is a bigger deal to me.

I know they are not cheap, but buying a cheap one and changing your mind isn't cheap either
I don't know if my input is helping at all, but that is my experience

can you find one second hand?
 
I'm really just curious if the torch end/consumables are worth trying to adapt to my Chinese cutter.

I know a HT is the top shit no issue there.
The issue is on a super budget build "not for profit" it's a serious financial investment.

A powermax 65 is over $4k these days.
That is a substantial chunk for a hobby toy.

And even if this cutter I bought dies every 3.5 years out warranty I can buy 5 more for the same price and potentially last me 18 years.

At that point I would have either decided this is a profit stream for me and bought/built a commercial table with appropriate power source like a HT.

My curiosity at this point is is it worth retrofitting a Hypertherm machine torch on my cutter to be able to use OEM Hypertherm consumables.
It doesn't appear to actually be more expensive than the equivalent Chinese machine torch.
 
At the shop, we're using a Hypertherm 65 for the Torchmate table and a 45 for the BendTech Dragon. I admit that I haven't done the math to compare, but they're convinced the Hypertherm consumables don't last that much longer to justify buying genuine over import consumables. Off the cuff, I'd say you might be getting 65~75% of the use at 50% of the cost? I'll also say that I run things at 88% speed on the table compared to the Hypertherm consumables. They do get the Hypertherm FineCut consumables for the items they want done cleanly.
 
At the shop, we're using a Hypertherm 65 for the Torchmate table and a 45 for the BendTech Dragon. I admit that I haven't done the math to compare, but they're convinced the Hypertherm consumables don't last that much longer to justify buying genuine over import consumables. Off the cuff, I'd say you might be getting 65~75% of the use at 50% of the cost? I'll also say that I run things at 88% speed on the table compared to the Hypertherm consumables. They do get the Hypertherm FineCut consumables for the items they want done cleanly.
Something like the fine cut stuff has me the most curious.

This machine came with 1mm nozzles I think and looking around there are both larger and smaller sizes to fit this torch.

With a 32"x32" envelope this is the wrong machine for any sort of production.
 
Posting some pages from the manual for reference.

1000007318.jpg

1000007319.jpg

1000007320.jpg

1000007321.jpg
 
Got the 1m ohm scaling resistors added to the arc voltage lines.

1000007310.jpg


Made the cables to connect the arc ok, torch fire and arc voltage connectors.
Saw a comment on the LinuxCNC forum about putting a pull down resistor on the arc ok line so I added a 1.5k ohm resistor to ground.

I tried to get the Arc voltage readout working using a bench power supply but couldn't that working to satisfaction.
The scaling resistors and voltage offset shit make my head spin.

More to learn.
 
Also fixed the only issue I saw I didn't like.

Just removed the wires installed some ferrules and cut off the excess, no pic of it before completely.

1000007313.jpg

1000007315.jpg
 
They have the machine torch on sale for $180 and I used the $40 in rewards money from the cutter purchase so it was $150.


1697570880617.jpeg


Found it to be a Tecmo torch, here is a link to a aftermarket site that has all the parts. It looks like a 1mm tip is 40-50a, interesting considering its sold as a "80" amp machine. For the 80a you would need a 1.3mm tip it seems.


1697571041192.png


1697571140790.png
 
Last edited:
Also using the same part number structure but changing the last two digits I can find down to .08mm/30A and .09mm/40A tips on other sites.

51311.08 and 51311.09
 
I also found this, what I was describing building myself. A euro connector torch with Hypertherm clone torch.
Something to keep in mind if I am not happy with the PT80. I can buy the clone torch assembly for $85 and put it on this torch cable I bought so no real loss there.

 
Got the cable chains done on the X and Y. Need to make the cable extensions, dredding soldering more 6 pin gx16 connectors...
I wish I would have used Duetsch bulkheads like I talked about doing...

1000007441.jpg
1000007444.jpg

1000007443.jpg

1000007444.jpg
 

Attachments

  • 1000007442.jpg
    1000007442.jpg
    2.5 MB · Views: 6
Found 6' 16mm linear rails for $61 on eBay so a 5'x table is a possibility.

I will likely build a new table regardless out of some thicker material and get another 32x32 water pan like the langmuir, I could then have a 5'+ X 32".

Also got my 3d printed machine torch mount finished last night, still need to get it on the machine and see how it works.
That will likely get a redesign with HGR rails too on version 2.

1000007721.jpg
 
just remember heat and plastic dont play well together
I'm a long way way from it being a problem 😔

Starting wiring up the cable chains and that is going to be a job, basically none of the cables I had are long enough so it's all new
:barf:
 
Not permanent by a mile but gets me something to use to figure it out.

Like I say I can quickly see swapping the X axis for HGR rail and then swapping the Z for some HGR rails too.
But I really want to get this going as is and figure out what I really need after using it.


1000007723.jpg
 
Those rails look nice!
Pretty amazed really, I have looked before and I thought each axis was around $150 for China no name rails, these are only 16mm rails though not the 20mm rails normal for a router etc. but they seem more than adequate for a light weight plasma gantry.

I might buy another set and just cut them down to whatever final length I need.
 
Progress
Got the torch cable boom roughed in with some zip ties. Not sure how to finish the boom, caribeners, 3d print some clips ???
1000007818.jpg


1000007819.jpg

1000007820.jpg
 
And then a first cut crash lol
Didn't have enough delay on the pierce.

 
But eventually I got a successful pierce and cut. Can't really tell you guys how cool it is to hit cycle start and it does what it's supposed to do....

I need to do a bunch of tuning to get the axis velocites and accelerations dialed in and I haven't even started on the sheetcam journey which seems really dauntimg playing with it.


1000007825.jpg


1000007829.jpg
 
Progress
Got the torch cable boom roughed in with some zip ties. Not sure how to finish the boom, caribeners, 3d print some clips ???
1000007818.jpg


1000007819.jpg

1000007820.jpg

On my first table I just used a bungee from a rafter.

Second table I ran it through the cable track.

Your fancy :p
 
if that is going to be a water tray, you will not want any of that electrical stuff sitting where it is

you are getting close! :grinpimp:
 
On my first table I just used a bungee from a rafter.

Second table I ran it through the cable track.

Your fancy :p
I get the "ideal" in my head and I can't shake it until I try it, it's almost never version 1 that I keep though.

With direct drive steppers I don't have a ton of power to drag the cable around and I still haven't tried to get the closed loop shit dialed in so missed steps are still a problem.
 
if that is going to be a water tray, you will not want any of that electrical stuff sitting where it is

you are getting close! :grinpimp:
Yeah that's why it's clamped to the upright, I wasn't going to protect it away from splash until I was done fucking around in it.

Not really sure where to put it that's safe but with the door on it's pretty water proof from above.
 
Yeah that's why it's clamped to the upright, I wasn't going to protect it away from splash until I was done fucking around in it.

Not really sure where to put it that's safe but with the door on it's pretty water proof from above.
I have everything away from the cutting table with its own-stand-up-guarded-on-three-sides-voters-booth sort of deal
the back of it will still get blasted from time to time with water/sparks
 
I have everything away from the cutting table with its own-stand-up-guarded-on-three-sides-voters-booth sort of deal
the back of it will still get blasted from time to time with water/sparks
I'm thinking putting it under the tray basically where it is now but about 6" rearward with a gasketed door and sealed cabinet. I can make some louvered vents on the 3d printer for air flow.
 
I'm thinking putting it under the tray basically where it is now but about 6" rearward with a gasketed door and sealed cabinet. I can make some louvered vents on the 3d printer for air flow.
On both my tables I had it under the water table.

Used a couple filtered electric fans to creat a positive pressure environment.

Still got some dust in it, but didn’t have any issues from it.
 
Anyone ever use this type of drain valve?
I am going to put this B&M cooler as a after cooler before the tank with a drip leg that I want a float based drain valve due to expected amount of generated water.

1699652647048.png
 
Top Back Refresh