What's new

Experiments in 3D Printing

i'm curious why you are still not printing these upside down, seems like it would take out a huge amount of the support and stress and related issues.

There's a lot of debate on that. Probably 50/50 on rails up vs. down. I'm still having support quality issues and the last one I tried rails down had way too much ugliness in the cavities and it's harder to get out. I'd rather have a little shitty surface on the underside of the trigger guard and front lower side of the frame and still be functional vs. a shitshow inside. Of course the one i tried upside down was with PETG so i should probably give it another shot with PLA+.


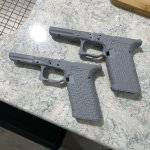
The one I started last night failed about halfway though. I had half a frame with a pile of spaghetti on top. I'm leaning toward an extruder problem now.

any thoughts on using PETG instead of PLA or PLA+ ?

i should probably start another thread, but it looks like PETG has similar heat requirements, but with higher impact resistance, hardness, than PLA so it might hold up better to the abuse of the slide


All of t he first ones I posted before the last were PETG. The gray one is the first I tried with PLA+.


I've printed almost exclusively with PETG on this printer. At the beginning because I was printing gears for my lathe (the main reason I bought it in the first place) and I just stuck with the because I use it so sporadically I'd always end up with moisture problems with PLA. PETG can sit for months and go right back to printing.


I picked up a drier box for the PLA last week so I should be able to keep it "fresh" a little better now.
 
LOL, our misguided leaders think that any gangster can push a button resulting in something perfectly formed and operational.

What? You just don't download a drawing of an AR, throw a block of raw aluminum on your mill and press GO? I've been lied to.
 
What? You just don't download a drawing of an AR, throw a block of raw aluminum on your mill and press GO? I've been lied to.


Been dabbling in CNC for years, recently started digging into additive. We're a generation or less from real magic shit.

Powder bed printing is amazing, metal sintering is unreal, film transfer(VLM) printing is just wild.


We're not really doing anything impossible by other means yet. Lots of amazing benefits, but reproducible with older tech. Once we start combining the additive methods and materials? Star Trek Replicator level shit.

Then the race will be to reverse it so the waste is efficiently recycled for printing again. Prototype is meh, into the hopper to refill the print material.

Don't even get me started on printing with human cellular material! "print me a new heart Alexa, fax machine/printer noises"! One day - corpse goes in, new printer ink refills come out good for printing dozens of organs each on demand probably hydrogen powered from the corpse water.

Sorry I'll stop geeking out now. :flipoff2:
 
Powder bed printing is amazing, metal sintering is unreal, film transfer(VLM) printing is just wild.


Until they go to the the simultaneous resins part, I wasn't seeing that much of a benefit over SLA. Very cool.
 
i'm curious why you are still not printing these upside down, seems like it would take out a huge amount of the support and stress and related issues.
If you print it upside down you'll be digging support material out of the inside of the frame, which is a pain in the ass and makes it more difficult to get the tolerances on the moving parts right. 10/22 receivers are the only ones I know of that you print upside down.
 
Thinking a 3d printer is becoming more of reality in my future.... have other ideas... of things to print , lowers are cool and so is this thread, that n many other ideas floating around in my head...
 
Thinking a 3d printer is becoming more of reality in my future.... have other ideas... of things to print , lowers are cool and so is this thread, that n many other ideas floating around in my head...
For how cheap they are they're a no-brainer. They're one of those tools that you constantly find uses for.
 
Well, that was a big fail! :laughing:

Came off the printer looking pretty good. I was really happy with the grip detail and texture but there were still a few cosmetic issues.

But it also looks like I have a z axis problem. Se that horizontal line that starts a little above the mag release and goes straight across to the front of the trigger guard? I was hoping it was just cosmetic, but as I started installing parts with very little force, she split right half in two.


Not entirely sure what's going on. It's like the z screw either jumped to much on that layer or the extruder just didn't put anything down. There's a pretty clean and straight break all the way across that level. Perhaps a slightly clogged extruder at that point. There are a couple other lines that look similar but none of them feel like they want to fail like this did.


I made a couple tweaks in the slicer and am running it again. If it does the same thing this time I'll know it's a screw problem. If it doesn't or moves around, probably time to do some extruder maintenance.
a common thing for long prints with out a ton of surface on the bed is to pull up one side as it cools. It will look like you have a zaxis problem, but it's actually the part shifting.

When printing things like that I usually add a big ass brim to the supports to make sure that they are stuck and that the corners don't lift.

If you get your support settings right they should not leave a big mess on your part. They should come off easily.
Have you done any temp tower/bridging testing with your setup? Figure that out and then you can figure out the least amount of support interface to your part needed to support it.
 
Pretty sure it's not lifting/shrinking. I use a glass bed and hairspray for adhesive and it works really well. Every now and then I'll have something lift and a larger brim is usually the solution. With the tree supports I'm using, they incorporate a pretty good brim so it hasn't been a problem.

The full layer (or more) horizontal lines don't scream lifting or distortion to me.

I haven't done any calibration prints for quite a while and I'm probably due. I actually downloaded several earlier today and plan to play with it this weekend. I have another frame printing now as the last one I tried failed. I did find some schmoo on my z screws so I gave them a good cleaning and re-oiled them. We'll see if that solved anything.


I did find another one of the earlier PETG frames I printed in my car this morning. Completely forgot that I brought it to work to show someone. So I threw the parts in it and played a little. I got a similar crack at the upper block pin, but this time I actually saw it happen as I was tapping the pin in. I'm guessing I have a little bit of shrinkage in the print and as I started tapping the pin it, the locking block pulled it in to alignment, which was a bit out of the actual hole alignment, and put too much stress on the print. I'll see how the PLA one goes together and that may indicated if I need to do a little dimensional calibration tuning.

The good news is that it seem like the more I shot through it, the better it gets. First few rounds would not fully cycle. It'd stop about 1/4" short of fully seating the next round. Just a tap on the but of the slide would send it home. I pulled the slide off and oiled everything a little heavier than normal and then hit a couple places that I could see had been rubbing with a file and it got A LOT better. I ran 5 rounds through it after that and only the 5th failed to fully load.

I suspect 9mm will cycle fine, but I'm probably not going to run any through this one with the crack. The .22 slide is just really sensitive even on a perfect OEM frame. I'm sure even a tiny bit of variance in a print isn't going help things.

1649472236048.png

1649472253813.png

1649472268095.png
 
OK, I'm baffled by this Z problem. Left this one overnight and came back to 80% of a frame and a birdsnest.

1649509476229.png


This is what the failed layer looks like. Almost like Z is jumping a step or something on that layer.
1649509511249.png


You can see in the first pic where the layer failed and it still managed to almost recover and print the next dozen or two layers, but eventually the nozzle probably snagged the print and ripped it off the table and from there it was just spaghetti.
 
I’ve got some Mendez mags printing right now. Looking good so far. I also had bad luck printing rails down and great luck printing rails up. The last couple weeks I’ve had a run of bad luck with the Ender 3. I had a Ubolt lower fail with only 10% left and it turned out the board in the printer went bad. Got that fixed and then realized my underextruding issues were a broken arm on the extruded. Got that replaced with a metal version and hopefully that’s better.
 
you dudes printing mags... any way to print out a 33 body but with rails inside to break up the double stack into something like the 1.5 stack that those new slim grip pussy frames use?

sorta like these 'desert' sten mags
supposedly they don't bind up from sand as badly
 
you dudes printing mags... any way to print out a 33 body but with rails inside to break up the double stack into something like the 1.5 stack that those new slim grip pussy frames use?

sorta like these 'desert' sten mags
supposedly they don't bind up from sand as badly

The problem with going from sheet metal to plastic is can't always get the thickness you need for strength.

If you're saying it's going from double stack to 1.5, does that mean you could potentially beef up the walls by the .5?
 
The problem with going from sheet metal to plastic is can't always get the thickness you need for strength.

If you're saying it's going from double stack to 1.5, does that mean you could potentially beef up the walls by the .5?
yeah, thicker walls than you'd normally do for a normal capacity mag
ribbed internally for pocket sand clearance (and pleasure)

The 33 I carry with me all the time gets full of sand every month or so.
I used to just empty it out into the dirt every other week but 9x19 isn't 12 cents a round any more... :c
I'm no good with CAD to do the design myself but I don't see why it wouldn't work.
 
Anyone good with 3d modeling? I need what seems like would be simple but I'm tired of messing around and trying to find a damn youtube tutorial I can understand.

I have two .stls, one for a case cover, second for a 30mm fan grill. I just wanna add two damn fans towards the bottom (aligned.) I keep adding boolean modifiers and deleting faces. I have blender, fusion 360 and OpenScad. How the hell do I do this? (Screen shot for what I want it to look like but with grill holes for fan.)


Screen Shot 2022-04-19 at 6.28.33 PM.png
 
I got to do some more learning with the Ender 3. I greased the Z drive shaft thingy based on some info here. After putting on the metal extruder I still had some issues. I think what was happening was the Bowden tube backing out of the hot end and causing it to periodically clog/stick and ruining a couple layers, then clearing and continuing to print. I did the below hot end fix and it’s been printing beautifully.


Then I started having issues with it giving me outage errors after it had been printing for a couple hours. I checked all the cable connections and after doing some research I opened the XT-50 connector and spread out the contacts and put some dielectric grease in it. So far so good. I’ve got a thump ‘n grind printing now.

 
Got distracted ro4 a while and haven't been able to troubleshoot my printer so no new prints to play with.

One of the grapy PLA+ ones that somewhat came out ok had been working great for the past few weeks. I'd been using it with .22 shotshell to shoot carpenter bees that are tryin to fuck up my cedar trim. :laughing:

But then I left it sitting on the seat of my golf cart last weekend....on a hot, sunny day. Turns out that'll get PLA+ hot enough to deform. Slide wouldn't move and the mag got stuck in the well. :lmao: I had to pull the pins and fully disassemble to get it the slide off.

So I had one of the earlier black PETG ones that I never assembled. It's actually one of the better ones I've printed. Just a few cosmetic defects on the grip from where supports kind of clogged up some of the honeycomb pattern.

Assembled easily and seems to cycle well on minimags.


1651283746193.png


And the graveyard of some that worked and some that were fully fails.
1651283796243.png
 
Got all the shit rounded up to put my printed 10/22 together. I haven't run it with full power stuff yet but I single loaded a few CBs through it in the back yard to check that out would go bang. Real notchy at first but it's starting to smooth out, should run good after a few boxes of break in

PXL_20220513_012655164.jpg
 
From what I have experienced with the 3D printed Glock receivers, they always crack on the rear rails pin. There just isnt a lot of meat there and the layers do not have a good "chemical" bond so they delaminate after a certain amount of shots if you are lucky.
 
From what I have experienced with the 3D printed Glock receivers, they always crack on the rear rails pin. There just isnt a lot of meat there and the layers do not have a good "chemical" bond so they delaminate after a certain amount of shots if you are lucky.
You talking this pin where my first one failed?

Haven't put a ton of rounds through my latest working frame, but so far it's holding up. Mostly been shooting shotshell with it so I'm sure that helps.


I wouldn't think it'd be too hard to redesign it to use a custom locking block instead of the factory glock one. I'd think you could move the pin or at least add another one to take the pressure off that location.
Yeah, exactly that location. Every failure I have seen (ABS, PETG, and some other unknown) has been right there. There is a large lifting force vector on that pin when the slide hits back to go back to chamber.
 
My nephew printed these on his ender 3, rails down in PLA.
I'll assemble them this weekend and if they flesh out, I'll post a link to the file

Speed has never been my strong suit. I'll go shoot then next week.
Pretty hard to beat this deal - got one in FDE and one in OD Green.

file


80 %.jpg
80 1%.jpg
80%.jpg
80%2.jpg
 
Last edited:
anyone done any more printing?

Theoretical question.

Say I submit a form 1 for a can. Serial number CAN001, 9mm cal, or whatever.

Could I then (legally) print ONE at will, whenever my 3d printed can inevitably breaks?
 
anyone done any more printing?

Theoretical question.

Say I submit a form 1 for a can. Serial number CAN001, 9mm cal, or whatever.

Could I then (legally) print ONE at will, whenever my 3d printed can inevitably breaks?
ATF kinda killed the form 1 suppressor thing when they decided that any parts of a suppressor are a suppressor. Not sure how they'd handle a 3d printed one but still. IF I were to theoretically print an NFA item I theoretically would keep my trap shut about it and not go blabbing to the ATF.

The other issue is heat causing droop and the resulting baffle/end cap strikes.
 
Last edited:
IF I were to theoretically print an NFA item I theoretically would keep my trap shut about it and not go blabbing to the ATF.
correct. I was curious about legalities.
The other issue is heat causing droop and the resulting baffle/end cap strikes.

I have no illusions that one would last for very long. Which is why I was curious about if I could print one, break it, then print its replacement as long as the serial number, LOA, and caliber are all within the parameters on the form 1
 
Last edited:
Top Back Refresh