What's new

Experiments in 3D Printing

bgaidan

Red Skull Member
Joined
Jul 18, 2020
Member Number
2322
Messages
2,943
:shocked:Figured I'd post some pics here as I play around. I've been seeing pics of these pop up on various sites and have been meaning to print one just to see how it goes. Finally got around to downloading one last night. 8 hours later I had what I guess is legally considered a firearm.

I went with the subcompact glock because I already have a 26 and I can test fit the parts from it here. Eventually if I order new parts, I'll go with a bigger frame model.

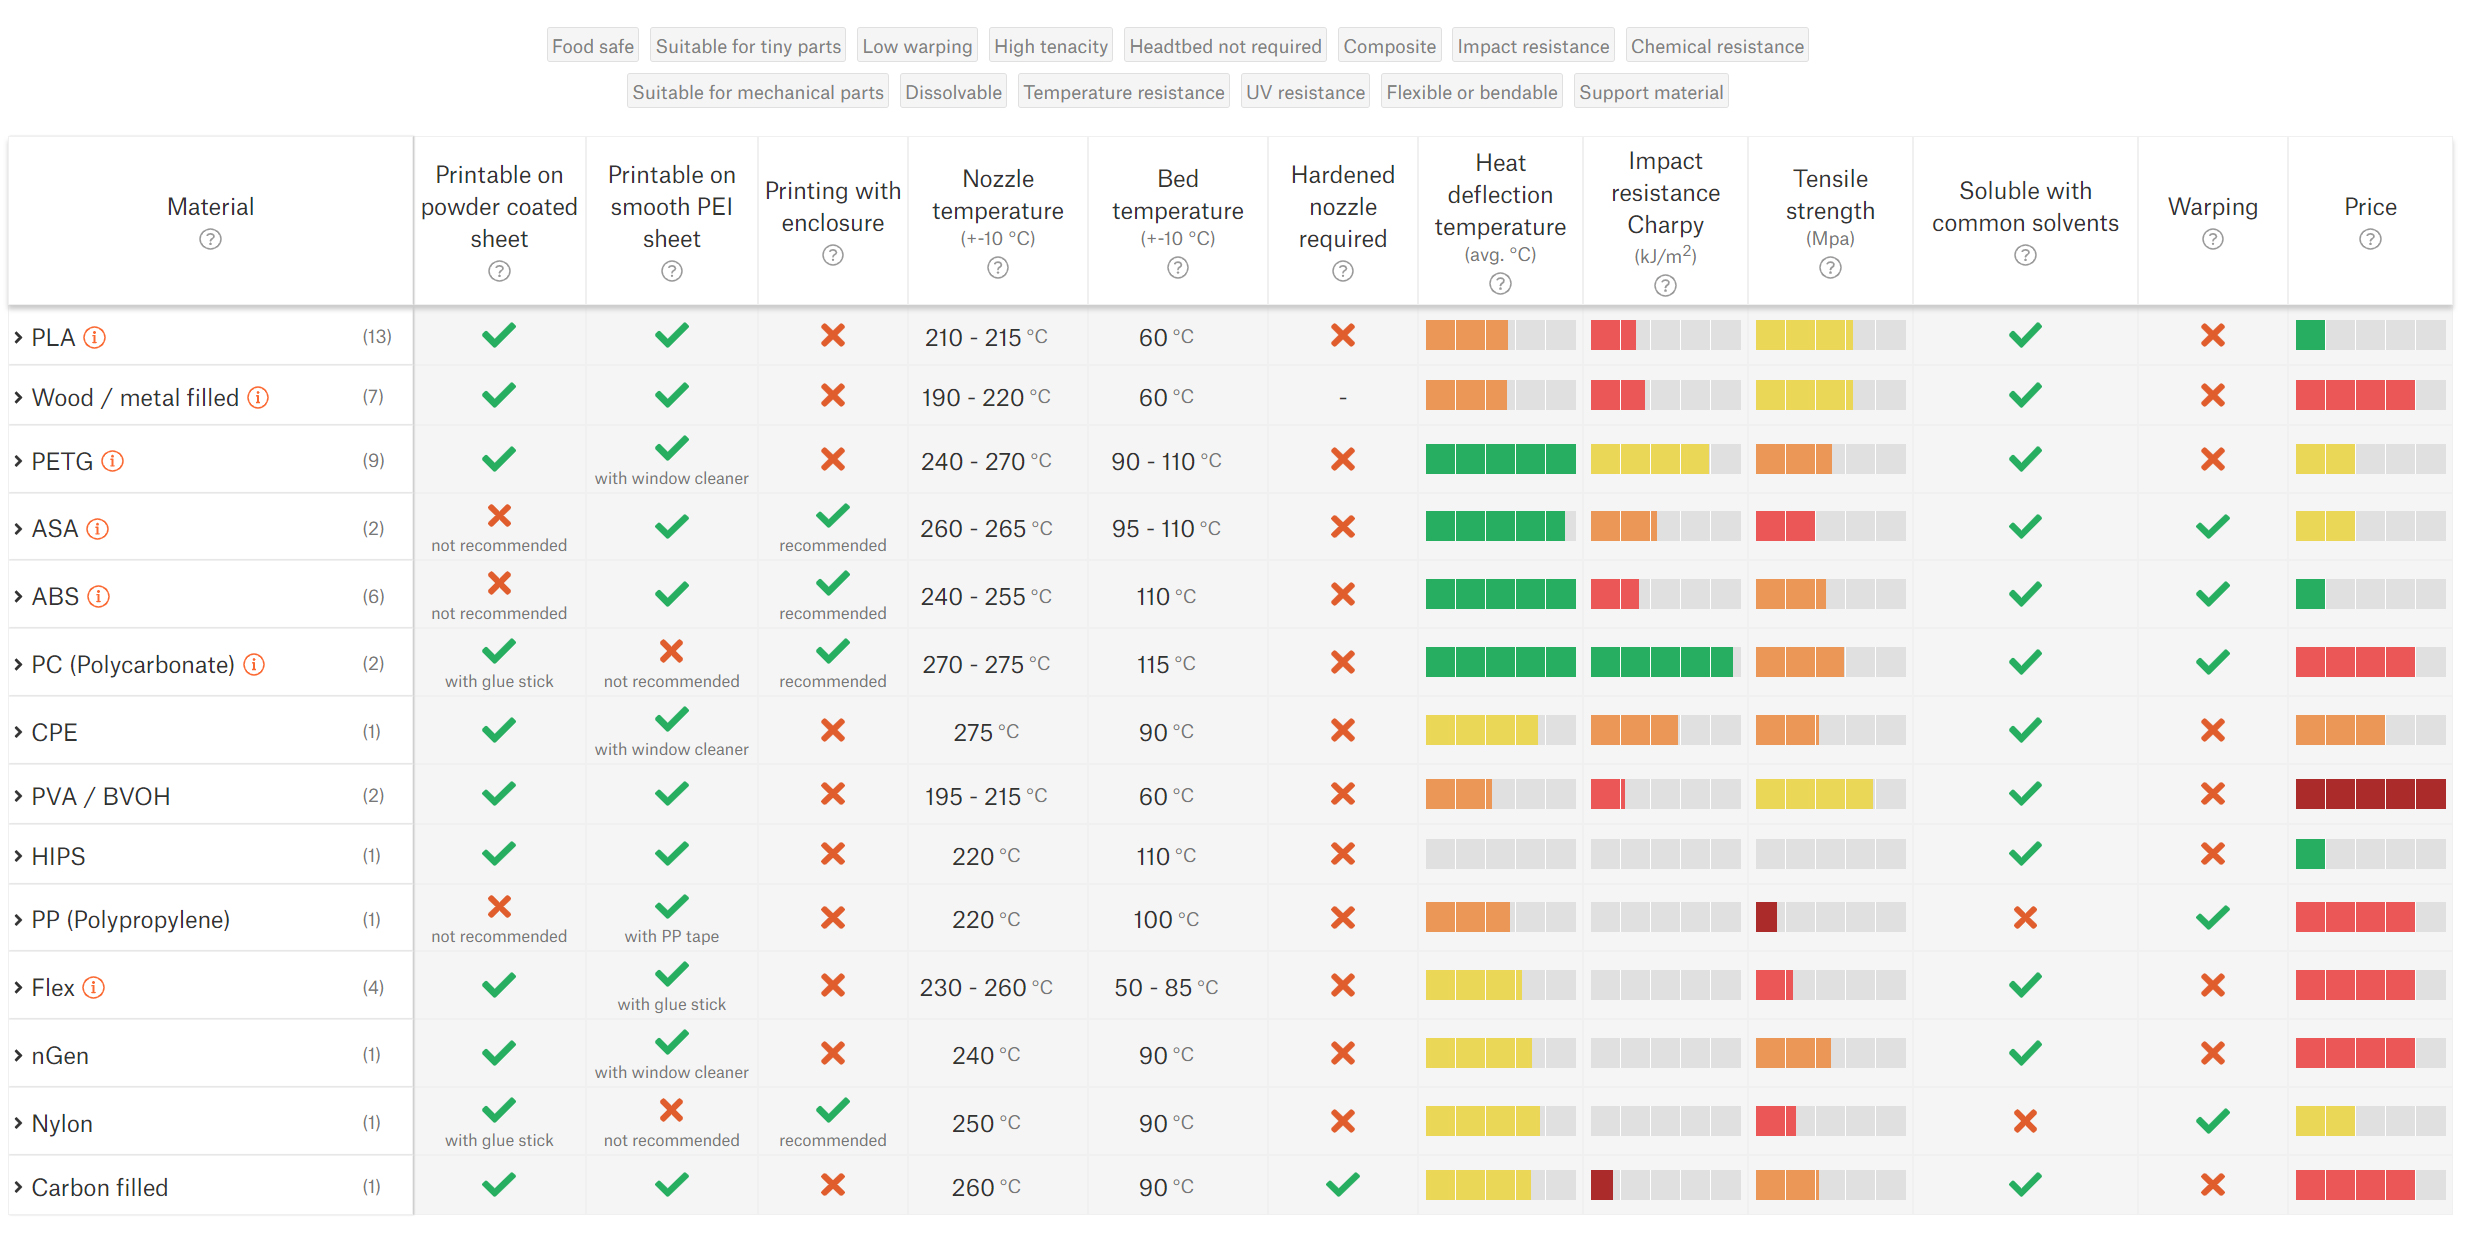
I forgot that I hadn't used my printer since I wiped my old HD and updated to Win10 so I had lost my old profiles in my slicer. I pulled in a recommended stock profile and made some very minor tweaks and sent it. Some things were off....like the support method I used was a little too liberal and I ended up with a lot of excess support material. I did this in PETG because that's what seems to print best on my little machine. PETG doesn't always do nice clean support breaks so there's quite a bit more cleanup than I would like.

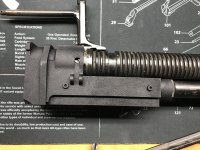
This is what it looked like when it finished printing:
1648211849402.png

1648211880886.png

1648211897939.png


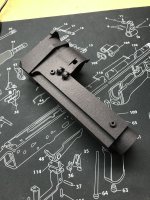
After some quick support pealing with a pair of pliers, I found a frame under all that shit:
1648211936205.png

1648211982227.png

1648212002425.png


So lots of support that didn't come off as easy as it should, but overall I'm not unhappy with the result for a first print with no tuning.

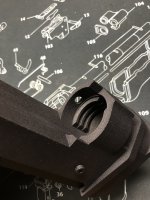
I whittled away at the support a little more when I got to work this morning and it's looking much better. The file I downloaded has several options for grip textures.. This one was a honeycomb type texture. I also screwed up here because I used a file that had "microtexture" which my printer won't do with PETG so that probably contributed to the shitty surface finish.
1648213348671.png

1648213367365.png

1648213391907.png


Of course I also fucked up and forgot to change the infill %. They recommend doing this at 100% and my slicer defaulted to 20%. There only a couple places thick enough for infill, mostly around the top of the grip, but I can feel that it's a bit weak there. So this will be a practice piece. I threw a new file to the printer this morning with the correct parameters changed and 100% infill and a different style of support so I should have a better example to play with when I get home tonight, but I'm confident this one could be made to work if I wanted to.

If that one works, I'll tear down my 26 and see what fits. There's a chance that I'll see some shrinkage in the PETG. I do have it tuned for shrinkage, but I don't usually print stuff this big so I may have to dial it in some more if parts aren't fitting right.

I honestly can't remember what's removable on the factory glock, like rails, so I don't know if I'll be able to 100% assemble it to fire without ordering some parts.

So for a couple bucks worth of filament and about 8 hours, I have what they feds would consider a firearm. You can buy a complete upper and lower kit for it for about $380, but if you're thrifty and shop around for deals, I'd bet you can get that under $300.
 
wait until the metal printers come down a bit more. It's crazy between the 2 what you can do.

I wouldn't hold my breath on that. At least not the laser sintered type. You're still in the hundreds of thousands of dollars to get in to anything plus the ovens are exactly something even a moderately advanced home gamer is likely going to be able to handle. I've seen some guys on reddit experimenting with sintering and the results are less than impressive so far.


I could see maybe some type of additive process - like a mini wire feed welder placing material, but even that's not on the visible horizon for home use.


If we're talking metal, you're still better off dropping 10k on a cnc mill. This is just fun because my $180 printer (that's long paid for itself on other projects) can spit out frames for a couple bucks apiece.....and you can have complete, fully functioning firearms for $3-400.
 
This is just fun because my $180 printer (that's long paid for itself on other projects) can spit out frames for a couple bucks apiece.....and you can have complete, fully functioning firearms for $3-400.
Code:
*looks at the pile of scrap tube and shit, shrugs*
oh wait it's gonna eat the asterisks... how do I outsmart the shit... Ah right
 
Did a little test fitting with parts from the 26. I need to order a set of rails and a gen3 locking block to actually fully assemble it. Fit was better than I expected. I'd probably have to do a little massaging to get it to operate smoothly, but pretty confident it'll work.

1648263322214.png

1648263427930.png


I thought I'd have a better example to play with when I got home, but apparently I had some bed adhesion problems and I came home to a plastic turd sitting on my printer. :laughing:
1648263492001.png


That clear PETG has always been a little picky about bed temps and I think I ran it too cool.

But no worries, loaded up another roll of PETG. This time in orange flavor.
1648263566498.png


Using tree supports so this one should come out much, much cleaner.


Also ordered a roll of PLA+ that Amazon will deliver tomorrow. I never like PLA, but I've been reading that + may be the better material for this.


Also found the .22 upper conversion kit for the 26 that I forgot I had. I think I'll order a full lower kit for this and make it the permanent home for the .22 kit. If things go well with this, I'll print something bigger.

I kinda want to make a Biggus Dickus....
1648263885094.png
 
I’ve been messing around with 3D printing firearm prototypes for a fun little side project I’ve been working on forever. I’ve been outsourcing these prints since I’m not buying a 3D printer, and don’t care for the fidelity of most consumer-level printers. These are nylon on an SLS printer.
 

Attachments

  • C8B6DDFC-06DD-4B08-BD09-DF36DB887FEC.jpeg
    C8B6DDFC-06DD-4B08-BD09-DF36DB887FEC.jpeg
    1.6 MB · Views: 29
  • 5787B32F-E826-485D-B882-C3561BBABDA3.jpeg
    5787B32F-E826-485D-B882-C3561BBABDA3.jpeg
    2.1 MB · Views: 27
  • 28E0212A-65F8-4D69-B497-FF062602AB6A.jpeg
    28E0212A-65F8-4D69-B497-FF062602AB6A.jpeg
    1.3 MB · Views: 28
  • 9ED649C9-486B-4D68-98D0-4A11470F1FEA.jpeg
    9ED649C9-486B-4D68-98D0-4A11470F1FEA.jpeg
    2.2 MB · Views: 28
Had some problems with the printer over the weekend. First, the SD slot was failing and the card was coming unseated 1/2 way through a print. Annoying. Got that fixed and was still having problems with supports failing, sticking to the nozzle and then ripping the rest of the print off the bed. Finally managed to get that mostly fixed and got this printed over night.

Didn't take a pic after I quickly stripped the support material off. It'll need a little fine tuning to clean up the support remnants, but overall I'm happy with the quality of the surfaces. Got couple other setting to tweak and I'll run another one tonight.
1648478997888.png


I ordered all the lower parts this morning so hopefully I'll have them by next weekend.
 
I’ve been messing around with 3D printing firearm prototypes for a fun little side project I’ve been working on forever. I’ve been outsourcing these prints since I’m not buying a 3D printer, and don’t care for the fidelity of most consumer-level printers. These are nylon on an SLS printer.
that sorta finned barrel makes me think some kinda hotchkiss or goryunov, maybe japan
whatzit?
 
that sorta finned barrel makes me think some kinda hotchkiss or goryunov, maybe japan
whatzit?

FND. I've been 3d-printing it to check dimensions against my 3d model. Once I'm happy with it, I'm going to need to find someone to make it, either on a CNC out of a bigass chunk of billet, or possibly lost-wax casting and finish the machining myself. I also have a mold and cores modeled up to use for pouring a wax cast that will be used for creating a ceramic shell, if CNC is not an option. These were originally cast, so that's one reason I've been looking into it as an option.

Apex recently started selling their torch-cut receiver sections, but do not sell the front section. Most people that have successfully built these have done so by re-welding their cut receivers. But most kits out there, like mine, did not come with the cut receiver sections, so there's never been a viable receiver option. I had borrowed a cut receiver many years ago to pull dimension from, but didn't quite get everything perfectly measured. I bought a cut one from Apex recently to compare against what I have, and I was very close, but had to make a few modifications to my model.

I'm about to send it out for another print, which should now be 99% accuratte. I've been printing various small sections just to keep cost down, since a full receiver is not the cheapest thing to have to print over and over.

If I can find someone to cast this, I will print the molds for the wax casting. Those mold are going to cost me a bit over 1k to do, so yeah, I'm trying to make sure I get it right on the first try. :D
 
neat
getting the shrinkage right on the first try is gonna be a miracle
from what I've read stuff never seems to pull exactly the same in every shape and material, might be worthwhile to do the "print the core and burnout oven it out" thing on a couple before getting the molds for the wax made
 
neat
getting the shrinkage right on the first try is gonna be a miracle
from what I've read stuff never seems to pull exactly the same in every shape and material, might be worthwhile to do the "print the core and burnout oven it out" thing on a couple before getting the molds for the wax made
Fortunately, the shrinkage rates of common materials are pretty well known, and I'm not looking to do anything exotic, so my hope is a little math will get me well within what I consider acceptable. My wax mold would, of course, compensate for the shrinkage of the wax, as well as the shrinkage of the steel. All of the tight-tolerance areas are all finish-machined anyway, so my thought is that if I'm off a few fractions of a percentage, it's not going to ruin the final piece. All assuming I can find a facility interested in doing a short run of them. I've talked to some places that do firearm castings and maintain 07s, but their minimum EAUs are a bit beyond my home-hobbiest budget.
 
well the metal shrinkage rate is constant when unconstrained, like a lead bullet mold where nothing's really holding it against the sides of the mold
A BAR rec that's mostly hollow with a core in it and a lot of other features? that's going to be extremely hard to calculate the shrinkage on

a common example is comparing a barbell shape to a plain cylindrical rod
the rod will shrink the calculated value where the barbell shape will be held by the mold so it will not shrink along its long axis anywhere near as much
the metal is solidifying and very weak for most of the cooling, so it isn't going to pull even fairly loose greensand molds never mind some sort of plaster of paris sorta investment casting mold
 
Getting better. Orange is today's print. Black was the very first try.

1648590916954.png

Still need to work on my support strategy. Getting a lot of roughness, but only on the underside of the frame and trigger guard that touches the supports. Trying one upside down now. That will make the floor of the trigger guard the only visible part that's supported. The rest will be inside the frame, which I care less about cleaning up and being a little rough.

1648591134286.png


This'll be my last PETG try and then I'll try PLA+ to see if that gives any better quality.


This latest one with 100% infill feels no different from my factory 26 frame. Can't wait for the parts to come in so I can get one assembled. Only ordered the lower parts so far. All in I think that was about $125 - $46 for a regular lower kit + $80 for the rails and locking block. Planning to test it with the 9mm slide from my 26 and also realized the other day that I have a AA .22lr upper conversion for the 26 so one of these may just end up the permanent home for that.
 
Parts kit came in today. Everything fit surprisingly well. Needed to drill some of the pin holes out, but I believe they're intentionally undersized in the model. Probably doing to need to do a little more massaging on the mag well. The mag inserts and removes fairly easily, but doesn't drop out like I'd like. You need to give it a little pull. Trigger also feels a little tight with the mag inserted. If it doesn't cycle when fired, that'll be my first suspect. Might need to massage a little material off the frame around the trigger bar area. Overall not bad.

Still waiting for my rail kit and locking block. Tracking looks like they'll be here by Saturday. Should be able to test fire this thing as soon as they show up.

Here it is with the .22 AA mag in it. Still not fully happy with the print quality, but it seems that it'll be fully functional. Still need to load up a roll of PLA+ to see how that does.

1648758345396.png

1648758409876.png
 
I’ve been messing around with 3D printing firearm prototypes for a fun little side project I’ve been working on forever. I’ve been outsourcing these prints since I’m not buying a 3D printer, and don’t care for the fidelity of most consumer-level printers. These are nylon on an SLS printer.
Looks great, we're prototyping on a hobby 3d printer pretty damn well (piecing together larger parts). Then having them printed in Nylon. Impressed with the quality and durability.

Bar to enter the PBF printer realm is high. $250k+
 
Rails came in yesterday. Dropped right in without any issues. Actually kind of surprised at the tolerances on the first try.

1648927480909.png

1648927492858.png


Tried it with the AA .22 slide. There was a bit of interference with the ejector when trying to install the slide, but it went on with a little twisting.
1648927597027.png
 
Test firing time....

Now, AA tells you to only use a few specific brands of round to eliminate cycling and jamming problems. I always used Mini Mags or golden bullets. For some reason I had some unknown federals loaded in the mag so I wen with them.

First round fired but didn't eject.
Second round fired, ejected and mostly cycled but was a good 1/2" from locking the slide.
Pretty much repeated for the next few rounds.


So I dug out some mini mags and tried again. They where much better, but I think I only had one out of 6 or 7actually fully cycle. It'd get about 1/4" from closing the slide and stop. Just a light shove would finish it. Not too surprising. I can feel just a little bit of binding that I'll have to chase down.


Not wanting to give up, I threw the 9mm slide on. One round loaded, fired and locked the slide back.
Two rounds loaded, fired, fully cycled. Sweet.

Then I noticed it...
1648928092101.png

1648928212998.png


So that didn't end as well as I'd hoped. :laughing:

But honestly not overly disappointed for a first try. There were some support issues in that area along with a little porosity.

I loaded up some PLA+ this morning and I'm running another unrelated project with it right now to get it tuned in. I'll start another frame as soon as it's done. Should be able to run another test tomorrow if things go well.
 
The lowers while ugly as sin they are starting to grow on me. The PLA+ should work better for you.
 
The lowers while ugly as sin they are starting to grow on me. The PLA+ should work better for you.
Yeah.....orange isn't exactly the best choice for a CCW piece either. :laughing:


PLA+ one is going on the printer now. Gonna run it slow so it'll probably take all night. Color's gonna be much better on this one too!
 
Are you going to anneal or is that a waste of time?
 
Are you going to anneal or is that a waste of time?
I've been reading a bit about salt annealing lately and the consensus seems to be that it's really not feasible for the home gamer yet. You have to pack (tightly) salt in to every little nook. If you miss even a little bit you'll get deformation and scrap the part. And no matter what you're going to see uneven shrinkage so it'd take a lot of trial and error to get it right. I'm sure there are guys working on models that will account for the shrinkage, but it's not there yet.

PLA+ frame is at 83% on the printer. Should be done this afternoon. Looking good so far.
 
Well, that was a big fail! :laughing:

Came off the printer looking pretty good. I was really happy with the grip detail and texture but there were still a few cosmetic issues.
1649019932667.png


But it also looks like I have a z axis problem. Se that horizontal line that starts a little above the mag release and goes straight across to the front of the trigger guard? I was hoping it was just cosmetic, but as I started installing parts with very little force, she split right half in two.

1649020038008.png


1649020053578.png


Not entirely sure what's going on. It's like the z screw either jumped to much on that layer or the extruder just didn't put anything down. There's a pretty clean and straight break all the way across that level. Perhaps a slightly clogged extruder at that point. There are a couple other lines that look similar but none of them feel like they want to fail like this did.


I made a couple tweaks in the slicer and am running it again. If it does the same thing this time I'll know it's a screw problem. If it doesn't or moves around, probably time to do some extruder maintenance.
 
any thoughts on using PETG instead of PLA or PLA+ ?

i should probably start another thread, but it looks like PETG has similar heat requirements, but with higher impact resistance, hardness, than PLA so it might hold up better to the abuse of the slide


Top Back Refresh