What's new

Defender 110 crawler/camper

Subtract unsprung weight. Your axles and wheels will be at least 200kg unsprung each end.

I don't know who accutune are, but you're heading towards sports-car ride frequencies that won't flex out.
Here are some stock figures. The Brits knew more about suspension 30 years ago than most car companies do today.

2003 Defender 90 weights (stock).
Fronts 175lb/in with 373kg corner weight (sprung)
Rears 225lb/in with 322kg corner weight (sprung).
Payload approx 600kg.

2003 Defender 110 station wagon (stock).
Fronts 180lb/in with 404kg corner weight (sprung)
Rears 330lb/in with 363kg corner weight (sprung).
Payload approx 900kg

Stock defender spring-rates are based around handling fully loaded. So at max GVW the rear sprung frequency is still higher than the front and the vehicle doesn't become a wallowing mess. They're not chosen for off-road flex. You go softer for running low loads offroad or you'll never use your travel.

On my RRC I'm at 495kg front sprung corners with a 4BD1T, dual batteries and Isuzu truck gearbox. But no winch or winch-bar.
Front spring frequency 1.25Hz unloaded. Rear 1.36Hz.

I'll update the thread as we sort through the suspension. Like I said, that’s where we’re chose to start on rates. Doesn’t mean I’m married to them.

Some progress today. Some setbacks. Was really wanting to do final assembly on the axle and get it back under the truck. Got my half shafts assembled with spicer joints, cleaned them up and painted everything to keep them from getting crusty, went to install them aaaand they’re like 1.5” too long :homer:

I gave a ton of measurements to ECGS so I’ll have to call them Monday and see if the screw up was mine or theirs.

Welded up the TRE cup into the passenger side high steer arm. That went well.

IMG_6919.jpeg


Then did the pitman arm. That went well too.

IMG_6920.jpeg


Until I flipped it and realized that the taper on the joint won’t be able to seat in the cup with that recess. I’ll stick the arm in the mill and knock that down so everything works.
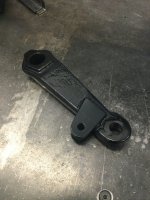
IMG_6921.jpeg
 
I wrapped my pitman arm with some 1/4” strip stock when I reamed it for a Chevy TRE. Thought the side walls were a bit thin to risk it.

B36F8095-6944-4A58-893D-02C9DC472DF0.jpeg
 
I'm having a similar Lt230 input.
Shaft from my th400 to lt230 All twisted up
Now i'm gonna try my luck with a 300M one
Have you guys considered cryo heating and micro polishing these?

 
I wrapped my pitman arm with some 1/4” strip stock when I reamed it for a Chevy TRE. Thought the side walls were a bit thin to risk it.

B36F8095-6944-4A58-893D-02C9DC472DF0.jpeg

Yeah, definitely doing the same. I'll draw up a little saddle and throw it in with the next batch of stuff to get laser cut.

It's gross and rainy here today, but I'm working up motivation to head to the shop and get a few more things punched out. I'll throw the axle back under the truck without shafts for now and get to working on the steering box setup. Somehow I never noticed that the input shaft is not parallel with the frame rail when mounted up, but instead it points outward like 5 degrees. Unfortunately that causes the strut tower and the steering shaft joint to try and occupy the same space. Thinking I'll just modify the mounting pad and wedge it so the input shaft points straight down the frame rail. I'll loose a little bit of steering angle in one direction, but don't think the whole range of steering this box has will get utilized anyways so it should be a non issue.
 
Have you guys considered cryo heating and micro polishing these?


Cryotreating is largely BS. Heat-treatment works because you're heating the metal up to the point where crystal structure changes and freezing structures in place through rapid cooling.
Making metal really cold doesn't create any new crystal structures or movements.

Improving surface finish (polishing) is always a good thing. It's just cost vs benefit.
 
Circling back to spring rates, the effective rate of a 250/350 combo is 145 with a frequency of 1.06hz Dougal.

Didn't get a whole hell of a lot done Sunday. Pitman arm is milled down so the joint sits right, and it looks like I miiiight be able to cut these inner shafts to fit. Crossing my fingers on that one. Going to be pretty busy here with other stuff for the next couple of weeks, but I'll try to sneak in a few hours here and there on the 110 to keep momentum up.

IMG_6927.jpeg
 
Circling back to spring rates, the effective rate of a 250/350 combo is 145 with a frequency of 1.06hz Dougal.

You're stacking springs? That changes everything. Your pic showed single springs so I went with that.

(250*350)/(250+350) = 145.8 lb/in.
 
You're stacking springs? That changes everything. Your pic showed single springs so I went with that.

(250*350)/(250+350) = 145.8 lb/in.
Yeah they’re dual rate coilovers, I just can’t test fit and cycle easily with both springs installed.
 
Trying to keep consistent with my small incremental progress. Been busy as shit on engine conversions but got a few hours in today.

Lower links welded and painted. Still only like 90% sure on my upper length so not welding that just yet.

Springs installed and preload set.

Inner shafts are headed to Branik to get modified.

Towers are 50% welded. When I pull the engine back out I’ll add some internal supports and final weld then.

Decided it was a good idea to add some frame plates behind the link mounts, so I drew up a set to have cut from 3/16. Those are basically the only thing keeping the truck from sitting under its own weight, so hopefully they get here quick.

Didn’t do a very good job documenting any of the tasks but here are some hasty photos after I was all done.


IMG_7020.jpeg


IMG_7021.jpeg
 
Alright! It’s no longer propped up by jackstands. Today feels like a big milestone.

Had a great afternoon getting everything on the frame burnt in and was able to finally get some weight on the front axle. I think we’re really close with rates. Still a lot of weight getting added up front between the winch, radiator, intercooler, steering box etc. but it only sits an inch higher than intended currently so that’s encouraging.

Did a quick little cycle with the forklift. Really happy with how everything looks so far.

IMG_7031.jpeg

IMG_7034.jpeg

IMG_7035.jpeg
 
Still pretty covered up in the shop but should be able to get a day in over the weekend, hopefully to get rear shock mounts built and maybe even get the engine out.

Decided that instead of hacking up this bumper I'd build a new one that's set up for an 8274. I can fumble my way around in AutoCAD and drew something up, but if I can wrap my head around Fusion I might have someone like OSH Cut laser cut the profile out of a piece of tube to save the hassle of cutting it up myself since the main body is just a piece of 2x6 that's sectioned and formed.

Screen Shot 2024-02-15 at 9.35.47 PM.png
I dig it
 
Screwed around a little this evening. Got a few parts drawn up to have cut on my buddies plasma table. Definitely getting into the ‘solve one problem, create two’ phase of things.

Had to buy an expensive ass Flaming River joint since the steering box is a weird 17mm-54 and nobody makes them. I adapted to double D from there so I can use cheap stuff to get to the column. That one showed up today, so I got the steering box set to clear the tower but now there’s fuck all for room for the water pump outlet, so that’ll have to get reengineered. Think I can just clock that neck upward and get some clearance.


IMG_7126.jpeg


Got started on notching the frame to clear the drag link at full stuff. Was hoping to stay out of the front crossmember gusseting but after cycling it, that’ll have to get cut and reworked as well.

IMG_7128.jpeg

IMG_7129.jpeg
 
Little more today. Had some old shock mounts on the shelf, ended up stretching them for the added length of the 14’s. Axle side bracket is an old TMR set I also had floating around. Unfortunately there’s only like 4.5” of shaft with this combo when the target was 6”, so l have to draw up some lowers to push the shock down some.

IMG_7136.jpeg
IMG_7137.jpeg

IMG_7138.jpeg


Added some material to the pitman. Forgot to snap a picture after it was all welded up, but got it painted and back on the box.

IMG_7135.jpeg

IMG_7139.jpeg
 
Feel like maybe I’m talking to myself at this point but keeping this rolling anyways.

Engine is back out so I can final weld all the mounting brackets then finish out the frame side upper link bracket. Trans mounts need to move down just a smidge, when I test fit a double cardan shaft it just barely fouled on the rear frame crossmember.

IMG_7284.jpeg

IMG_7287.jpeg


One cool thing about these trucks is the entire floor just bolts in, so access is convenient.

IMG_7295.jpeg


Finally sorted out the steering box clearance issue. Was able to squeeze the box up another inch to take advantage of the outward angle of the strut tower.

IMG_7285.jpeg

IMG_7286.jpeg


Got a few jobs to do while the engine is on the floor as well. The Cummins flex plate doesn’t quite fit in the bell housing, so I had to shave a bit from the casting to gain a little room.
IMG_7292.jpeg


And the location of the starter motor with this adapter fouls on the block just slightly. Only need to take like 3/8” off this little ledge and it should fit nicely.

IMG_7290.jpeg


Planning on spending most of tomorrow in the shop so, we’ll see what I can get accomplished.
 
Not talking to yourself....

I'm enjoying following along, just have nothing to really add.

LOVE that bolt-in floor. I would think that would make things SO much easier to fab/access in that part of the vehicle.
 
As long as someone’s reading this shit! I feel like I’m totally winging it on this thing so maybe the occasional confirmation that I’m not a complete idiot could be useful.

Here's something you guys can help with...I’m a little unsure on where to finalize the upper link placement on the frame. I have everything plugged into the calculator with reasonable accuracy and by moving the frame bracket up or down an inch can land anywhere between like 12% and 44% AS while maintaining good VS, but I don’t know what I should be aiming for. Lower is just more compliant, right? Should I stay close to the rear end numbers to keep things balanced? Think I'm somewhere around 38% there. Treefrog can you chime in?

Had a good day, didn't really take many pictures. Transmission is bolted up for good -- got the block clearanced only to find that the pocket in the bellhousing isn't deep enough for the snout of the starter motor. Looks like there are a few varieties out there, some of which don't have the little shroud around the drive gear, so hopefully that's an easy fix.

Engine and transmission brackets are welded in. I added another one of those hexagonal frame plates to the inside of the chassis where the upper link bracket will sit. All that really remains up front is finalizing the steering box bracket and the frame notch, both of which seems pretty straight forward.

Feeling good overall. It's crazy what a couple hours here and there can add up to in terms of progress.
 
I like that RW adapter. The DPE one is shorter, you have to do some clearancing on an AX15 to make it work. An extra 1/2" probably would have solved all that.
 
As long as someone’s reading this shit! I feel like I’m totally winging it on this thing so maybe the occasional confirmation that I’m not a complete idiot could be useful.

Here's something you guys can help with...I’m a little unsure on where to finalize the upper link placement on the frame. I have everything plugged into the calculator with reasonable accuracy and by moving the frame bracket up or down an inch can land anywhere between like 12% and 44% AS while maintaining good VS, but I don’t know what I should be aiming for. Lower is just more compliant, right? Should I stay close to the rear end numbers to keep things balanced? Think I'm somewhere around 38% there. Treefrog can you chime in?

Had a good day, didn't really take many pictures. Transmission is bolted up for good -- got the block clearanced only to find that the pocket in the bellhousing isn't deep enough for the snout of the starter motor. Looks like there are a few varieties out there, some of which don't have the little shroud around the drive gear, so hopefully that's an easy fix.

Engine and transmission brackets are welded in. I added another one of those hexagonal frame plates to the inside of the chassis where the upper link bracket will sit. All that really remains up front is finalizing the steering box bracket and the frame notch, both of which seems pretty straight forward.

Feeling good overall. It's crazy what a couple hours here and there can add up to in terms of progress.
For a street driven rig, the higher value is generally favored from what I have read. Even more so considering the awd transfer case.
 
  • Like
Reactions: ash
Digging the shit out of this. :smokin:

Balls deep in a Disco 1 M57 swap myself at the moment so appreciate dealing with the Land Rover “idiosyncrasies” :lmao:
 
  • Like
Reactions: ash
You’re not talking to yourself! Please keep posting. Bad ass build for sure!
 
Radiator question.

New bling bling radiator/intercooler combo arrived. It’s designed for this motor in a Defender but I’m so far off in the weeds it of course isn’t a direct fit.

So the lower neck fouls on the steering box. I’m really hoping I can squeeze it all the way down on the tank and slip past the box, but barring that it will probably need to move up.

If it does get moved up, will the area of core below the outlet see less flow, or will this negatively impact the radiators efficiency? My gut says yes, but hopefully I'm wrong.

IMG_7372.jpeg
IMG_7369.jpeg
 
If you're cutting and welding anyway, you may be able to put in some sort of deflector to force the water to go through the whole rad?
 
Top Back Refresh