McBastard79
Badical
- Joined
- May 20, 2020
- Member Number
- 681
- Messages
- 199
This is going to be a sweet rig
Follow along with the video below to see how to install our site as a web app on your home screen.
Note: This feature may not be available in some browsers.
Thank you, I appretiate that.This is going to be a sweet rig
I am not touching the knuckles at other other then to weld on a lower coil over mount. My only need is for this to not have death wobble when doing 80mph.Damn, that sucks.
For the front axle, are you planning on rotating your knuckles or leaving them stock/attached how they are? Set your steering king pin inclination and don't worry about pinion angle if you aren't going through the hassle of changing the KPI.
no point is having an "ideal" pinion angle, something that matches your T case output angle with standard driveshaft or something that points to t case output with multijoint shaft, if it ends up making your steering 0* or negative on the KPI and the truck driving darting.
ignore the pinion angle then.I am not touching the knuckles at other other then to weld on a lower coil over mount. My only need is for this to not have death wobble when doing 80mph.

 sorry about that.
Thanks man, I am hoping to get a floor poured in this shop this summer, fingers crossed. but either way I am defintly going to build my self some sort of heavy lift option this spring.solid progress
you absolutely need an overhead crane or at least some i-beam and rollers for a chain hoist working on a dirt floor shop. as somebody working outside, i'm jealous either way
You have no idea man, we get taxed for paying taxes on top of taxes.The building in Canada tax sucks.
Was a crazy finish yesterday that's for sure.
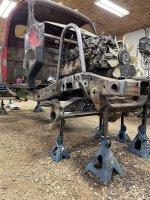
Will you still be able to pull the T-Case without pulling the cab? Or are you planning to make that whole skid removable?Alright dudes and dudettes,
Here the weekly update on my shit box... I mean a project that I am in love with and have not been seriously considering burning to the ground.
For the last 2 weeks I have been battling both myself and this project, mentally and physically. Its been a back and forth battle, to try and pull the image that I have created in my mind from the either into creation. However, every time I try this it back fires either because I am trying to save my self work from installing the 4L80E which in hind sight was the wrong approach. I should have just installed it like I did with out the torque converter and built the tubing the first time around with the parts in place, there by using the function over form approach. As well I was trying to build, all of this with very limited tube on hand, and the stress of trying to build this with out ruining the material I think planted the seeds where I ended up making stupid mistakes that cost me time and material.
I say this because once I got the call that the tubing, I ordered 2 weeks ago was ready for pic up, the build went off with out any problems, and I was even able to salvage previously bent part, which in the end allowed me to create the image I had in my mind with a few changes due to functionality.


I also need to say that with out bending, cooping or even working on tubing in this form for several years, I am very happy with the fit up, and the over all out come.
If you guys are liking the build process here, please consider heading over to Vet Built on YouTube and you can follow the build there as well.
Thanks you. In all honesty it took me 10-15min to get it fit up, and them maybe another 5 just widdeling the inner parts of the tubing with a die grinder to knock it out. I was really surprised at how fast it went. You can see the process on YTWill you still be able to pull the T-Case without pulling the cab? Or are you planning to make that whole skid removable?
Beautiful work by the way. That tube in the rear middle looked like a bitch to get perfect.