How to install the app on iOS
Follow along with the video below to see how to install our site as a web app on your home screen.
Note: This feature may not be available in some browsers.
You are using an out of date browser. It may not display this or other websites correctly.
You should upgrade or use an alternative browser.
You should upgrade or use an alternative browser.
Chevy too.Gotta love the Ford power steering pumps, gotta pull the pulley off so you can unbolt the pump.
Provience
Kill!
biggest problem is that I grew up on toyota stuff. super easy to bolt on/off the power steering pump, easy to shim/adjust valves, crank oil pumps, easy dist timing, aluminum heads and intakes 
getting through the learning curve though, eventually
getting through the learning curve though, eventually
You can cut the head off of a ¼" bolt, then slot the threaded end of the shank about 1" with a hacksaw. This will give you a place to insert a piece of emery cloth, chuck it up in a drill or die grinder and you'll have a hone.and I tried to just use some sand paper and a finger instead of a hone to "rebuild it",
Provience
Kill!
The only issue with that is it lacks the pressure [albeit light] and stability of the "real" brake hones.You can cut the head off of a ¼" bolt, then slot the threaded end of the shank about 1" with a hacksaw. This will give you a place to insert a piece of emery cloth, chuck it up in a drill or die grinder and you'll have a hone.
It probably would've been better than what I used, and just sanding mostly worked, but the constant dampness along the booster was bugging me
Provience
Kill!
Alright, let's pop it back open again. Whatever we get is what we are going to stick with. This is why routing the plug wires around the front is more convenient than routing them across the middle of the valve covers

and despite having no gauges, got some evidence that oil has been doing oil things. That's always nice

Loosened up all the rocker arms to start with, set it up to TDC #1, then tightened then up to 20lbft based on what the distributor was pointing to

and used a ratchet to crank it over and the camera on the phone to see if everything was moving about evenly on both sides. Seems to be.
and figured i'd share the noises that remain. certainly still some tick due to the exhaust stud missing on the rear passenger head, probably more of a lifter tick on the drivers side head. Can't win them all, well, probably could've kept track of lifters and rods and such during removal and installation. It's quieter with the hood shut, and that's what matters.
and since i was taking videos of things, figured i'd see if taking a video of the exhaust would pick up some of the sound. Seems to be pretty close to reality. It sounds significantly better than when I first did it, probably because it isn't point straight into my open garage 2-1/2" is still too large a diameter for this setup at idle, but it doesn't sound loud or annoying while driving.
Tore in dash apart again, checked the cluster and seemed to be getting resistance at the gauges of interest, so rigged up some wires at the battery

and giving 12v power to the gauges I was able to get a response from them all, here you can see fuel/water/oil all off zero

Primary reason it all came apart was to change out the ignition switch. funny setup with this rod that runs down the column to just a hole in the bottom of the switch

replacement unit installed, there is nearly a full key potion of adjustment in the slider nuts. This also controls all of the feedback in the key, the key is no longer sticky and loose. Crisp and firm positions way better than expected

the panel was working and I was getting power to the cluster connector with the new ignition switch, plugged it back in and fired up the truck. Reaching around the back to fondle the wires made them fluctuate. Took it apart again, did what I could to strain relieve them. Everything seemed connected to the plug itself, do still have some concerns about the printed circuit on the back of the cluster itself.
pretty sure these are for the door speakers, needed to make a note of the color and check the wiring diagram. there is much wiring on the inside to get through. I'd like for the radio to function the dash speakers, the legal compliance lights to work and find a spot for power for the power windows.

guess i'll have to get a trailer brake controller wired up as well, but that's all pretty simple once I get the factory mess and aftermarket add ons cleaned up
and despite having no gauges, got some evidence that oil has been doing oil things. That's always nice
Loosened up all the rocker arms to start with, set it up to TDC #1, then tightened then up to 20lbft based on what the distributor was pointing to
and used a ratchet to crank it over and the camera on the phone to see if everything was moving about evenly on both sides. Seems to be.
and figured i'd share the noises that remain. certainly still some tick due to the exhaust stud missing on the rear passenger head, probably more of a lifter tick on the drivers side head. Can't win them all, well, probably could've kept track of lifters and rods and such during removal and installation. It's quieter with the hood shut, and that's what matters.
and since i was taking videos of things, figured i'd see if taking a video of the exhaust would pick up some of the sound. Seems to be pretty close to reality. It sounds significantly better than when I first did it, probably because it isn't point straight into my open garage
2-1/2" is still too large a diameter for this setup at idle, but it doesn't sound loud or annoying while driving. Tore in dash apart again, checked the cluster and seemed to be getting resistance at the gauges of interest, so rigged up some wires at the battery
and giving 12v power to the gauges I was able to get a response from them all, here you can see fuel/water/oil all off zero
Primary reason it all came apart was to change out the ignition switch. funny setup with this rod that runs down the column to just a hole in the bottom of the switch
replacement unit installed, there is nearly a full key potion of adjustment in the slider nuts. This also controls all of the feedback in the key, the key is no longer sticky and loose. Crisp and firm positions
way better than expectedthe panel was working and I was getting power to the cluster connector with the new ignition switch, plugged it back in and fired up the truck. Reaching around the back to fondle the wires made them fluctuate. Took it apart again, did what I could to strain relieve them. Everything seemed connected to the plug itself, do still have some concerns about the printed circuit on the back of the cluster itself.
pretty sure these are for the door speakers, needed to make a note of the color and check the wiring diagram. there is much wiring on the inside to get through. I'd like for the radio to function the dash speakers, the legal compliance lights to work and find a spot for power for the power windows.
guess i'll have to get a trailer brake controller wired up as well, but that's all pretty simple once I get the factory mess and aftermarket add ons cleaned up
Provience
Kill!
got a start on some wiring today, only had 1 bad fuse in the box. starting off with a reference picture for when I eventually get lost 

Got sidetracked by the parking brake not working. Turns out there was a dirt dobber house blocking the thing up. Lots of penetrating spray lube and working it by hand freed it up. Pretty excited to have that functioning, down side is now i need to adjust the rear brakes


went digging for the easy stuff for the headlights. Popped apart the connectors because the plugs had some corrosion.

vinegar and steel wool and some sand paper got the things all cleaned up

no real surprise, floor dimmer switch was dead and no longer dimmer switching

and lots of open connections when playing with the dash headlight switch. Did have good power coming in, not good going out.

with enough finangling, found the spots where the headlight switch will still make contact. Both headlights turned on. Spending the ~$20 for new switches to save the headache in the future

Moved on to the power windows/door since it was right there. Tomorrow i'm going to move the truck to the middle of the driveway so that I can work on taillights.
When I used the door off the wires that were hanging out and a 20v battery, they ran up and down great. The lines were just twisted and taped together

Took open the door harness to find the ends i needed, decided to also remove the power door lock and speaker wiring

...
Got sidetracked by the parking brake not working. Turns out there was a dirt dobber house blocking the thing up. Lots of penetrating spray lube and working it by hand freed it up. Pretty excited to have that functioning, down side is now i need to adjust the rear brakes
went digging for the easy stuff for the headlights. Popped apart the connectors because the plugs had some corrosion.
vinegar and steel wool and some sand paper got the things all cleaned up
no real surprise, floor dimmer switch was dead and no longer dimmer switching
and lots of open connections when playing with the dash headlight switch. Did have good power coming in, not good going out.
with enough finangling, found the spots where the headlight switch will still make contact. Both headlights turned on. Spending the ~$20 for new switches to save the headache in the future
Moved on to the power windows/door since it was right there. Tomorrow i'm going to move the truck to the middle of the driveway so that I can work on taillights.
When I used the door off the wires that were hanging out and a 20v battery, they ran up and down great. The lines were just twisted and taped together
Took open the door harness to find the ends i needed, decided to also remove the power door lock and speaker wiring
...
Provience
Kill!
now just the 3 wires are going to the door, blue for 12v power and a red/yellow pair to run to the passenger side

ran it down to an unused keyed spot in the fuse box. Easy way? yes. 20 amp circuit breaker is what the 1985 wiring diagram says the power windows call for (30 amp for the locks ) so i used a 20amp fuse

making a dang mess on the inside. Getting rid of wiring for: Door speakers, Door locks, courtesy lights, stock carb control, aftermarket switches, cigar lighter, 4x4 indicator and whatever else happens to bug me at any given moment

and the power windows are sloooooww. Struggling to get the window all the way up Not sure if it is poor contact in the switch, but that's the way i'm leaning. Going to have to check the volt drop when in use and see what I can see. These switches aren't available at oreilly or LMC truck. If I can't get them cleaned up i'll just toss some generics in there instead.

still worth it to get rid of the crank windows
ran it down to an unused keyed spot in the fuse box. Easy way? yes. 20 amp circuit breaker is what the 1985 wiring diagram says the power windows call for (30 amp for the locks
) so i used a 20amp fusemaking a dang mess on the inside. Getting rid of wiring for: Door speakers, Door locks, courtesy lights, stock carb control, aftermarket switches, cigar lighter, 4x4 indicator and whatever else happens to bug me at any given moment
and the power windows are sloooooww. Struggling to get the window all the way up
Not sure if it is poor contact in the switch, but that's the way i'm leaning. Going to have to check the volt drop when in use and see what I can see. These switches aren't available at oreilly or LMC truck. If I can't get them cleaned up i'll just toss some generics in there instead.still worth it to get rid of the crank windows
reptillikus
ate lug
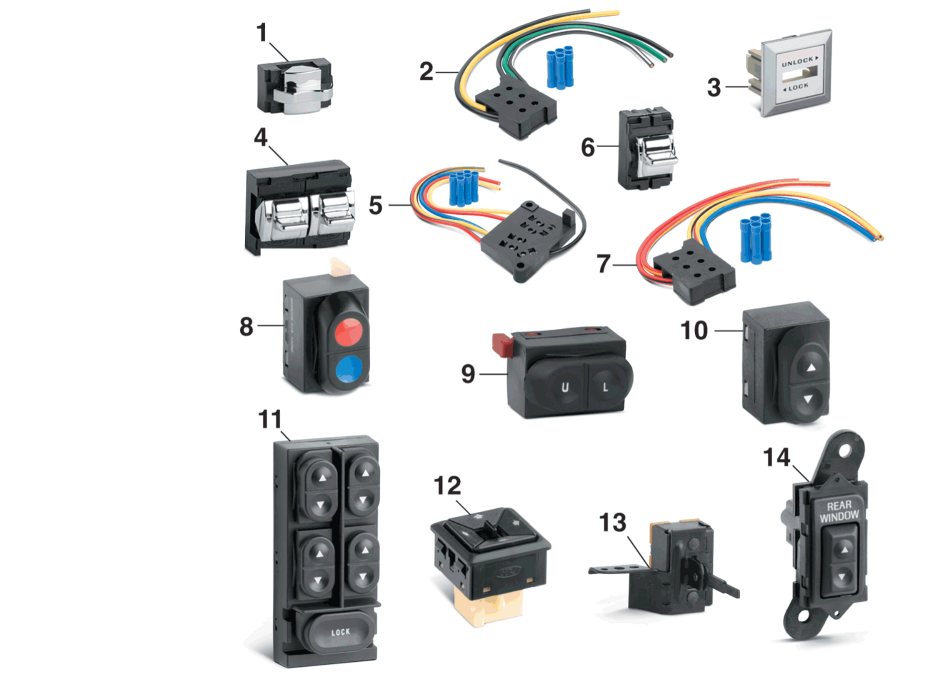
LMC has a listing for the power window switches The driver side dual switch is expensive.
 www.lmctruck.com
You can probably fix them though. If theyre anything like the 87-91 switches you can easily take them apart and clean the contacts.
Power Window, Door Lock and Mirror Switches
Shop from thousands of parts and accessories to help you restore, maintain, and customize your Chevrolet, GMC, Dodge or Ford truck or SUV. Keep 'em on the road with the right part, right price, right now.
www.lmctruck.com
You can probably fix them though. If theyre anything like the 87-91 switches you can easily take them apart and clean the contacts.
Provience
Kill!
that's a good link, guess i went to the wrong spot on their website yesterday when I was looking for it. Did find a bunch of these Dorman ones that are pretty closeLMC has a listing for the power window switches The driver side dual switch is expensive.
Power Window, Door Lock and Mirror Switches
Shop from thousands of parts and accessories to help you restore, maintain, and customize your Chevrolet, GMC, Dodge or Ford truck or SUV. Keep 'em on the road with the right part, right price, right now.
You can probably fix them though. If theyre anything like the 87-91 switches you can easily take them apart and clean the contacts.
gently popped off the socket and cleaned up the contacts. Made a pretty good difference. Still weak rolling up the drivers side window, goes down good though
on to the passenger side. This side was worse. The socket was snapped worse, one of the terminals was cracked and not happy about going in. Decided to just gut all of that.
at least they left me some ends on the factory connector
Beings i'd already had enough length from the drivers side for power, ground and wire, ran the two leads over to the passenger and got it all connected. Passenger window works great. makes me think I might need a motor or to pull the motor apart and clean up the insides on the drivers side.
This all came out from the dash and doors. Going to save all the factory connections and plugs and add the wire to the spare wires bucket.
picked up and got the new headlight switch installed.
works great, super happy with it. Still no taillights, so it wasn't that simpleand popped off the steering whelel
combination switch is broken in a couple spots, going to see what those run. not a required thing, but we are doing comfort and convenience stuff now
alright, time to figure out why the heater box won't heat, fan blower won't blow and fuel tank selector won't select
...
Provience
Kill!
Dirt mountain on the flapper, that'll shut it down every time.

worthwhile to get the vents all pulled off and at least wipe down everything else back in there

Moved on to popping off the switches

and years of dust accumulation on the factory grease. I probably should've looked for some replacement lithium or graphite or other light lubricant. Just cleaning and sanding all the contacts brought them back to good functional levels though


the flapper only fits one way, boy howdy did I fight that dang thing to line up and run myself crazy for a bit

not even close to lining up rather than get too far down the rabbit hole, I went ahead and just put a new loop in the cable right where it would fit and function. Works now and does all the stuff

Found this little clip on the floor when I was putting all the tools away that would've been perfect for solving my cable length, probably where it came from oh well, not going back on anytime soon

worthwhile to get the vents all pulled off and at least wipe down everything else back in there
Moved on to popping off the switches
and years of dust accumulation on the factory grease. I probably should've looked for some replacement lithium or graphite or other light lubricant. Just cleaning and sanding all the contacts brought them back to good functional levels though
the flapper only fits one way, boy howdy did I fight that dang thing to line up and run myself crazy for a bit
not even close to lining up
rather than get too far down the rabbit hole, I went ahead and just put a new loop in the cable right where it would fit and function. Works now and does all the stuff Found this little clip on the floor when I was putting all the tools away
that would've been perfect for solving my cable length, probably where it came from oh well, not going back on anytime soonProvience
Kill!
and some updated overall shots. Other than the combination switch, pretty well done inside the cab. Instrument cluster all works, windshield wipers work, radio works, heater works, fuel tanks work, parking brake works, horn was working, windows and doors all work.


Took it down the street to corner gas station. One of the brakes is wanting to hang up at times, front fuel tank shut off about 3/4 full on the gauge, if that is accurate or not, rear tank pretty much refused to take fuel from the pump M92PV4U is proven correct once again and absolutely nothing for rear tail lights or brake lights, just a big mess of wires back there.

If I can get the brake lights to work and whatever caliper is hanging up to stop, I might just borrow some license plates and give it a run back and forth to work for a couple days
Took it down the street to corner gas station. One of the brakes is wanting to hang up at times, front fuel tank shut off about 3/4 full on the gauge, if that is accurate or not, rear tank pretty much refused to take fuel from the pump M92PV4U is proven correct once again
and absolutely nothing for rear tail lights or brake lights, just a big mess of wires back there. If I can get the brake lights to work and whatever caliper is hanging up to stop, I might just borrow some license plates and give it a run back and forth to work for a couple days
reptillikus
ate lug
Hell yeah, just a couple things left keeping you from DDing it
Provience
Kill!
it's kind of funny how different it is to drive compared to the 1978 2WD. Seating position, way it handles, all that stuff.Hell yeah, just a couple things left keeping you from DDing it
reptillikus
ate lug
Probably those leaf springs in the front. I always thought the leaf spring TTBs rode pretty decent, especially since the D60 trucks rode so bad
Provience
Kill!
Alright, started off with picking up the tires. Right front is the caliper that locked up when I first got it, that one is still getting tight. Not terrible, but spinning by hand it does get stiff after the brakes are applied. However, I think i'm going to run it for a bit. Drivers rear was solid.  I could just barely get it to go backward, no chance of going forward.
Started off with the penetrating oil

and then on to the rear tail lights. power and switch at the pedal was good, so went to the back. Paint marker says it's already got a junkyard harness, I remember getting the light housing, don't remember getting the harness

This is the starting point for the rear, just a whole assortment of leads and colors and tape

Cut back the mess that was running to the gooseneck receptacle in the bedside, left a nub of wires. These had been run in the fender and were very brittle and cracked

Onto the main harness, this looked to be most of my issues. Ground wire splice falling apart, cut purple reserve light wire, cut brown marker light wire

added some labels to the stubs of white wires, brown marker, orange RH signal, green LH signal. This way I don't have to use the meter or open the harness again when I get the trailer plug in place

Lines seemed fine all the way up to the firewall connector, popped it apart and gave it a good scrubbing

taped up and re-wrapped the rear harness

and zip tied out of the way

and now i've got marker lights on both sides

I could just barely get it to go backward, no chance of going forward. Started off with the penetrating oil
and then on to the rear tail lights. power and switch at the pedal was good, so went to the back. Paint marker says it's already got a junkyard harness, I remember getting the light housing, don't remember getting the harness
This is the starting point for the rear, just a whole assortment of leads and colors and tape
Cut back the mess that was running to the gooseneck receptacle in the bedside, left a nub of wires. These had been run in the fender and were very brittle and cracked
Onto the main harness, this looked to be most of my issues. Ground wire splice falling apart, cut purple reserve light wire, cut brown marker light wire
added some labels to the stubs of white wires, brown marker, orange RH signal, green LH signal. This way I don't have to use the meter or open the harness again when I get the trailer plug in place
Lines seemed fine all the way up to the firewall connector, popped it apart and gave it a good scrubbing
taped up and re-wrapped the rear harness
and zip tied out of the way
and now i've got marker lights on both sides
Provience
Kill!
and signal lights on the drivers side. Still not getting signal to the passenger side rear, going to wait until the new combination switch arrives before messing with it any more. Issue seems to be somewhere between the firewall and fuse box, combi switch is about all that's there.

Good sign, i'm not the first person to remove this spindle nut with a hammer and chisel

lots of hammering finally got the drum to free up, evidence of dirt doppers in here as well

Reference picture, it's a mess but nothing seems to be broken.

scrubbed all the dirt out, sprayed it off a bunch and added grease to the touch points on the backing pad.

cleaned everything up and reinstalled, seems to move reasonably well enough now

and degunked a bunch of the drum, it's sort of smooth, in an old drum sort of way

and got the adjusters adjusted, now have a functioning parking brake
didn't take the passenger side apart, the star ratchet for the adjuster doesn't sound like it is clicking as it spins. Certainly some advantage to be gained if that one gets cleaned up as well.
back to waiting on parts and considering options for rear bumper. Waiting on rain, didn't want to get too involved with anything today
Good sign, i'm not the first person to remove this spindle nut with a hammer and chisel
lots of hammering finally got the drum to free up, evidence of dirt doppers in here as well
Reference picture, it's a mess but nothing seems to be broken.
scrubbed all the dirt out, sprayed it off a bunch and added grease to the touch points on the backing pad.
cleaned everything up and reinstalled, seems to move reasonably well enough now
and degunked a bunch of the drum, it's sort of smooth, in an old drum sort of way
and got the adjusters adjusted, now have a functioning parking brake
didn't take the passenger side apart, the star ratchet for the adjuster doesn't sound like it is clicking as it spins. Certainly some advantage to be gained if that one gets cleaned up as well.
back to waiting on parts and considering options for rear bumper. Waiting on rain, didn't want to get too involved with anything today
Provience
Kill!
the coil spring twin i beam really doesn't ride bad. Cutting down the wind noise by fixing the weather stripping and door hinges and latches makes a huge difference. This F350 let's me see the ground through with the door closedProbably those leaf springs in the front. I always thought the leaf spring TTBs rode pretty decent, especially since the D60 trucks rode so bad
That's a couple years from now project thoughreptillikus
ate lug
Door seals drive me nuts. Even new they leak on my DD.
You sure your brake issue is a sticky caliper and not a bad rubber hose? IIRC you rebuilt the calipers, no?
Provience
Kill!
All the rubber and hard lines were replaced, now that the master cylinder is new caliper is all I can suspect.
Door seals drive me nuts. Even new they leak on my DD.
You sure your brake issue is a sticky caliper and not a bad rubber hose? IIRC you rebuilt the calipers, no?
I did put pistons and seals in the calipers, and it isn't locking hard, more of an occasional drag. It might free up with some use and move better.
reptillikus
ate lug
Hmm yeah, I missed that you replaced the hoses. Maybe it is the caliper then.
Provience
Kill!
Before photo. I even had put grease or bond breaker between the caliper and the mounts. 2 possibilities that I can think of: piston bores have issues not allowing the pistons to pull back smoothly, too much roughness between the calipers and mount ears/spring

Pretty sweet amount of threads on the locking bolt. Oddly enough, it didn't come out like it was stripped and it went back in just fine

In an attempt to remedy one of the possible solutions, I spend a good bit of time sanding and cleaning the spring for good slide ability.

Alas, it was all for naught. New caliper came with decent paint/coating, new banjo bolt and new springs. Pretty great value for $50

And it installed much more quickly than putting the old one back in last time, still went ahead and used some anti-seize on the caliper slide mounts, just because

And moved on to the rear. Camera focused on the end of the spindle, so it's harder to tell what's going on. The cable that holds the ratchet lock lever arm up is not in it's anchor on the rear shoe liner.

and cleaned up, lubricated and wiped down

Easier to use clear, but looping any hose that fits over the bleeder and dropping it into a cup works really well for bleeding brakes alone. Also works well when using a friend to make less of a mess. I'm a touch sad that this uses a 7 or 8 MM wrench for the bleeder and everything else is 3/8", not sad enough to swap the bleeder

then redid the flare at the master cylinder. If it doesn't stop the leak, i'm going to have to redo that whole dang line and just start over
now with the brakes bled, the wheels all spin acceptably by hand forward and backward, before and after brake application. as done as that all gets.
Pretty sweet amount of threads on the locking bolt. Oddly enough, it didn't come out like it was stripped and it went back in just fine
In an attempt to remedy one of the possible solutions, I spend a good bit of time sanding and cleaning the spring for good slide ability.
Alas, it was all for naught. New caliper came with decent paint/coating, new banjo bolt and new springs. Pretty great value for $50
And it installed much more quickly than putting the old one back in last time, still went ahead and used some anti-seize on the caliper slide mounts, just because
And moved on to the rear. Camera focused on the end of the spindle, so it's harder to tell what's going on. The cable that holds the ratchet lock lever arm up is not in it's anchor on the rear shoe liner.
and cleaned up, lubricated and wiped down
Easier to use clear, but looping any hose that fits over the bleeder and dropping it into a cup works really well for bleeding brakes alone. Also works well when using a friend to make less of a mess. I'm a touch sad that this uses a 7 or 8 MM wrench for the bleeder and everything else is 3/8", not sad enough to swap the bleeder
then redid the flare at the master cylinder. If it doesn't stop the leak, i'm going to have to redo that whole dang line and just start over
now with the brakes bled, the wheels all spin acceptably by hand forward and backward, before and after brake application.
as done as that all gets.
Last edited:
Provience
Kill!
Since it was already a gear oil day thanks to pulling the rear shaft, popped off the rear diff cover for to have a look
Happy with it, certainly not the first person to have the cover off. The chunk of whatever it is between the ring gear and the housing ended up being a piece of rubber more like the top of a vacuum cap instead of just a plug. I'm happy it wasn't metal.

Beings the rear seemed taken care of, I just stuck my finger in the front. Goo up there still had a color-other-than-black to it. Other than adding a quart to top it off, left it alone.

darn you cheap tools and your tempting prices! This pump worked really well. Put a couple quarts into the transfer case, 1 into front diff and 1 into rear diff before it failed. ~1gal transfer life Fortunately without the spare tire below the rear tank, plenty of room to dump the gallon jug into a narrow funnel

Had a decent bit of parts arrive. don't have the auto so de-pinned the column lamp wire. good to have another wire with the appropriate terminal for a wide range of ford connectors

My poor steering column bolt rolled off a thread. Thing was giving me fits. That's a 7/16 die & that's a 3/8" bolt, this is staged for the photo because...well, that's what happens when you use a die to check your bolts you get 1 partway through before saying "yeah, that isn't right"

The prodigy P3 controller arrived today, won on eBay for $40 because it was setup for a hyundai something. Same controller as in the other truck, this was I don't have to mess with swapping them around. Couldn't find a spot that called out to mount it on this dash. Going here means I can rest the heal of my hand on the Tcase lever if i ever need to mess with the controller, which is convenient. it just barely bonks it when thrusting into 2H

likewise couldn't figure a good spot for a USB plug in port, went with next to the glovebox. Picked up one that has a on/off button so that it can be deactivated and won't leave a light on. Other option would've been to take one apart and remove the light.

After I drilled that hole I thought "gee, I can just run this off a keyed 12v instead of always hot and then it won't matter" If it ends up being a pain in the ass, in several years it'll be easy enough to swap.
still got lots of connections to make and wires to run, overall not much really though and i'm well into convenience and away from "need to" things
Happy with it, certainly not the first person to have the cover off. The chunk of whatever it is between the ring gear and the housing ended up being a piece of rubber
more like the top of a vacuum cap instead of just a plug. I'm happy it wasn't metal. Beings the rear seemed taken care of, I just stuck my finger in the front. Goo up there still had a color-other-than-black to it. Other than adding a quart to top it off, left it alone.
darn you cheap tools and your tempting prices! This pump worked really well. Put a couple quarts into the transfer case, 1 into front diff and 1 into rear diff before it failed. ~1gal transfer life
Fortunately without the spare tire below the rear tank, plenty of room to dump the gallon jug into a narrow funnelHad a decent bit of parts arrive. don't have the auto so de-pinned the column lamp wire. good to have another wire with the appropriate terminal for a wide range of ford connectors
My poor steering column bolt rolled off a thread. Thing was giving me fits. That's a 7/16 die & that's a 3/8" bolt, this is staged for the photo because...well, that's what happens when you use a die to check your bolts
you get 1 partway through before saying "yeah, that isn't right"The prodigy P3 controller arrived today, won on eBay for $40 because it was setup for a hyundai something. Same controller as in the other truck, this was I don't have to mess with swapping them around. Couldn't find a spot that called out to mount it on this dash. Going here means I can rest the heal of my hand on the Tcase lever if i ever need to mess with the controller, which is convenient. it just barely bonks it when thrusting into 2H
likewise couldn't figure a good spot for a USB plug in port, went with next to the glovebox. Picked up one that has a on/off button so that it can be deactivated and won't leave a light on. Other option would've been to take one apart and remove the light.
After I drilled that hole I thought "gee, I can just run this off a keyed 12v instead of always hot and then it won't matter"
If it ends up being a pain in the ass, in several years it'll be easy enough to swap.still got lots of connections to make and wires to run, overall not much really though and i'm well into convenience and away from "need to" things