budget76
Thread Killer
Picked up this 1968 (maybe earlier, but thats the title/vin plate anyway) IH C1300 pickup a couple weeks ago. Had it shipped from the southern border of California. Paid $2300 for the truck with quotes of $1800 to ship. $2900 later and it got to my door.
Knew basically nothing but what the ad showed and that it was parked 2yrs ago when the brother died. Was unclear if the windshield was broken or not, wound up it was. Has brand new tires on it, win there. gambled it was as solid as the pics made it look, and pretty much succeeded. Battery box, a spot up under the cowl by the glovebox, and small spots on the common cowl area behind the hood the size of a dime are all I've found so I'm happy. Anything near me would be a rot box and probably no cheaper.
plans?
-short term - get it running and driving locally. Clean up the interior, paint the underside / seal up surface rust / etc. Make it more comfortable
-long term - crown vic frontend, 6.0 LS from my escalade, leaning towards TKO/TKX trans but MAYBE go 4L80 for simplicity/cost, Ford 8.8 rear, etc. Goal is to drive this 9 months of the year till the salt goes down, comfortably.
more updates and pics later. have made some good progress, but it's going to be a slow one with house projects & a 1-yr-old at home


Going to keep a rough cost list running until it gets painful
Knew basically nothing but what the ad showed and that it was parked 2yrs ago when the brother died. Was unclear if the windshield was broken or not, wound up it was. Has brand new tires on it, win there. gambled it was as solid as the pics made it look, and pretty much succeeded. Battery box, a spot up under the cowl by the glovebox, and small spots on the common cowl area behind the hood the size of a dime are all I've found so I'm happy. Anything near me would be a rot box and probably no cheaper.
plans?
-short term - get it running and driving locally. Clean up the interior, paint the underside / seal up surface rust / etc. Make it more comfortable
-long term - crown vic frontend, 6.0 LS from my escalade, leaning towards TKO/TKX trans but MAYBE go 4L80 for simplicity/cost, Ford 8.8 rear, etc. Goal is to drive this 9 months of the year till the salt goes down, comfortably.
more updates and pics later. have made some good progress, but it's going to be a slow one with house projects & a 1-yr-old at home
Going to keep a rough cost list running until it gets painful
- Truck $2300
- Shipping $2900 (quotes were $1800 but NOBODY would commit)
- Misc door parts Binder Planet $60
- Door latch & battery tray Chaz $100
- Seat $40 FB Market
- Windshield Gasket $75 car-part.com
- Windshield $550 installed
- Crown Vic Caliper $35 Advance Auto
- Crown Vic caliper soft line $15 Amazon
- Crown Vic wheel bearing $37 ebay
- Crown Vic to LS motor mounts $250 Outkast Autoworks
- Misc hardware stock up - Rivnuts, stainless machine screws, etc. $50ish Amazon
- AR5 manual Trans: $800 FB marketplace locally
- AR5 to LS adapter plate, braided feed line, -3AN adapter, AR5 slave remote bleeder $520 FABbot
- AR5 to LS clutch Slave & Clutch bolts $85 FABbot/Cyber
- Rustoleum Satin Black 5 Quarts ~$40 Amazon
- Cam/spring/retainer set 11/2023 - $341 Summit
- Delphi LS7 Lifters & trays 11/2023 - $170 LSXceleration
- Full gasket kit & Crank bolt 11/2023 - $200 Autozone
- LUK Clutch, PP, Flywheel, hardware (used, <10k miles) - $80 FB Market
- TTY head bolts, Ford Triangle to 3/4"DD steering shaft adapter, LS cam retainer plate - $65 Ebay
- Aluminum barbell, dipstick hold down, oil galley plug $10.50 Ebay (only used the barbell, dipstick didn't fit and galley plug not needed)
- 30" Stainless tilt steering column $140 Ebay. (same as Jegs, but WAY cheaper. I had both in my hands)
- Harmonic balancer install tool $10 Ebay
- Dorman smooth idler pulley $15 Amazon
- ebay header & y-pipe kit $275 did not fit. have to try to sell
- no-name water pump ebay $67
- Crown vic steering rack line adapter $65 Range Industries (wasted $20 on an ebay version too)
- Fuel tank GM adapter flange $120 Range Industries
- C10 trans crossmember $50 Ebay
- Wilwood clutch master 260-25098 Amazon $63
- 3/16" rubber p-clamps for brake lines qty20 $10 amazon
- Wilwood clutch pedal 340-13834 $75 Amazon + another for brake $100 Amazon
- 2x 25' NiCopp 3/16 brake lines w/ fittings $30 ebay
- Steering column clamps/mounts 2 styles $17+$35 Amazon
- Brake line Tee fitting $8 thestopshop Amazon
- Fluid Film Black 1gal $50
- Carter P76272M fuel pump open box $36 Amazon broken and refunded, $110 off Ebay
- Aftermarket cast exhaust manifolds ~$120 + $30ish shipping fees to return the ones I couldn't use
- various frame patch steel & cab patch steel $50
- Ford 8.8 rear + driveshaft $260
- Flex Fuel Injectors 12613412 & retainers (appear to be OEM overstock clearing) $40 Ebay
- 2x 10ft 3/8" Fuel Injection line, 2x 6AN-push 90* adapters, 84pc fuel injection hose clamp kit, $42 all Amazon
- 3/8 fuel rail to rubber adapters $10 Amazon
- cheap 8.8 LSD unit Ebay $165
- "universal" cable throttle pedal Ebay $30
- Bubble-to-double brake line adapters $10
- AR5 Short Shifter FabBot $200
- -3AN 18" line for clutch feed $12 ebay
- Ford 8.8 rebuild kit KOYO brgs $58 ebay
- Ford 8.8 crush sleeve eliminator $15 ebay
- Ford 8.8 Aluminum fancy rear diff cover $65 Amazon
- 3AN-3AN male adapters for clutch line $12 for 2 only needed 1 Amazon
- generic LS swap throttle cable $20 Amazon
- ForeverSharp Steering Wheel $130
- 6-bolt steering wheel adapter $28 Amazon
- SOLD: Bendix Hydrovac brake booster, lines, hdw etc. $100+ Binder Planet
- SOLD 11/23: Holley carb & carb kit. $47+ after shipping
- SOLD: 11/23: 266, trans, driveshaft etc. $100+
- SOLD: 6/24: escalade cluster $95+
- SOLD: 6/24: OEM NOS taillights $150-50paid=$100+
- SOLD: 6/24: GMT800 headers and y-pipe that didn't fit $120+
Last edited:
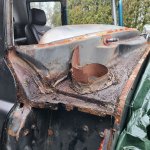
 DEFINITELY have to fix the glovebox area tho and get in that cowl to clean it out. Got to get some more pics of that area. Hood hinge area looks solid but I did not pull the hinges off to verify. no signs of rust peeking out, think I might be OK

