What's new

14 JKU M-380 "Kilroy"

well I think I've discovered the cause of my 'chattery' engine - way too much lifter preload. I used digital calipers to measure how far the lifter plunger recesses into the lifter as the valvetrain is tightened up - from 'no slack' to 'tight' there appears to be about...wait for it... 167 thou (.167) of preload...which is about .137 too much (that's just over 1/8"). Spec is .030. This alone is likely the reason the lifters have been so noisy, and only through the simple task of replacing the lifters did I discover it. I have an adjustable pushrod coming along with a set of 8" calipers, and I'll soon know exactly what length of pushrods I need - my prediction is 6.800 (6.941 is what was in it). The spec for these lifters is .030, so yah it was way off.

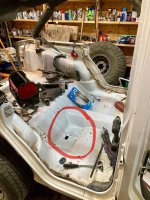
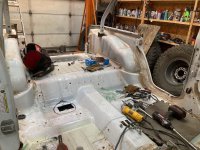
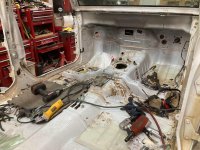
whilst I'm figuring all that out...axles are back from the blaster and they're ready for the trusses. The Artec truss kits are very impressive jigsaw puzzles - the attention to detail and fitment are the best I've ever seen. Soon as the axles are done the Jeep comes in for disassembly, and I'll get the body off asap to get the frame ready to bolt in the lift kit, and then the axles.

TNBu1l2.jpg


FlvsuTh.jpg


4p4jEfC.jpg


jwtkb7m.jpg


And I'm using 'Steel-It' to pre-paint underneath the hardware in advance of welding it all up - it's a weldable HD stainless steel-infused polyurethane paint - neat stuff, and reeeeeally bad for you -

lL3rYh8.jpg


qoA5IaA.jpg


u7dkpVi.jpg
 
alright - I've been pondering how to mount my full-hydro ram for a very long time, and my solution came down to most pros outnumbering the least cons, and that meant mounting it 'straight-on'. I'm running my ram completely inline with the TREs, and the main reasons come down to this - when I'm wheeling the majority of my bonks and bangs to the front end are when the wheels are steered straight - not at max clock, so, I'm mounting my ram so that the stress of those impacts will transfer 'through' the ram and not 'against' it (the seals, mounts), etc. Any impacts to the tires will transfer straight through the TREs and ramrod right to the other end, and not at an angle which would hammer on the ram seals and mounts...at least that's how I figured it.
Plus, at max clock the outer knuckle does indeed turn less than the inner, so my street manners should should be...well pretty much about as good as possible. Tire scrub really isn't a major factor, but I wanted to prevent it as much as possible, and off road I think the impact-resistant nature of mounting the ram this way in my mind far surpasses having the ramrod in-line with the TRE at max clock, which until very recently was my plan.
Plus, there is more room to access the diff cover because the ram and linkage is mounted a little further away, bonus.

Now it's time to warm everything up and glue it all together for good.

Is it perfect, no, but it is good enough. Here's a schematic for how I did it -

S5EeFje.jpg


cP7tbXr.jpg


To help me understand the nature of the linkage...I employed some of my favorite toys and built a scale model of my setup - when I saw how it was reacting I mocked up the real linkage the same way, and sure enough it was accurate. Lego's rule 😎

F3d2tN6.jpg


MvGEpw6.jpg
 
alright - think I have the pushrod mystery solved. My calculated eyeball math indicated a 6.800" pushrod would do the trick...and I think I was right. Got a pushrod checker (Speedmaster 401.1001 - Speedmaster PCE401.1001 Speedmaster Pushrod Length Checkers | Summit Racing) and at zero lash my pushrods measured out between 6.759-6.763 , which with an additional .037-.041 will equal 6.800, and I am near certain that is within the preload spec for these magnum lifters (they said .030, and that was essentially an 'average'), and is also well below .075 preload which contacts the lifter snap ring clips. Soon as I get the e-mail back from the Top Line tech folks to confirm my math I'll be ordering a nice simple set of off-the-shelf-in-stock Comp Cams #7632-16 6.800 pushrods (COMP Cams 7632-1 COMP Cams Magnum Pushrods | Summit Racing), which should make my valvetrain a lot happier...and hopefully a lot quieter too.

Meanwhile, the full-hydro ram mounts are tacked in place and I've figured out the gussets to reinforce the leading edge against impacts, and I'll soon be gluing it all together for good.
 
...got the front diff housing and most of the Artec truss kit glued together this morning - definitely not my best looking work, but it's done, and done is good. On hindsight I think I would have run .035 instead of the .030 - I really had to crank up the wire speed to keep up with the heat, and I think .035 would have helped with that. But, it's done, and I didn't find any cracks, so now it's on to do the rear truss, and the last bits of the suspension brackets and such. Good day 👍

yH1dcP5.jpg


CdjtA4O.jpg


0SM7NJw.jpg
 
alright - a week ago I thought I had the pushrod mystery solved...and still do, but there's a twist....

First...is appears the problem the whole time was...wait for it...pushrods too long. The new V10 lifters went in just fine, but when I installed the valvetrain I noticed something very not awesome - the pushrods were 'contacting' the snap rings at the top of the lifters - the preload was so deep that the angle of the pushrods into the lifters was so far in that they contact the snap rings - even bent in a couple of the tabs (with the snap rings facing up - a pure coincidence - I'd never have noticed it if the horse shoe hadn't just happened to be facing up).
hSF1Com.jpg


Well that's not awesome, so I contacted Dave at Top Line (and sent a couple pics of the 'contact'), and he and his tech folks indicated that there was way way too much preload. So, I put a fresh battery in my dial calipers and did my best to measure it, and if I measured correctly or even close to correctly...my lifter preload is .167 ...and my research indicates it's supposed to be in the .030 range, so it's about .137 too much preload - that over 1/8" too long.

As I understand, lifter preload is the distance the push rod socket depresses into the internal lifter bore before the rocker arm gets tight (pic below).
M6PSVB1.jpg


This is how I measured that distance: I started the rocker arm bolt, threaded it in until there was no slack between the pushrod and the lifter socket, and then measured how far the pushrod/socket 'travelled' before the rocker bolt got tight - it went .167 , which as I'm seeing is a whole lot.

BN2NE4O.jpg


My current pushrods measured out at 6.941 (which are the new rods that are .036 longer than stock (6.905 I think is the OE length)), which with the new Comp cam (and presumed lower base circle) I installed because we thought the rods would be too short. Apparently that was not the case, and was apparently an overcorrection. The original rods were 6.905, but, with .167 preload and a target of .030, I need to get rods that are .137 shorter, or 6.804.

I hoped my calculated eyeball math indicated a 6.800" pushrod would do the trick...and I think I was right. Got a pushrod checker (Speedmaster 401.1001 - Speedmaster PCE401.1001 Speedmaster Pushrod Length Checkers | Summit Racing), and at zero lash on a couple different holes the checker measured out between 6.759-6.763 , which with an additional .037-.041 will equal 6.800, and I am near certain that is within the preload spec for these magnum lifters (they said .030, and that was essentially an 'average'), and is also well below .075 preload which is how far the preload has to be for the pushrods to contact the snap ring clips. Soon as I get the e-mail back from the Top Line tech folks to confirm my math I'll be ordering a nice simple set of off-the-shelf-in-stock Comp Cams #7632-16 6.800 pushrods (COMP Cams 7632-1 COMP Cams Magnum Pushrods | Summit Racing), which should make my valvetrain a lot happier...and hopefully a lot quieter too.

Bottom Line - get a pushrod checker and don't guess like I did - know.
 
Last edited:
well...the 'musical lifters' saga continues. It's always 'something' so I shouldn't be surprised...but this squarely falls into the 'well that's just strange' department...and I'm hoping it's a V10 vs V8 thing...

First off, I got the Comp Cams 6.800 pushrods, #7632 (289/302 Ford btw), and they installed just dandy - preload looks to be in the .030-.050 range, and in this hydraulic lifter equation I'm calling that 'good enough'.

But...(there's always a 'but'...)...I noticed there is a similar but less invasive 'interference' issue with the lifters' snap ring retainers and the pushrods...and I'll do my best to 'splain what I'm seeing, lifter functionality, and what I did.

BLUF: I'm using the V10 lifters, but with the V8 retainer clips - not the HD snap rings.

I am making the presumption that 'nothing should 'contact' anything else in the valve train equation. On the base circle everything is fine - the snap rings can rotate around in their grooves and no contact. But, with a lifter up on a cam lobe and the plunger all the way 'in' (engine not running/lifters 'bled down'/not filled with oil, etc), the angle is higher between the lifter and pushrod, and the snap ring cannot rotate all the way around without contacting the pushrod.

On a lobe, plunger all the way in, snap ring eyelets facing down - the arrow is where the interference happens when I rotate the snap rings around -
lZuNNBu.jpg


But rotate the snap ring up and around...and it runs smack into the pushrod...which can't be right...but again, these are Viper V10 lifters...
2sOTk4s.jpg


Now as I understand, with the engine running and the lifter(s) on the base circle, the lifters will fill with oil, filling the plunger area, and because the oil cannot bleed out quickly the resulting oil-filled lifter can overcome the valve spring pressure when ramping up, thus opening the valve, and repeats the process all the time (I don't really understand what the preload value is really for but one neuronal synapses at a time). But, when the engine is shut off...any lifter up on a lobe will initially hang the valve 'open'...and the lifter will very slowly lose oil prime within itself, allowing the valve spring to 'push' out the oil, allowing the valve to close all the way...which also pushes the plunger deeper into the lifter. If the snap rings end up with the eyelets facing 'down' then no problem, but, my concern is this - if a snap ring rotates in it's groove and ends up with the eyelets facing 'up', when the engine is shut off the pushrod will initially be fine...until the lifter bleeds down...and the pushrod will literally get wedged against the snap ring, like this -
hSF1Com.jpg


In my mind that is simply unacceptable, and frankly I'm amazed the Mopar engineers allowed it to happen.

All I can figure is the Viper V10 engines (heads, rockers, valve train geometry, etc.) are different enough - something about the V10s have less of an angle difference between the centerline of the lifters and pushrods, that this is not an issue, but on a magnum V8, it obviously 'is'.

So - I removed the HD snap ring retainers and replaced them with the OE standard duty clips, and my assessment is that while the same interference issue can likely happen, the lighter retainer clips can flex a little and 'absorb' any intermittent interference issues that might happen, whereas the snap rings, cannot.

I don't know how else to do it, and I cannot see any way in which there can be 'zero interference'. It'd be great if there was a small ridge on the 'bottom' of the lifter snap ring groove to disable the snap rings from rotating in their grooves up and facing up - a 'stop' like that would prevent the snap rings from rotating more than a few degrees, but there isn't.

Out with the snap rings - didn't even unbolt everything - just popped 'em out and plyer'd 'em apart and into the trash -
kbHCmJE.jpg


...and installed the standard non-sexy clips -
GxbTxBv.jpg


Meantime, primed the engine and oil is soaking each rocker, so that's good -
RzHmnV8.jpg
 
ok - I got a set of Melling MPR-667 (6.792" - and they measure out almost dead nuts), and installed two of 'em, along with re-installing the snap rings.

Bottom line - it's good...I think. If I'm measuring right preload looks to be in the .015 - .020 range, and, when up on a lobe the snap rings will rotate all the way around in their groove. For sure there is positive preload with everything bolted tight, and the snap rings will rotate around without contacting the pushrods.

Topline says the lighter preload is just fine, so I'm gonna run it as-is. And I'm hopeful my engine 'chatter' will be all but gone.

Alright - with all this engine BS hopefully out of the way I can now get back to axles and suspensions and the fun stuff...and the axles are almost done 👍 .

- Sam
 
the month-long axle weld-a-thon is complete 👍

The Artec full-hydro mount isn't yet engineered to 'interface' with the Apex D60 truss, so that took a lot of time to trim the mount to mate up clean, and I made a top cover plate and internal bracing to reinforce the front edge from impacts -

k6U2iBt.jpg


mVtJxBN.jpg


DD68YCo.jpg


once the ram is bled I'll rotate it back like this and install the cover plate for good -
kCOn8Nf.jpg


EGNwE0T.jpg


ZctH7pK.jpg


SAb9oOU.jpg


K1qfTQp.jpg


rear 14b -

lJ9boqW.jpg


these mini-scalers are great at removing slag -

SmEXRnw.jpg


Also got the Artec high-steer arms installed, including bronze bushings and I cut small grooves into the adjuster plate to get just a little bit more grease in 'dere -

8r8lDj8.jpg


Grwwp7x.jpg


ec24zGe.jpg


got this nifty luggage weigh scale to get 25 lbs of pull in the knuckles -

tCoVTIx.jpg


Now time to clean house, strip the Jeep, and bring it in 👍
 
Last edited:
a'rite - Jeep is gutted, the busted up windshield is out, and the body should be off real soon -

pLZlzu5.jpg


x0I4pTJ.jpg


I'm going to use the OE Jeep fuel pump/sending unit, and to do that I'll need a simple way to 'access/maintain' the unit without having to either drop the tank or lift the body. I found where the sending unit is below the rear floor, and once I cut away the proper area to get the sending unit out I'll make a simple access panel to cover it up - right 'here' -

TsfVV0y.jpg


bbsrhX0.jpg


Will probably do similar access panels for the same reasons above the tranny and t-case.

Meanwhile, the valvetrain is all back together and the engine is buttoned up. Ditched the 'torque-to-yield' intake bolts and got some good ones, and used new washers to allow things to 'slide' on assembly -

1pWTEIk.jpg


Ti7AbjT.jpg
 

Attachments

  • bbsrhX0.jpg
    bbsrhX0.jpg
    152.4 KB · Views: 3
  • TsfVV0y.jpg
    TsfVV0y.jpg
    118.6 KB · Views: 3
  • x0I4pTJ.jpg
    x0I4pTJ.jpg
    174.1 KB · Views: 3
  • pLZlzu5.jpg
    pLZlzu5.jpg
    177.7 KB · Views: 3
got a second chain hoist for my crane, which made pulling the body a breeze. Used the pressure washer to remove about an inch of dirt off the chassis, and started dissecting the driveline this morning

mysZVJE.jpg


DsABOBl.jpg
 
booyah - it 'fits' 👍. Got the suspension bolted up, engine hovering in place, and this morning lowered the body back on, and everything fits good - better than expected - the radiator has a quarter inch to spare, and there's room to adjust the engine/driveline placement 👍 . The extra room not occupied by the shorter V6 enables the placement of a V8 quite nicely...almost like they expected V8's to be in there 🤔😊 .

Interesting factoid - being a RHD chassis, the steering gearbox bolts up on the p-side, which means the geometry is all backwards, meaning the trackbars bolt up opposite of a normal LHD chassis, and so I need to buzz off the OE track bar brackets and glue on aftermarket units, probably from Artec - still researching lengths and such.

So - now to fab up engine/trans mount plates, bolt 'em in place, and connect everything back up 👍

The IRO frame mounts are designed to 'bolt' on, but I'm welding mine for extra insurance (just tacked in place for now) -
xHpM4QH.jpg


kmZzzA7.jpg


so the Iron Rock 4.5" long arm kit doesn't actually come with a d-side front upper control arm or mount - it's designed as a 3-link setup via the p-side upper only, which is ok, but the Artec truss kit includes the 4th link mount on the truss......and so being me I asked the guys at IRO to include a second p-side upper mount and arm, cut apart the mount, and grafted it onto the d-side lower mount in the kit, and welded it up with the other mounts - a mirror image of the entire p-side mount. Then attached the second p-side upper arm, and now I have a fully functional 4-link front just like I wanted -
H7E3Wo5.jpg


this is the unaltered p-side
5kqyyOv.jpg


LiOaHa8.jpg


engine hovering in place...getting a wag at where to put it -
MSPVzoF.jpg


as expected, because of the longer trans and t-case, this crossmember had to be cut away - I'll reconnect it somehow later -
7MxShIH.jpg


two chain hoists = good 👍
vuQ0BGG.jpg


body back on -
JnQmeL8.jpg


radiator in place...and it all clears -
7GpTk0d.jpg


...there's more room around the firewall than I thought there'd be - have to bolt up the magnum manifolds first but I'm thinking I'll move the engine back another half inch and up at least 1 inch for more suspension clearance, maybe 2 -

bxL7Zes.jpg


RHxvPYv.jpg


t2uxKuH.jpg


AQNMpAx.jpg


the OE radiator coolant reservoir is right smack in the way of the power steering pump and serpentine setup, so that'll have to be relocated, but so far it's the only thing causing any 'interference' issues...and that ain't bad -
sxoacrP.jpg
 
Exhaust is tack'd in place. Starting with the OE Magnum manifolds, used most of the OE Jeep system plus a couple sections of 2" and 2.5" tubing here and there, rerouted to go around the relocated trans crossmember etc, and will final weld after the rest of the chassis is done. Fuel system plumbing is next, the brake lines, then the body goes on for mods.

Gonna be neat to hear how the Mag 360 sounds with the Jeeps' muffler and resonator - bet it sounds good. Anyway, progress.

plqRFaE.jpg


RZxz30g.jpg


jzim72l.jpg


trans crossmember was moved back about 5 inches to line up with the longer unit (was at the blue arrow, now at the orange), and now everything clears 'clean' -
adxszdN.jpg


U7AwHTO.jpg


zvFtNAJ.jpg


...eliminated a 'flattened' area here I think originally for track bar clearance -
xUfnDJS.jpg
 
ok - made three strategically-placed holes in the floor to give me full access to the gas tank, including removing the sending unit to replace the fuel pump - all without having to drop the tank (and cover, and armor, and and and), and I'll make three matching bolt-on trap door panels to cover things up -

nI5hnYA.jpg


First - sending unit. There's two braces that meet up under the floor, and I cut away as much panel as I could without cutting into the braces, just to have something to start with, and lucked out because I can juuuust squeeze out the sending unit as-is 👍 - and I highly recommend the sending unit ring clamp tool - like $30 on Amazon and WELL worth the $ -

XCBhjRZ.jpg


gAht3Fp.jpg


Next - the OE fuel level system uses whateverthehell ohms range (still don't know for certain), so I'm using a stand-alone 8" float assembly from ISSPRO that matches my gauges, with the respective 240-33 ohms rating; drilled the hole, and I can reach inside the tank and I'll use a nice ring clamp to secure the 5 bolts from the bottom -

p5Hcqo6.jpg


here's a look inside the tank - there's about...I dunno...1/4" between the bottom of the float and the bottom of the tank...so I'll have a bit 'more' after the gauge reads empty :)

p2TE9A2.jpg


other side -

1dMRVQr.jpg


Next - return line. My Holley Sniper EFI needs a return line, and I got this nice return line kit from EFI Systems Pro - same place I got the Sniper from - great place and great tech support -

mjNj0KJ.jpg


Float and return line installed - little heat and the OE plastic return line tubing slid right over the new fitting, and used an EFI clamp to make sure it stay's put -

C2j5DaV.jpg


Next - the main vent. Wanted to be able to access the main vent and fuel full/vent tubes, so out came the deathwheel and another hole in the floor is made -

eiBJm29.jpg


KPOHlAS.jpg
 
Top Back Refresh