What's new

Tearing apart a parts 00 Tracker for my Samurai and 99 Tracker rigs.

There was one for sale locally for $650. One of Byro’s buddies bought it.

I’m almost certain using a Samurai 3rd is the ticket to stopping the front diffs from blowing up. The third member is the weak point, and once it breaks it snaps the outers on the housing with it.

Now keeping CV’s alive with a front locker is another obstacle.

I mean they obviously exist. But like you said, they're stupid expensive.

I still wonder if a cradle similar to the Sami tcase cradles would work.

Edit: well shit, this isn't a bad price on fleabay

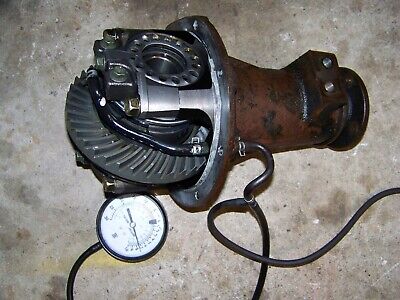
Suzuki VITARA Chevy Tracker Cast Steel Front Differential Axle Housing | eBay

Beat95yj

The diff on the other hand seems a little high :homer:

 
Got the engine out and next is to make room in my shop and roll this rig out. Tear the engine down and see what’s worth keeping on it.

IMG_2744.jpeg
 
Picking away slowly at the carcass. Next is removing the steering, outer suspension and drivetrain and the front differential assembly.

Once that’s done I’ll set it on the ground and drag it outside. From there I’ll remove the rear fiberglass topper, rear door and anything else I think I want. Then I’ll lift it and remove the rear tires and flip the rig upside down and remove the fuel tank and rear differential with suspension. The rear control arms are junk so I’ll just cut them in half to remove the rearmed assembly.

IMG_2774.jpeg
IMG_2773.jpeg
IMG_2772.jpeg
IMG_2771.jpeg
 
Floor jack? How bout ratchet chain binder instead. No weight in the chassis now for down pressure with a jack :laughing:

IMG_2776.jpeg
 
Whelp, draining the front turd member and gonna get some lunch. Later today I’ll pull the turd member and then drag it outside for the final phase of stripping down. The back half.

I get to play with fire on that phase… after the fuel tank is removed :flipoff2:

IMG_2778.jpeg
 
Ready to drag it out of my shop for phase 2 stripping or back half.

IMG_2781.jpeg
 
Got the engine tore down to mostly a king block. Still hanging on my picker as I really don’t want to dig out my engine stand. I may tho as what’s the point of having it if I don’t use it :homer::laughing:

Either tomorrow night or over the weekend I’ll dig back into it and get it tore rest of the way down. I’m interested in seeing the internal damage in it.

IMG_2811.jpeg
 
I forgot to post this photo up. After I took the exhaust manifold heat shield off, I found two large cracks in the manifold tubes. This poor thing was run very hard and put away wet :eek:

IMG_2809.jpeg
 
Try to find one of the factory tubular style exhaust manifolds. The 2.0 came with the cast manifold like you have or a tubular style.

Not the best picture to show it but it's all I have on my phone to show what it looks like.

I just cut the flange off and tig welded a v-band on.

PXL_20210410_165335543.jpg
 
Last edited:
Try to find one of the factory tubular style exhaust manifolds. The 2.0 came with the cast manifold like you have or a tubular style.

Not the best picture to show it but it's all I have on my phone to show what it looks like.

I just cut the flange off a tig welded a v-band on.

PXL_20210410_165335543.jpg
Couple things, what’s up with the radiator cap filler in the coolant tube? Also, what trans are you running?
 
So, I finished tearing the engine rest of the way down tonight. It had a couple more surprises in store for me too.

While I knew it had two spun rods, once taking it down, I found three spun rods and slivers of bearings in only one of the three stuck to the crank.

Video of rod play
 
Couple things, what’s up with the radiator cap filler in the coolant tube? Also, what trans are you running?
I added the inline radiator cap there because the radiator im using in my buggy does not have a cap built in.

It's the 4 speed automatic that comes behind the 2.0. Then it's the Tracker t-case that has been modified into a doubler, adapter setup and then a top shift Toyota t-case on the back.
 
But wait… there’s more,, if you act now, I’ll show you the other surprise it was holding


That’s right, the last surprise it was holding is a specially custom designed curved connecting rod too.

IMG_2818.jpeg
 
I added the inline radiator cap there because the radiator im using in my buggy does not have a cap built in.

It's the 4 speed automatic that comes behind the 2.0. Then it's the Tracker t-case that has been modified into a doubler, adapter setup and then a top shift Toyota t-case on the back.
Who did the t case adaptor setup?
 
Guy named Keith Rice, found out about him through some other Suzuki guys several years ago. Contacted him through Facebook and got the doubler way back in 2018. Pretty sure he's still making them but not 100% sure.

He makes the adapters to Toyota t-case or d300/Atlas pattern. Buddy of mine has the d300 setup in his 2.0 powered Sami buggy.
I tried looking him up and thought I found him,
 
His profile picture on Facebook is a rock bouncer.
 
Well, I finally got back on this. Finishing up the slicing dicing on my tracker carcass. It’s ready to take the scrapy now I think. Gotta drain the heavily dented old fuel tank and then smash it to make scrappy happy.

It’s nice to have a helping hand make short order of this. :smokin:

IMG_3024.jpeg
 
Fun stuff.

Im in the middle of a full ground up resto-mod of a gen2 2-door vitara tracker.
Completed a zero mile rebuild on the J20A recently.

If you have any questions about the rebuild I can probably answer them.
But a set of factory service/repair manuals is suggested.

Ive attached a spreadsheet for all things J20A build related, and some engine build photos :grinpimp:
Also, a link to my tracker build Flickr album. Lots of tear-down/build photos, might help


53579371053_65f619d1a5_b.jpg


53421478465_b442b5f308_b.jpg


53420130512_428ab43291_b.jpg


53462214804_5a61c67880_b.jpg
 
I found my factory service manual on eBay for around $25-30. Definitely worth it.
 
Top Back Refresh