What's new

Dust Buggy

Still working on the wiring one piece at a time. Wiring disappears in pictures but it takes forever.
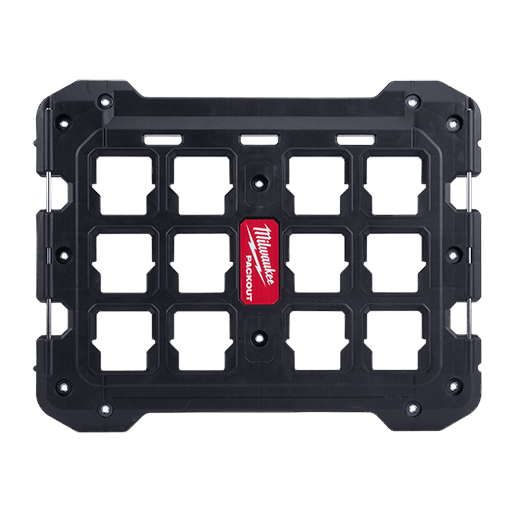
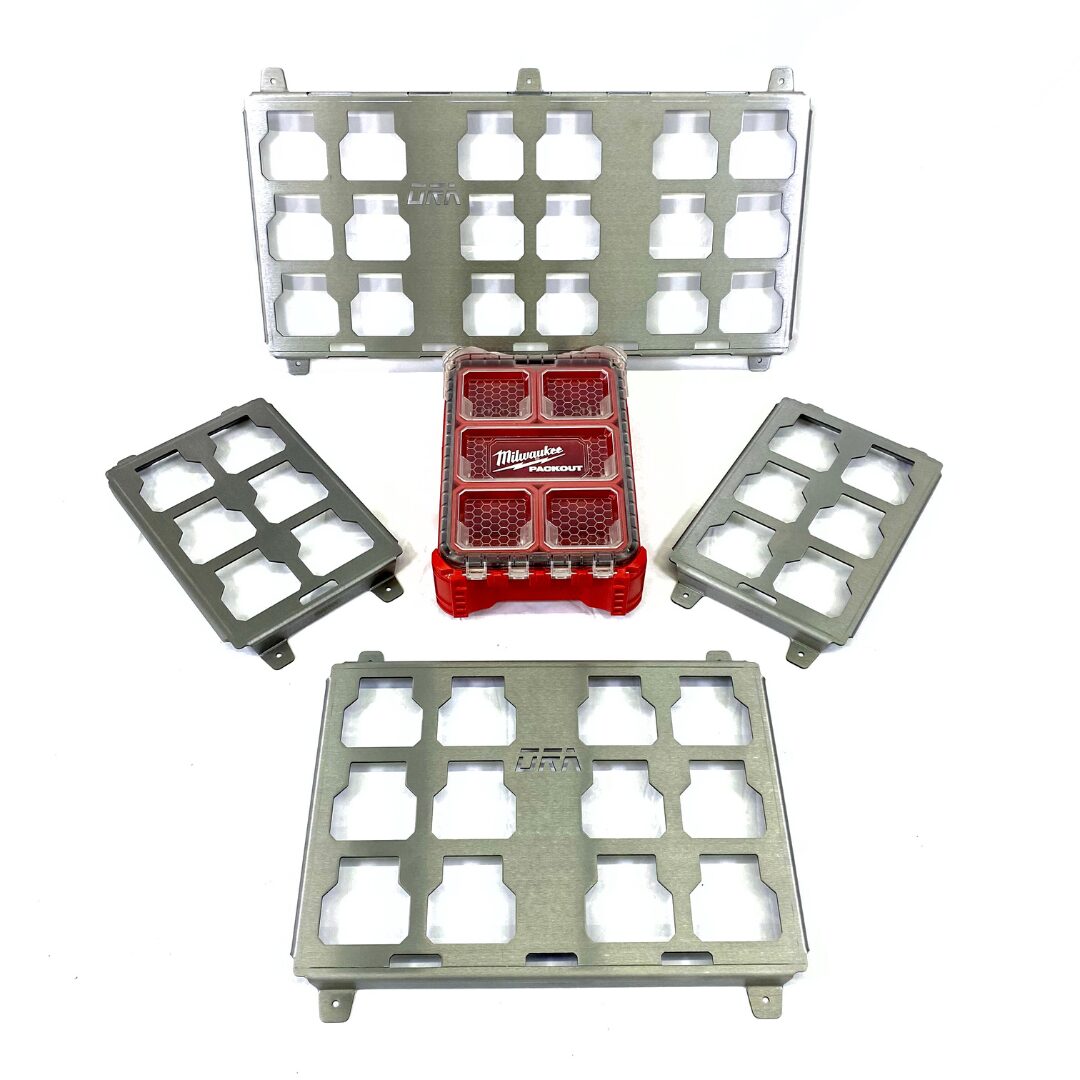
Also got the Milwaukee pack outs mounted. Seems like a good mounting system for off road use. Rock bouncers and golf cart racers seem to be running it and production mounts are pretty common now.
IMG_5224.jpeg

IMG_5225.jpeg

IMG_5223.jpeg

IMG_5226.jpeg
 
How did you mount the packouts?
Milwaukee makes a plate that bolts to the flat deck. I will probably add the half size ones somewhere near the seats. I’ve even seen them on the underside of roofs. There are fab shops making metal ones but they will have sharp edges to cut stuff. The plastic ones are pretty tough.
 
Last edited:
While priming the oiling circuit I heard oil pissing onto the ground and found a big puddle. The pan was leaking from both filter ports at the pan connection.
I am using a stock gasket and one of the generic 7 quart pans. The welds looked really good almost robot welded. Not sure what is going on???
I was an idiot for thinking the lower engine skid could be fixed. So I will now add the tube disconnects so I can drop the skid and change the pan.
What pan should I run?

Thinking about this pan.
61Ezv12IPVL._AC_SX679_.jpg


Leaking pan for reference.
 
Last edited:
I have the Pacific Fab steel pan, but it seems they are out of business. Not sure who makes a steel pan of similar shape.

I wouldn't run a cast pan. They like to shatter with any kind of contact.

Looking at Summit, the Milodon #31507 looks pretty damn close to the Pacific Fab pan, size wise. 5.375" deep. Kick outs on both side and doesn't look like the kick outs stick out more than the filter.
 
MAST motorsports.
Mine has been thoroughly "tested" (because I don't run an engine skid).
 
Someone on the old board said Champ oil pans came from the same source as the Pac fab pans. I had one on my last rig, and run one currently. I think I bought my last one through Summit racing.

You need LS1000, 750LS1 and either LS1001-1 or LS1001 and LS1001-2.


Last edited:
Someone on the old board said Champ oil pans came from the same source as the Pac fab pans. I had one on my last rig, and run one currently. I think I bought my last one through Summit racing.

You need LS1000, 750LS1 and either LS1001-1 or LS1001 and LS1001-2.


This, I had the champ pan setup on my old LS engine buggy.
 
The Amazon pan is actually pretty good. The oil cooler ports need to be cleaned up with a bur. I also used a GM gasket for both the pan and cooler ports. The rear bolts are stock length and too long and need about 3/8” removed. Also deburred the pick up tube. Maybe 15 min of cleanup and everything fit.
Still waiting on oil cooler adapters and accumulator fittings as the filter moved.
Waiting on the TMR tube joints to reattach to skid. The upper tubes are 1.75 x .120 same as joints. The lowers are 1.75 x .25 so I will have to whittle down the joints. Might plug weld and fill the joint cavity and then machine down the step so it fits the smaller ID.
Transfer case and NWF doubler is filled.
Trans and steering need some cranking and refilling.
Getting close.
IMG_5330.jpeg

IMG_5331.jpeg

IMG_5333.jpeg
 
Last edited:

This pic has me baffaled. So the tranny bolts to the engine oil pan? I’ve never seen that. Is there any problem dropping the pan with the tranny in place? Do you install the tranny with the torque converter all ready bolted to the flywheel? I’ve always had a terrible time getting the torque converter to seat in the tranny correctly. Can’t imagine doing it with it on the flywheel.
 
In a factory Gen3 to 4L80E, there's a dust cover that bolts from the bellhousing to the oil pan.
 
Finally figured out the fuel issue.
The older year truck pump with the plastic tops uses the same plug but different pins compared to the newer model metal top pumps. So the pump was not getting power.
In addition to that the in tank pump wires are shorter than the metal spring tubes that hold it together so if the tank swells or if over extended the wires will pull off the motor. So I added 3 more inches to the wires so they have slack.
Good news is the pump is so quiet that I can barely hear it run. Key on runs the pump for a few seconds then shuts off if the motor is not cranked over.
 
It fired up right away after sitting for 7 years.
I’ve been filling, running, shut off, refilling and most everything has stopped taking fluid.
Two times now on the restart the starter has spun and ground against the flywheel but has not engage the teeth. If I manually rotate the crank a little then the starter will engage on the next try.
What is going on?
 
Last edited:
Two times now on the restart the starter has spun and ground against the flywheel but has not engage the teeth. If I manually rotate the crank a little then the starter will engage on the next try.
What is going on?
Solenoid is weak or rusty or whatever and not strong/fast enough to force the beveled end of the gear teeth into the flywheel and cram the flywheel over a tad as needed for full engagement before the motor spins up.

And once the motor gets current and starts spinning theirs no way that shit is gonna mesh. :laughing:

Pull the starter and cycle the solenoid a fuckton of times and see if that fixes it.
 
I bolted up a new starter and it got worse. Same part but tighter tolerances since it’s new.
I then checked the ring to pinion gap and there was none. Supposed to be a paperclip gap.
Further investigation says there are multiple starter tooth’s 9,11,13 depending upon year and flexplate which are all still 168 tooth.
When I changed the flex plate for the 4L80 the gap closed up.
A 9 tooth #6494 starter opened up mesh to spec.
 
Last edited:
Orbital was self steering in both directions due to the orbital shaft being side loaded.
The steering column having two bearings. One at the orbital/orbital column and one near the wheel was off about 3/16" which was enough to side load the orbital from about 18" away that is only point .6 degree off. The weird part is that the steering wheel end was welded after everything else so that it would be aligned.
Solution is to weld in a U Joint instead of the bolt in rigid coupler.
 
Starter solved? More shims?
I bolted up a new starter and it got worse. Same part but tighter tolerances since it’s new.
I then checked the ring to pinion gap and there was none. Supposed to be a paperclip gap.
Further investigation says there are multiple starter tooth’s 9,11,13 depending upon year and flexplate which are all still 168 tooth.
When I changed the flex plate for the 4L80 the gap closed up.
A 9 tooth #6494 starter opened up mesh to spec.
I had been editing post 562.
GM probably had a QC issue on flexplates and block/starter locations which led to the fix being the change of starter pinions. Or the starter pinions were wearing and then added pinion teeth which effected flexplates.
All the LS flexplates are supposed to be 168 tooth but the OD can vary.
Pinion tooth count will changed the diameter of pinion and mesh clearance.
Starter bolt and location machining will also determine mesh clearance.
So we end up with a mismatch of parts that are all supposed to fit but don't and have to be tuned.
Add into the mix that the starters can have plug or stud terminals, so be carful cutting off the plug and switching to ring terminals unless you can reattach the plug because the parts houses did not have the plugs. Don't ask me how I know.
So the starter is working great only to get me to the next road block, which at the moment is the brake lines.
 
Broke the brake lines.
While tightening the nut, and holding the ferrule, the fitting broke.
Not knowing if I did something wrong I decided to break another one and it snapped super easy.
After looking at it and seeing how little material connects the stem, nut, ferrule, I figured there had to be a better fitting.
Found out they make the rubber style one piece fitting and use an aluminum knurled sleeve to take up the space for SS braid.
Both old and new are DOT but the one piece is way stronger.
Thanks to Bebop for helping sort it out.
IMG_5384.jpeg

IMG_5385.jpeg

IMG_5381.jpeg
 
Last edited:
^^^ what brand are we looking at? Definitely want to avoid the weaker fittings
Both are DOT rated BrakeQuip BQ but one style is not like the other.
You want the big one piece fitting designed for thicker wall tube possibly OEM rubber style. Then the aluminum sleeve gets added. It has the double bump crimp VS. the thin sleek 2 piece that is too weak.
 
Update on the steering:
When I was mounting the cooler up higher I had a feeling it would be a pain to purge the air and sure enough it is. The air cannot move to the reservoir, so I had to vacuum the reservoir to get the air out. It works great once done and throws around the 40’s with a pinky but I rather not have to deal with purging if I loose fluid or intake air. So I will be switching from the Howe to the Radial Dynamics reservoir, but not sure of which size.
The pump flow determines the size of the reservoir. If I stay with the CBR non regulated I should run the 4" res if drop down in pump size to the TC I can run the 3.5" res. This also means adding in a remote filter as the RD res doesn't have a filter.
Still in the back of my mind is that Campbells run the same Howe res and Bombers run the same PSC CBR and why shouldn't it be good enough?
Id rather tear it down, sell off the newish parts and rework it now rather than put it off and do it later.

So what I will end up with:
Orbital 200-0758-002 (PSC Motorsports FHV-CE160)
Pump RD Pro Series TC High Performance Steering Pump 11.0CC 6GPM regulated
Reservoir RD Vortex Steering Reservoir, 3.5", Gen II
PSC XR 2.5" B x1.5" R x 8" S
GM Wix 51042XP 13/16" oil filter 9GPM with 1/2" NPT CVR mount
 
Top Back Refresh