Well, that just got expensive..... But it solves a lot of issues and will talk to all my Victron shit. I am slowly ditching all the 12V appliance and shit in the living area. All the lighting is now LED that will run 12/24. Being able to pump twice the current through the existing power cabling to the inverter will be nice.wakespeed regulator.
How to install the app on iOS
Follow along with the video below to see how to install our site as a web app on your home screen.
Note: This feature may not be available in some browsers.
You are using an out of date browser. It may not display this or other websites correctly.
You should upgrade or use an alternative browser.
You should upgrade or use an alternative browser.
1959 GMC 2 ton bus - 4x4 swap
- Thread starter thatbus
- Start date
Opiebennett
XJ_Ranger
Current = amps = flow
Potential = Volts = pressure
Volts x amps = watts
Potential = Volts = pressure
Volts x amps = watts
I take it you mean double the voltage, same amps, which doubles the input wattage, and should help the output power?Being able to pump twice the current through the existing power cabling to the inverter will be nice.
thatbus
Well-known member
- Joined
- May 1, 2022
- Member Number
- 5129
- Messages
- 156
Also look at the Balmar alternatives to the Wakespeed. You can find the MC612/MC624 and similar programmable or current-limiting regulators on ebay for $150 USD-ish. New they go for like $250 last I saw.Well, that just got expensive..... But it solves a lot of issues and will talk to all my Victron shit. I am slowly ditching all the 12V appliance and shit in the living area. All the lighting is now LED that will run 12/24. Being able to pump twice the current through the existing power cabling to the inverter will be nice.
thatbus
Well-known member
- Joined
- May 1, 2022
- Member Number
- 5129
- Messages
- 156
Got a question for anyone with some air compressor experience...
Was initially thinking of doing a 24V electric air compressor. The CFM seems shitty for these units though, for the price you pay. The pneumatic fuel shutoff solenoid "fails" to an open valve via a spring, so, I can start the bus with 0 air pressure no worries. That got me thinking...
A higher CFM belt-driven option would be nice and I should be able to satisfy my air needs when the engine isn't running with a small tank. York compressors seem interesting as an option but I can't find much locally. No idea what my DT360 originally came with but it has a bracket for a compressor. Neighbour also gave me a nice, American-made "model 34" Sanborn compressor for free. Came from some sort of shop compressor. Good condition and it's just collecting dust...
Is there any reason I couldn't just slap a magnetic clutch on this thing and run with it? I can't find RPM specs for it but I know similar models like to spin between 700 and 1200 RPM.
Or like oplebennet said; if you use the same cables, which will handle the same current regardless of voltage, you double the watts/power you can deliver to loads by doubling the voltage.
Was initially thinking of doing a 24V electric air compressor. The CFM seems shitty for these units though, for the price you pay. The pneumatic fuel shutoff solenoid "fails" to an open valve via a spring, so, I can start the bus with 0 air pressure no worries. That got me thinking...
A higher CFM belt-driven option would be nice and I should be able to satisfy my air needs when the engine isn't running with a small tank. York compressors seem interesting as an option but I can't find much locally. No idea what my DT360 originally came with but it has a bracket for a compressor. Neighbour also gave me a nice, American-made "model 34" Sanborn compressor for free. Came from some sort of shop compressor. Good condition and it's just collecting dust...
Is there any reason I couldn't just slap a magnetic clutch on this thing and run with it? I can't find RPM specs for it but I know similar models like to spin between 700 and 1200 RPM.
IMO, makes things a bit easier to measure things in power aka. watts when you're considering differences in voltage. Volts (V) x current (A or I) = watts (W). A 1200W air con will have the same power running at 12V DC x 100A or 24V DC x 50A or 120V AC x 10A for example... but obviously way smaller cables with the latter.Current = watts to me at least. But I'm not a sparky.
Or like oplebennet said; if you use the same cables, which will handle the same current regardless of voltage, you double the watts/power you can deliver to loads by doubling the voltage.
thatbus
Well-known member
- Joined
- May 1, 2022
- Member Number
- 5129
- Messages
- 156
Just need to paint, sealant, and rivet 'er in, but I'm liking how that fits...
All that's left to do with the engine is SS hardlines to the tank, install the fuel tank, and install the hydroboost/hydro steering assist components.
thatbus
Well-known member
- Joined
- May 1, 2022
- Member Number
- 5129
- Messages
- 156
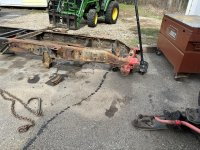
Would appreciate some opinions on how to handle the frame painting on this bus...

Given this is on a tight budget, "cheap but effective" is the aim. At the same time, I don't want to waste my time here. Is it worth media blasting the frame, and generally, more cost-effective to rent a unit myself, buy some chinesium from harbor freight/princess auto, or find someone who does mobile blasting? The rust is very light, all surface, no flaking whatsoever.
If I blast it, I intend to go with roll-on coal tar epoxy; ugly, stinky, but damn effective. If not, I'll prep with phosphoric acid and use a moisture-cure-urethane like POR-15.
Thoughts?
Had some fun beadrolling today:

Made a few plates to sandwich the firewall insulation against and use for bulkhead passthroughs. Real happy with how the electrical/air line panel turned out:

Fab'd a new clutch linkage too:

Also got lucky with this find:

Surplus, straight from the Corpus Christi Army Depot; a several thousand dollar 1/4 rivet gun for $82 lol. Someone decided that unjamming it and replacing the jaws wasn't worth it I guess...
Given this is on a tight budget, "cheap but effective" is the aim. At the same time, I don't want to waste my time here. Is it worth media blasting the frame, and generally, more cost-effective to rent a unit myself, buy some chinesium from harbor freight/princess auto, or find someone who does mobile blasting? The rust is very light, all surface, no flaking whatsoever.
If I blast it, I intend to go with roll-on coal tar epoxy; ugly, stinky, but damn effective. If not, I'll prep with phosphoric acid and use a moisture-cure-urethane like POR-15.
Thoughts?
Had some fun beadrolling today:
Made a few plates to sandwich the firewall insulation against and use for bulkhead passthroughs. Real happy with how the electrical/air line panel turned out:
Fab'd a new clutch linkage too:
Also got lucky with this find:
Surplus, straight from the Corpus Christi Army Depot; a several thousand dollar 1/4 rivet gun for $82 lol. Someone decided that unjamming it and replacing the jaws wasn't worth it I guess...
arse_sidewards
Contrary to everything
- Joined
- May 19, 2020
- Member Number
- 71
- Messages
- 8,008
If you do sandblast it go straight to a pressure pot. Don’t waste your time with siphon feed stuff.
thatbus
Well-known member
- Joined
- May 1, 2022
- Member Number
- 5129
- Messages
- 156
Well, seems that sandblasting would be prohibitively expensive in having someone come out to do it, and the rental places are the same story, or, they rent out a good pressure pot but don't rent the compressor required to run it... go figure. 
I'll need to buy epoxy paint anyways for this bus and can get a great price on Benjamin Moore V155 epoxy primer which seems to be pretty forgiving far as surface prep goes; designed to work over phosphoric acid surface treatments. Something I do a lot of, and have always had good results with. I would then coat with their V400/410 polyamide epoxy, and do a final coat of something with high UV resistance for the bodywork... probably not necessary for the frame. Eventually I'd fluid film or cosmoline the chassis with RP342. Sound like a good plan?
I'll need to buy epoxy paint anyways for this bus and can get a great price on Benjamin Moore V155 epoxy primer which seems to be pretty forgiving far as surface prep goes; designed to work over phosphoric acid surface treatments. Something I do a lot of, and have always had good results with. I would then coat with their V400/410 polyamide epoxy, and do a final coat of something with high UV resistance for the bodywork... probably not necessary for the frame. Eventually I'd fluid film or cosmoline the chassis with RP342. Sound like a good plan?
arse_sidewards
Contrary to everything
- Joined
- May 19, 2020
- Member Number
- 71
- Messages
- 8,008
For "imperfect" projects like this I use Rustoleum "rusty metal primer" (which I think is just red oxide primer but with something other than lead) for shit like that and it's never let me down. I can't say that about epoxy primers.
I'd treat it and then pressure wash it off if chemical compatibility is a concern.
But if you've used that primer before on a job like this and had good results then it's probably fine.
I'd treat it and then pressure wash it off if chemical compatibility is a concern.
But if you've used that primer before on a job like this and had good results then it's probably fine.
thatbus
Well-known member
- Joined
- May 1, 2022
- Member Number
- 5129
- Messages
- 156
That is actually what I've used on several parts. The transfer case (goes over CARC paint nicely), rear axle, firewall, doghouse, etc.For "imperfect" projects like this I use Rustoleum "rusty metal primer" (which I think is just red oxide primer but with something other than lead) for shit like that and it's never let me down. I can't say that about epoxy primers.
I'd treat it and then pressure wash it off if chemical compatibility is a concern.
But if you've used that primer before on a job like this and had good results then it's probably fine.
Either Rustoleum rusty metal primer or POR15 as a base + Rustoleum Tractor Paint + their tractor paint hardener.
So far it's been great for parts that have sat outside for over a year exposed to the elements, but granted it's not like I've actually driven the vehicle yet... Always hear people touting how great epoxy paints are... while shitting on POR15... while then recommending a virtually identical moisture-cure-urethane. So IDK what to believe.

thatbus
Well-known member
- Joined
- May 1, 2022
- Member Number
- 5129
- Messages
- 156
Figured out my paint situation...
Ended up with Benjamin Moore V155 epoxy primer. It seems extremely forgiving far as prep goes. A good application of phosphoric acid, degreasing, and you'll get a solid coat. I will be topcoating it with a urethane from the same paint system.
Also made a fan shroud for the DT360:

Ended up with Benjamin Moore V155 epoxy primer. It seems extremely forgiving far as prep goes. A good application of phosphoric acid, degreasing, and you'll get a solid coat. I will be topcoating it with a urethane from the same paint system.
Also made a fan shroud for the DT360:
thatbus
Well-known member
- Joined
- May 1, 2022
- Member Number
- 5129
- Messages
- 156
Fan shroud completed, and also used the remaining aluminum for the fuse/relay panel I started working on. Want to get the basic electrical stuff done so it'll be driveable soon and essentially plug and play once I bring everything to the bus' storage site. All of the major wiring harnesses have been finished as well.


Opiebennett
XJ_Ranger
That fan shroud is awesome!
350TacoZilla
Well-known member
I recently bought one of those sand blasters that attach to your pressure washer but I haven't gotten to use it yet so I can't really say if its a good buy or not yet. I bought it after hearing how they are a little quicker and less messy than any of the smaller do it at home sand blasters. My dad has one of the harbor freight roll around ones ( I think it holds like 1 50lb sack of sand at a time) and it works but is pretty slow and goes through sand pretty quick. I also bought corroseal for the same project so again can't vouch for it yet but my thinking was to blast everywhere I could reach with pressure washer and then try to spray the corro seal in hard to reach areas before doing the top coat.
thatbus
Well-known member
- Joined
- May 1, 2022
- Member Number
- 5129
- Messages
- 156
Thanks! Proud of how it turned out. Definitely fun to see my sheetmetal skills coming along... That cheap-ass Princess Auto beadroller is the gift that keeps on giving lol.That fan shroud is awesome!
I recently bought one of those sand blasters that attach to your pressure washer but I haven't gotten to use it yet so I can't really say if its a good buy or not yet. I bought it after hearing how they are a little quicker and less messy than any of the smaller do it at home sand blasters. My dad has one of the harbor freight roll around ones ( I think it holds like 1 50lb sack of sand at a time) and it works but is pretty slow and goes through sand pretty quick. I also bought corroseal for the same project so again can't vouch for it yet but my thinking was to blast everywhere I could reach with pressure washer and then try to spray the corro seal in hard to reach areas before doing the top coat.
I have one of those and ironically, have been thinking about an air compressor blaster instead, or just renting a pressure pot when I need it.
The pressure washer ones do work well for getting rid of heavy debris, but fuck are they ever messy. You don't get a cloud of debris, so the silicosis danger is probably less... but, everything in a 15ft. radius is covered in wet beads of glass or whatever media you're using. This makes it a pain to clean up and reuse, as the media must be dried really well (baked or on a tarp in the sun) otherwise it'll clog the venturi on the blaster attachment. For the longest time it looked like someone dropped glitter on our driveway and the street in front of our house.
Also, because everything gets wet, it'll flash rust, which I find makes it not a great tool for prep work in the way a dry media blaster would be.
I do like it for removing heavy rust, road debris, and taking down to bare metal, then degreasing, then using phosphoric acid though.
thatbus
Well-known member
- Joined
- May 1, 2022
- Member Number
- 5129
- Messages
- 156
Fan shroud installed today. For just measuring the thing on-site and going off of photos, then fabricating it at home... it fit up pretty damn well.
As it is now, the blades sit about 7/8 of the way in at the top, 1/2 of the way in at the bottom. I'll see if I want to keep the protective "shroud" over the top of the fan...
Not pictured: Me playing around with the clutch pedal's lever ratios. Feels great now. Also installed some heater hoses.
With the axle done, only thing left for it, is to add some extra leaves to the pack. Chopped these down with a cut-off wheel, from some new springs that were the wrong size for a friend's build. The spring never exceeded 170 deg. C in the immediate area beside each cut - I figure this is fine?
Current plan is to paint the rest of the frame, then get the front axle in. Once the axle is in, the hydroboost and power steering lines will be run, brake lines run, wiring harnesses I built over winter will be installed, and then the old rear will be swapped with the new rear.
The rear will need to be lifted 6.5" to match the front axle, so the bus sits level. I know on MDT 4x4's they often just add lift block and call it a day. From what I've seen, often a lot more than 6.5 inches... I don't like that for axle wrap reasons though. I would also like air in the rear. I've toyed with the idea of a Freightliner Airliner setup, but that has poor articulation and its single thick spring mounts under the axle, not above like most springs... I've seen people mount them on top, and they eventually crack and fail. Don't want that.
What's the downside to smaller lift blocks, and just slapping some bags in the middle of the leafspring to give the rest of the lift, similar to those "airbag helper" kits? I would retain a (slightly under-sprung) leaf spring suspension if a bag gives out, which I see as a plus. If I dont do this, I would likely fab my own Kelderman-esque "two-stage air ride" that replaces the rear shackles, or just get a International 3800 rear leaf suspension from a bus at work, and save the air ride for later... Thoughts?
Grendel
Iron Sharpens Iron
- Joined
- May 19, 2020
- Member Number
- 297
- Messages
- 3,142
What springs are you using in the front? You probably posted them but now 8 pages of stuff to go through.
I ask, as I have a 70's C50 chassis that originally used funky slipper style springs that need to go.
I am doing rear F550 springs, hangers and shackles (they fit perfectly) but want to keep the front hangers in place.
Thinking 2wd F150 rears, in front.
I ask, as I have a 70's C50 chassis that originally used funky slipper style springs that need to go.
I am doing rear F550 springs, hangers and shackles (they fit perfectly) but want to keep the front hangers in place.
Thinking 2wd F150 rears, in front.
Attachments
thatbus
Well-known member
- Joined
- May 1, 2022
- Member Number
- 5129
- Messages
- 156
What springs are you using in the front? You probably posted them but now 8 pages of stuff to go through.
I ask, as I have a 70's C50 chassis that originally used funky slipper style springs that need to go.
I am doing rear F550 springs, hangers and shackles (they fit perfectly) but want to keep the front hangers in place.
Thinking 2wd F150 rears, in front.
They're 47" chevy springs in the front. Longer would be nicer, but I can't go longer unless the springs are asymmetric. For a number of reasons, it wouldnt be practical to move the front shackle hanger.
The rears are about 56" and 8500lb capacity. They could do with another 1,000-2,000lbs or so.
Grendel
Iron Sharpens Iron
- Joined
- May 19, 2020
- Member Number
- 297
- Messages
- 3,142
The F150 springs I mentioned are 56" long, with a long side and and a short side.They're 47" chevy springs in the front. Longer would be nicer, but I can't go longer unless the springs are asymmetric. For a number of reasons, it wouldnt be practical to move the front shackle hanger.
The rears are about 56" and 8500lb capacity. They could do with another 1,000-2,000lbs or so.

1997 - 2003 Ford F150, F250 under 8500 GVW rear leaf spring, 5(4/1) leaves, 2200 lbs capacity
Product code: 43-1199HD. Springs are for 1997-2003 Ford F150, F250 under 8500 GVW. Order from General Spring for the lowest price available & 1 year warranty.
 www.generalspringkc.com
thatbus
Well-known member
- Joined
- May 1, 2022
- Member Number
- 5129
- Messages
- 156
Axle is in!


Enlisted the help of my dad, and we managed to drop the axle parallel to the bus, then winch it on plywood "skids" sideways underneath the bus and into position. Didn't want to bother with re-arranging the cribbing and rolling it under. Did that last time, wasn't much easier...

This is how it sits with the full weight of the bus, minus whatever I'll add for the interior. Pretty good I think. The only issue is the angle of the draglink.

The draglink maxes out with one more inch of spring travel... obviously way too little. I'll need either a S-curved linkage (easy but not a fan), or a bigger lift block under the steering arm. This would be the best fix I imagine, as the draglink will sit horizontal/parallel to the leaves. I'm thinking I'll get a forged Dana 60 lower kingpin cap (same bolt pattern as the top of the Dana 70's knuckle) and weld on a steel block, then drill holes for the studs, and re-attach the steering arm seen above. Thoughts?
Enlisted the help of my dad, and we managed to drop the axle parallel to the bus, then winch it on plywood "skids" sideways underneath the bus and into position. Didn't want to bother with re-arranging the cribbing and rolling it under. Did that last time, wasn't much easier...
This is how it sits with the full weight of the bus, minus whatever I'll add for the interior. Pretty good I think. The only issue is the angle of the draglink.
The draglink maxes out with one more inch of spring travel... obviously way too little. I'll need either a S-curved linkage (easy but not a fan), or a bigger lift block under the steering arm. This would be the best fix I imagine, as the draglink will sit horizontal/parallel to the leaves. I'm thinking I'll get a forged Dana 60 lower kingpin cap (same bolt pattern as the top of the Dana 70's knuckle) and weld on a steel block, then drill holes for the studs, and re-attach the steering arm seen above. Thoughts?
Last edited:
Curious to see how much bump steer you are going to have with the front mounted shackle and push pull steering... anything you can do to get the drag link long should definitely help. Awesome to see this thing coming together. 
thatbus
Well-known member
- Joined
- May 1, 2022
- Member Number
- 5129
- Messages
- 156
Curious to see how much bump steer you are going to have with the front mounted shackle and push pull steering... anything you can do to get the drag link long should definitely help. Awesome to see this thing coming together.
Thanks man - it's very exciting to see all this hard work materialize in a finished engine, sheetmetal work, an axle under the bus, etc.
Assuming I'm doing this correctly above... I don't think the bump steer should be too bad, assuming with a front shackle the spring still moves in a relatively smooth arc. Took some measurements of everything at ride height yesterday. Trying to match the original draglink angle and length as was originally on the bus, which seemed to have surprisingly good geometry.
If the above is as accurate as I think it is, then the distance between the center of the pitman's DRE taper and the steering arm's DRE taper seems to stay nearly the same throughout the entire arc of the spring's travel. Are the above numbers "good"? I have no reference except intuition here.
(In the pic above, I forgot to account for shackle movement, but the numbers didn't change too much after I figured that in).
thatbus
Well-known member
- Joined
- May 1, 2022
- Member Number
- 5129
- Messages
- 156
Raising the steering arm 3" and shifting it 2.88" forward (therefore lengthening the draglink - the pitman is behind the axle) seems to give me the best geometry/lowest bump steer.
Can anyone see any problems with this design? If not, I'll go ahead with it.
It's basically just a 3" thick steel block with six 1/2" holes and a bore drilled to accept the 1-1/2" diameter of the steering arm's kingpin (blue). The lower (yellow) forged kingpin cap is just from a Dana 60 (my closed knuckle 70 uses these on the top and bottom of the knuckles - same bolt pattern). I plan on welding this to the 3" thick steel block, so I'm not relying only on faying surface friction to prevent twisting. I have some threaded grade 8 studs from the Dana 60's steering block that I'll use for the 4 shorter holes, and grade 8 allthread for the longer, middle 2 holes.

Some of you may recall the machined steel steering arm I had done up for the 60 that was originally going under this bus. Probably like 5 pages back, by now... I could weld that to the 3" steel block above, no need to bolt the original steering arm to this block. Not sure if there is any advantage to that, though. So I wouldn't be relying only on welds to prevent that steering arm from shearing off the block, I'd drill the block and arm for dowel pins. Thoughts?
Can anyone see any problems with this design? If not, I'll go ahead with it.
It's basically just a 3" thick steel block with six 1/2" holes and a bore drilled to accept the 1-1/2" diameter of the steering arm's kingpin (blue). The lower (yellow) forged kingpin cap is just from a Dana 60 (my closed knuckle 70 uses these on the top and bottom of the knuckles - same bolt pattern). I plan on welding this to the 3" thick steel block, so I'm not relying only on faying surface friction to prevent twisting. I have some threaded grade 8 studs from the Dana 60's steering block that I'll use for the 4 shorter holes, and grade 8 allthread for the longer, middle 2 holes.
Some of you may recall the machined steel steering arm I had done up for the 60 that was originally going under this bus. Probably like 5 pages back, by now... I could weld that to the 3" steel block above, no need to bolt the original steering arm to this block. Not sure if there is any advantage to that, though. So I wouldn't be relying only on welds to prevent that steering arm from shearing off the block, I'd drill the block and arm for dowel pins. Thoughts?