What's new

Tire Vulcanizing Thread

bad zuki

Thread De-Railer
Joined
Oct 2, 2023
Member Number
6938
Messages
150
Loc
GWNF
Quick Backstory, I'm 4th Generation Tire guy. I started working for the family business rolling recaps at the age of 14. Re-treaded on and off for the next 10 years working from Tire Patcher to Truck Driver. I've worked with OE manufacture's with patch development and testing.

Rules for Tire patching.
1. While grinding you will get dirty. DO NOT TOUCH any part of the glue or patch area with your Richard Beaters at any time. Period.
2. Put the patch on the inside of the Rim, towards the buggy, after the patch.

I'll be adding to this vocab when I remember more.
1. Tire terms
A-B Rubber: 2 part self vulcanizing rubber. Sold in bulk as a single rope that you mix with raw rubber. BK on top. Industrial on the bottom.
Cement: Normally non self vulcanizing cement. You can get self vulcanizing, but It doesn't make the strongest bond IMHO.
Chamber: Industrail Pressure Cooker (Autoclave)
Extruder: A heated screw gun to melt and force raw rubber down into a repair area. Generally 110v and based on an air drill. Here
Heptane: Tire cleaning/ prep chemical or Store bought. Rubber Prep
Patch: A rubber and Cord lasagna. Different patches are using diffent directions of cord fibers to match Bias and Radial. It is important to use the right patch.
Raw rubber: Any rubber added during repair. Rope rubber or Cushion Gum. (Cushion gum is great to keep something from rubbing!)
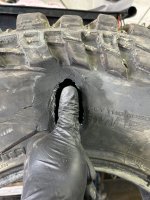
Section Repair: Patch where you remove cords to make room and find the end of the cut cords of the tire.
Stone: Tire buffing stone.
Spotter: A smaller tire press with heater.
Spot Repair: Patch where you do not remove cords. Generally a smaller patch.

2. Rules of Tire patching.
The natural oils on your hands will interfere with the glue. This is why 80% of patches, that I get to fix, have an issue with. Don't touch the underside of the patch or the glue.
The Patch edge must be showing. That ring around the outside of the patch is there to help hold the air seal and is a check to see if it was repaired correctly.
Let the Tire dry 12 hours in a heated enviroment before patching. Remove all water/trash the day before. Tires patch better when hot. If the tire has been sitting in the snow and mud, the water can evaporate out of the rubber pores and effect the chemical reaction. I generally let them set in the sun for a couple of hours. Some people recommend 24 hours, but I think this is overkill.
Store your patching material in a cool dark place. Air conditioned 70 degrees works best. Any heat will start the vulcanizing process on patches and cement.

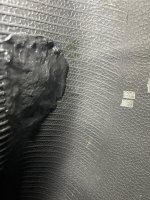
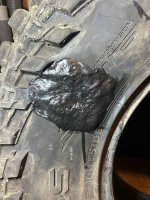
3. Thoughts on Glue Treads and external repairs.: Although never dealing with them. I really like what they have. It looks like a great product and has a practical use for Offroad recovery and LIGHT DUTY use. I don't know what exactly they are using for an adhesive and accelerator, but with my experience in the tire world, the glues will start to cure after the bottles hit 85-90 degrees. If you are using them everyday, like in a manufacturing setting, its fine to let the cure a little bit, but set them in a rig untouched and with a year they will start to degrade (Glue tread says 2 years on their Site ). Their patch is not DOT approved, nor will they sell a DOT option in the future. When we did a spot or section, we would stap OUR Manufacture's DOT brand on it. I bet that thier patch is safe and would pass a DOT, however you can never predict how someone will be applying it in the field.

4. A-B Compound, (aka BK's kit, Self Vulcanizing): A-B compound is absolutely amazing. Its primary use is for tires that are too large to go into our spotter or in the chamber. Think large earth moving equipment. Tires with thick sidewalls that need the stiffest rubber help support the phyical weight of the machine and won't flex. The prep is the same as a normal patch, but you sit there and mix the rubber with an extruder like you would with a 2 part Epoxy. Its recommend that you patch the inside to help make the repair last longer, but isn't required on some tires. A-B compound is like welding 1/4" steel plates on the side of a 1" plate if done incorrectly. The repair is going to break at the welds unless it's supported correctly.

Picture from Great Grandad's original store, circa 1953,

Screenshot 2024-03-27 104634.png


Edit #1 added link to AB compounds
 
Last edited:
5. Tire Patch sizing. If you want to balance and drive your patch on the road, each patch manufacturer makes charts to size the maximum patch size that won’t affect the tires balance. This might seem like such a big deal, but you don’t want to just slap a 1’x1’ patch in everything. You want the right size patch for the right size repair. Too small of a patch, it will rip and too big, the tire won’t flex correctly. I’ve got some old templates that I don’t use, but they are nice for beginners and easy to make out of cardboard.

IMG_1526.jpeg
IMG_1530.jpeg


6. Spotters and presses. I’m very fortunate to have gotten the spotter that I have. They make similar ones from speedway, I’ll edit a link off Mobile. I think a screw type will work just fine. Mine runs off 120v and a 40 psi air bag. In theory, both of these do the exact same thing.

IMG_1524.jpeg
IMG_1525.jpeg


7. How many tires should I need to patch to get into this? That’s up to you. I wouldn’t recommend buying everything I have to patch 2 tires. If you/club needs it, go for it. I give bulk rates if someone brings 3-4. That’s about all I patch in an evening by myself. It sucks turning everything on for 1 tire, it takes the same amount of time in the shop to patch 2-3 as it does 1. I’d try my hardest to find a retread plant close to you. Most of them run remote offices with route drivers that have a 1 week turn around. And most of them won’t charge you much if they can patch it. If they can’t, generally they just give it back free of charge.

8. Hand tools. you don’t need many hand tools, but I recommend getting a few things to just leave on the patching station. 1. A dull ice pick. This is my #1 diagnostic tool. I can tell how big the hole is, I can tell what kind of material the tire is made out of, and I can tell if there is any other hidden holes that might not be shown until you get to grinding. #2 horse shoe pliers, for pulling stuff or plugs out of the tire. You’ll be removing that glue tread, these will do the trick. #3 smaller pliers for grabbing bits of rubber out. #4 a sharp knife. #5. Scissors.
IMG_1570.jpeg


9. PPE. Rubber grinding dust gets literally everywhere and creates a fine dust that will go into your lungs. Wear a respirator! If not, your snot will be black for 2 days. I wear a respirator, old hat to keep the dust out of my hair, ear protection, and a face shield. The stones I use will loose carbide bits and those things land directly in between safety glasses and respirators.
 
10. Specialty tools for hot patching. I use a lower speed air grinder for the stones and a die grinder for the fine stones. All of them have old intertubes strapped on the air line to exhaust the air away from you. It makes them a lot quieter.
IMG_1533.jpeg
IMG_1534.jpeg


After that, I use an extruder, if you found one of these cheap, I’d recommend getting it. It makes A-B a breeze. This one doesn’t have the heater built on, it’s built into the stand. Below is pictured how we used to mix it with raw rubber.

IMG_1572.jpeg
IMG_1560.jpeg


Here are the bits/tools I use. The copper color round and flat stones go from rough to fine with different radiuses and are for use in different tires. You don’t need all of these, but it makes it easy. Also there are some round cutters to take the bulk off and a fine and course wire wheel. The bottom are just different carbides

IMG_1568.jpeg


After that we have the die grinder and assorted stones. These burn the cords back to make a nice finish. The cement doesnt like Kevlar or metal and wants to stick to rubber. Then we have the patch stitcher, this runs all the air out from under the patch after you’ve installed it. I have a thin one for patches and a thick one for raw rubber.

IMG_1569.jpeg


Then you need some raw rubber like the rolls pictured, some cement, tire prep, and assorted collection of patch sizes.

IMG_1567.jpeg
 
Good thread bad zuki. I did this back in my 20s and have forgot most of it. I worked in retread shops till I was 26. It really does not look like much has changed. We used mostly Tech stuff which was pretty much the same as Bandag.
 
Good thread bad zuki.
Thanks!
I worked at the tire place long enough to know that you either start your own tire company or find a better job. :laughing:
Most all of my stuff is 80's Bandag. At one time Grandad was the 2nd Largest Bandag Retreader on the east coast (Supposedly), Alot of it is a good story, but I'll try not to talk about it too much on this thread.
 
Pretty cool deep dive into this topic. Thanks for taking the time to share info.

When I sliced the sidewall of a 39" Red (shocking I know), there were only two options within 2.5 hours of me. Thankfully the patch worked even though the old guy doing the work didn't really want to mess with it. Said the Red was harder to work on than log skidder tires.
 
When I sliced the sidewall of a 39" Red (shocking I know), there were only two options within 2.5 hours of me. Thankfully the patch worked even though the old guy doing the work didn't really want to mess with it. Said the Red was harder to work on than log skidder tires.
Thanks! If you know any truck shops in the local area, go to them and ask who their tire retreader is. Generally they pickup the tires from the truck owners or other tire shops. I would run routes to locations 3-5 hours away. That's pretty standard industry practice.
 
Thanks! If you know any truck shops in the local area, go to them and ask who their tire retreader is. Generally they pickup the tires from the truck owners or other tire shops. I would run routes to locations 3-5 hours away. That's pretty standard industry practice.
Makes sense for sure and will keep that in mind if I ever need that service again. His patch/repair didn't look good, but it holds air and hasn't been an issue so I don't mind one bit.
 
If you find someone to do your vulcanizing, please dismount the rim and clearly mark the sidewall of the tire and the hole. Here is a picture of how we would mark a nail hole repair. On offroad/dirty tires, sometimes its hard for me to find the small pin holes, black sharpies do not work well. We use Tire Crayons. You can get them at Napa or amazon. White is best, but I've got 3 cases of blue to use up.

1.jpg


Finding nail holes and and inperfections would normally be done on an NDT machine, (Non Destruction Testing) and I don't have one.
Here is a video of one in action. Its basically an giant coil that is firing 8000 volts on the inside of the tire to find the holes and ground roller on the other side of the tire.
Bandag NDT Machine

I take the Rotary Gouge (Spinning Knife) and cut the tread back. This is the fastest way to remove rubber. 4 passes and the tread lugs are no more. These do not like to see any metal, so the main use is for the sidewalls and tread.

6.jpg

8.jpg


Next step is to buff the tire down with a grinding attachment. You can remove all of the rubber with the grinder, but it sends alot of rubber dust in the area. These stones don't care what you do to them.

9.jpg

10.jpg


Now going to the inside of the tire to help find the end of the cut and prepair for the patch. There is 1 large hole and 2 smaller holes. Just for beginners, we select the patch sizing mat and get an estimate on the size of patch needed. A general rule of thumb is the width of the patch needs to 3 times the length of the cut. 1" cut. 3x6" wide patch. .5" cut. 1.5"x3" patch. This measure is generally overkill on larger holes. You will figure out what size works best after a while. (see patch sizing charts in previous post)

3.jpg


I didn't have the exact size patch, but had one slightly larger, so I marked the larger patch in a tire crayon. I pre-bend the patch to match the inside of the sidewall. This will make it easier to set in when appling it later. It feels weird to do this, but the patch is designed to flex during road usage. Set the patch aside for now.

4.jpg
 
good am,
so i have a set of iroks, like 8 tires i am gonna use for back ups and burn outs. but one has a sidewall damage, chunk of rubber missing from the sidewall not a hole. its about 2 inch maybe smaller. i can get a pic tonight. my plan is to get the vulcanizing machine off amazon for 100 bucks and give this a whirl.
 
So my wife cut an almost new 37" mickey boss mt and I bought the busted knuckle repair kit to see if I can save the tire. Let me tell you, mixing the part A and B together with my hands took about 25 minutes before it quit sticking to my hands. That part sucked. lol I did this a few days ago so it is fully cured. BUT, I somehow must have got some air trapped in between the 2 layers when I put that stuff on the inside of the tire as there is a small spot, about the size of a nickel maybe, that is kinda spongy. I haven't mounted the tire back on the rim yet as I'm not sure what to do about it now. Half tempted to run it and see what happens... It's only gonna be the spare now with maybe 10 psi in it. What are your thoughts bad zuki ?
 

Attachments

  • IMG_1072.jpg
    IMG_1072.jpg
    764.1 KB · Views: 1
  • IMG_1071.jpg
    IMG_1071.jpg
    762.9 KB · Views: 1
  • IMG_1070.jpg
    IMG_1070.jpg
    957.1 KB · Views: 1
  • IMG_1068.jpg
    IMG_1068.jpg
    685.6 KB · Views: 1
  • IMG_1067.jpg
    IMG_1067.jpg
    754.2 KB · Views: 1
This is great write-up. Thanks for doing this.
We have a local guy that does our offroad tires (he rides too) and we are lucky to have him. I appreciate the links to supplies and have bookmarked them in case I need to figure out how to do this if the local guy stops/retires/whatever.
 
So my wife cut an almost new 37" mickey boss mt and I bought the busted knuckle repair kit to see if I can save the tire. Let me tell you, mixing the part A and B together with my hands took about 25 minutes before it quit sticking to my hands. That part sucked. lol I did this a few days ago so it is fully cured. BUT, I somehow must have got some air trapped in between the 2 layers when I put that stuff on the inside of the tire as there is a small spot, about the size of a nickel maybe, that is kinda spongy. I haven't mounted the tire back on the rim yet as I'm not sure what to do about it now. Half tempted to run it and see what happens... It's only gonna be the spare now with maybe 10 psi in it. What are your thoughts bad zuki ?

Thank you bad zuki for taking the time to put this all together, it is something I've always wanted to learn/try

89yjon I recently helped a buddy do a 37" cooper with the bk compound. My first try was a failure, got in a hurry mixing and ended up with air pockets. 2nd try I got the roller tool bad zuki shows here

IMG_1569.jpeg


My 2nd try looked decent, held air but seemed soft,

438270867_1107750823849698_510630729680789567_n.jpg

438209125_1128958421566178_7992690126555000563_n.jpg


He intended to use it as a spare but I told him to run it while wheeling (off road only) as a test. It lasted 3 weekend trips before it took a direct hit on a branch root and failed. As mentioned the compound alone patch even done correctly seemed too soft. I really think an interior patch combined with the compound would be the way to go. Also curious to hear bad zuki's input
 
Mornin,
Feel free to post pictures up.

That part sucked. lol
:lmao: Been there, done that.
I did this a few days ago so it is fully cured. BUT, I somehow must have got some air trapped in between the 2 layers when I put that stuff on the inside of the tire as there is a small spot, about the size of a nickel maybe, that is kinda spongy. I haven't mounted the tire back on the rim yet as I'm not sure what to do about it now. Half tempted to run it and see what happens... It's only gonna be the spare now with maybe 10 psi in it. What are your thoughts bad zuki ?

1. AB compound likes to be mixed and applied at one time. You can do it in 2 sections, but It needs to setup, than re-vulcanize again.
2. AB compound still needs a patch, If the sidewall is stiff enough like a bias ply or 10+ ply, you can get away with not patching it, but I still recommend patching it, since the patch acts as additional cords and support to keep stress off the AB compound. The compound is only as strong as the cords/rubber around it. Kinda like a weld.
3. My ass got sidetracked and forgot about this thread. I need to add the inside process.......

89yjon I recently helped a buddy do a 37" cooper with the bk compound. My first try was a failure, got in a hurry mixing and ended up with air pockets. 2nd try I got the roller tool bad zuki shows here

My 2nd try looked decent, held air but seemed soft,

He intended to use it as a spare but I told him to run it while wheeling (off road only) as a test. It lasted 3 weekend trips before it took a direct hit on a branch root and failed. As mentioned the compound alone patch even done correctly seemed too soft. I really think an interior patch combined with the compound would be the way to go. Also curious to hear bad zuki's input
Ill go edit the first post. I HIGHLY recommend that you put a patched tire on the inside of the rim. The outside sidewalls get over 90% of the damage to an offroad tire, the rest is running over something sharp in the tread.

One thing to mention on your patch job, The outside grinding looks good, but you need to remove all of the rubber and cords to cut out any future issues. Think about Cast Iron cracks. Same thing.

438270867_1107750823849698_510630729680789567_n.jpg
 
One thing to mention on your patch job, The outside grinding looks good, but you need to remove all of the rubber and cords to cut out any future issues. Think about Cast Iron cracks. Same thing.

Noted, thank you.
 
I used the marker to highlight the Inside patching area.
11.jpg


Since this cut was touching, we are just going to use a die grinder to clean out the cords.

12.jpg


After that I started Buffing the inside of the patch location using the patch size as a template. Always go bigger here. We will use that area later.
I like to start with a Large Fine cut Stone wheel on the inside to test the inside rubber depth and casing build. This practice comes with time spent on different Tires. Maxxis and Interco you can get away with a light chainsawing, where BFG and Toyos take a finer touch.

13.jpg

If you look closely to the left of the cut, you can start to see the cords on the inside of the tire. This means back off.

14.jpg


After that, I take some rubber buff and apply a light coating, let it soak and take the fine wire wheel and brush the patch surface, removing the residue. DO NOT apply too much glue, This will cause issues with the vulcanizing process. Rub it in until its flush and doesn't shimmer like the bottom

15.jpg


Vaccum out the bits and grab your favorite flavor of baby batter and apply to every surface you want vulcanized.

16.jpg


DO NOT apply too much glue, This will cause issues with the vulcanizing process. Rub it in until its flush and doesn't shimmer like the bottom of this picture. I Did this for demonstraion then removed the excess.

18.jpg


Allow the glue to set up for about 15-30 minutes, This will depend on garage temperurature. I buff a bigger area as a test patch for the glue. After the glue is set up. Ill test the test area and it will stick to your finger like a light super glue. Its important to never tough the patch or glue with your hand from this point out. This is the easiest way to get the patch ready. Basically you will have 2 handles to lower the patch on the glue. Don't worry about that cut line in the patch, it is normal.

19.jpg
20.jpg
 
Install patch and roll out all the bubbles. Make sure that the glue is touching all areas of the inside of the cut as well. The patches don't like to have extra glue added to them. I purposefully left the tread area un-buffed. The rubber won't stick there at all and will make cleanup a breeze.

23.jpg


25.jpg


Then I use raw rubber in the extruder. I normally cut about 8-12" off in strips just to make it managable. Fill the hole first then fill out from there. The rubber will cure to itself so no extra glue is required.

24.jpg
26.jpg


Next we take the handle of the stitcher and smooth out the large section of rubber. Stitching is required for AB to release any gas from mixing, but not required with the Spotter.

Preheat your spotting machine prior to putting the tire in, This will cut your cooking time in half or more. Slap the tire in and cook for an hour or so. plus or minus depending on air temp.

28.jpg


29.jpg
30.jpg


Thank you all for coming to my Tedx talk. :flipoff2:
 

Attachments

  • 27.jpg
    27.jpg
    704.4 KB · Views: 1
Thanks for the tip! I will probably take that tire to my tire guy and have him grind out a little on the inside of the tire and put a patch on it. When I showed him the tire before I tried to fix it he was concerned about a sidewall patch being too stiff when aired down. This is only my 2nd sidewall cut wheeling in over 25 years. I "knock on rubber" have never hurt my 40' nitto trail graps and I'm on my second set of them.
 
Yes, this model has the heater in the base. Its a nail hole repair extruder. Some come with the heater built in, but they are a lot pricier.

Here is a link to some. Ill try and find a cheaper one.

You don't need an extruder, just layer raw rubber onto the cement. The spotter forces it into the hole. It will take a few more minutes to cook it if the raw rubber isn't heated before you put it in the machine.
 
so this i what i was looking at for a machine nothing fancy and if i can just lay the raw rubber in a clean up hole and squeeze / melt awesome for sure

1713456940373.png
 
Clean and glued, like this picture. But You will might have to layer it. Buff, glue, vulcanize, buff, glue vulcanize etc.. to get the desired height.. Id do some test patches with a junk tire. You don't want the spotter to be too hot and burn the rubber, or too cold that it will take a long time to cook.

I read the ad for that spotter, It says the maximum size of vulcanizing is 118mm (3.5") Mine is like 6x9 or something and it can do around a 8"x12" patch, but that takes about 2 hours to do. I wouldn't recommend going over a 4"x6" patch in that press. Mine is a 120v heater. Nothing crazy.
 
there is a semi local guy here that i would use if i needed a huge one done. i will get that pic tonight and put a tape measure on it to make sure i am not in over my head. :beer:
 
so i cleaned the bead lock out last night and i feel like it almost stopped the leak completely. but i still think there is a seeper.

how do you repair the bead? grind it out and rebuild it. or deal with it since its a off road tire?
and the gouges in the sidewall like great candidates to either try the A B stuff or you actually melting rubber. hmmmm
 
Those weld on beadlocks always leak. I quit messing other peoples beadlocks years ago because they leak out here and there.
If you can pull the ring off and look at the bead itself, I doubt the tire is cut. If it is. take all the rings off an grind down that edge.

Id buy a tub of this and apply it when you put it back on.

71KVDY2kYwL._AC_SL1500_.jpg


Bead repair sucks in the spotter. It can be done, but its a pain. I just threw out a 37 because It was too close to the bead to patch.
 
Top Back Refresh