What's new

Lifted TDI Volkswagen Split Window Camper Bus Build

zerobalance

Well-known member
Joined
Sep 15, 2020
Member Number
2874
Messages
90
Loc
Ohio, the middle part of it
Since this section is getting so VW heavy, I figure I will post some of mine up. I had a thread on this previously, but deleted it since it's going a different direction now. Since I'm a serial project starter, I'll be working on this in tandem with Buford.

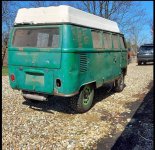
The backstory, we pulled some VW busses out of the woods in MN in 2014. The rest got sold/restored, but this poor thing was destined to become a parts bus because the roof was wasted. I decided to keep it and do something with it, so it sat around my place until 2020.


2053194.jpg

2053193.jpg


Covid was going on so I decided to swap a 2.0 engine out of a Jetta into it, and lift it. I ripped out the stock transmission, and modified the rear suspension to use a CV joint 3 rib transaxle from a 71 bus, and stuck it all together, with a little wiring magic, it was moving under it's own power for the first time since 82.

2097559.jpg


As I said, the roof was toasty. Luckily, while on a trip, we were eating lunch in Louisville KY, and the guy next to us was a VW guy. He had a Sportsmobile top off a later bus on the 3rd floor of his hardware store next door, so I ended up with that, VW stuff has a way of finding you when you least expect it.
25550554_10155855745358267_7816663989809520014_n.jpg

2085389.jpg


317079051_10159962546383267_4849415331903305843_n.jpg


Then I got stupid busy with my shop and it kinda just sat. The shop was full so I shoved it outside, which was fortunate, because the building burned to the ground about 2 weeks later.

Cool pic of it in the snow.
317336096_10159962546798267_7092489199877747057_n.jpg
 

Attachments

  • 317079051_10159962546383267_4849415331903305843_n.jpg
    317079051_10159962546383267_4849415331903305843_n.jpg
    229.9 KB · Views: 8
Last edited:
Sooo....after I got a new building up. I drug it back in.
317067044_10159962547043267_2674469693539829672_n.jpg


I have been thinkign more about the direction I want to take with this, and I kinda want to be able to drive it cross country. I had already been wanting to put a TDI diesel in it, and had managed to accumulate 3 of them. To use the 4 speed bus transmission, I would have to dump a bunch into regearing, and still only have 4 gears and a 80 year old design. I decided to go with a modern transmission. I really wanted to make it all wheel drive, but that started getting overly complex, so for now I'll just do a transverse setup.

It's been done before, one fellow put the whole front end from a golf under his bus, which looked a bit hack. Another used stock bus trailing arms and make a very complex panhard setup. Stock bus suspension won't work, as the trailing arms run right where the engine will be sitting. I decided to model it out, and decide what to do. I'm leaning toward using Audi TT rear knuckles, and fabbing control arms to fit them.

Started by mating a GTI 6 speed to an ALH TDI. I'll eventually do to a common rail engine, but for now, the ALH is easy. The GTI transmission gearing is almost perfect to mate to 30" tires.
20231205_110815.jpg


And a quick model in Fusion. The disc represent the axle cups. I'll eventually model a complete engine and transaxle.

2023-12-06.png
 
Last edited:
I sat around and brainstormed, moved reference points, measured all kinds of parts I have around, sat around some more and came up with some goals.
1) No custom moving parts. i.e. axles, wheel bearings, etc. I want wear items to be off the shelf available.
2) Be somewhat reversible. I doubt this bus will be returned to stock, but just in case, I'd like to keep the main torsion tube in place. This might not be feasible, but I'm keeping it in mind.
3) Be easy to service. I'm too old to be contorting myself into the side of an engine compartment to add oil, and want easy accessibility for major repairs like clutches.

With all that in mind, I decided to make basically a complete "module" of sorts to completely contain the engine, transmission, and rear suspension. The idea being to unbolt the entire rear subframe and remove everything as one unit for service, also because the stamped rear "frame" of the bus is not up to the task of supporting all the suspension and drivetrain parts. Also, the "frame" interferes with exactly where the end of the engine needs to sit. In order to have a somewhat normal CV axle on the left side, the engine needs to be shifted pretty far right.

This is a rough approximation of where it will sit. This allows use a pretty common Audi TT Right side CV shaft, and I think I can get it to the point that they are equal length, so I can carry one spare to cover both sides. My next task is to get a TT rear suspension in the shop, and start measuring it so I can draw the "module" and figure out how the hell the suspension links will all fit. In this position, I have a very reasonable 13 degrees of axle angle at ride height. The tires in the model are about 1.5" wider than the ones I am using so more space is available than shown.

2023-12-08 (1).png
2023-12-08.png
 
Yesterday I went out back to my Audi parts farm and pulled out a crappy rear suspension from an all wheel drive TT.

20231208_145901.jpg
20231208_151534.jpg


And pulled it apart.

20231209_044935.jpg


I'm not great with fusion yet, so trying to spend time on it every day getting some skills. I've also been experimenting with photogrammetry. I don't have the extra scratch for a 3d scanner, so free app it is. Pulling this into fusion a mesh and then tracing it out to get my part.


Since I had everything apart, and I didn't feel like spending hours modeling it out, I figured I'd set it all together. With the arms forward, it is painfully obvious this won't work. The spring will hit the block and there is no place for the control arms.

20231209_122842.jpg


I scratched my head for a bit, considered dragging it all out to the junk pile, and in general was discouraged, until I thought, "Hey dumbass" and flipped them side to side.
20231209_123703.jpg


Perfect. There is plenty of room behind the engine in the bus to mount them, and I think I can make springs work. The width is spot on for the bus WMS, using a R32 short axle on the left and a GTI ( I think, the part number is scraped off) short axle on the right. There is plenty of room for control arms, and I think the radiator and fuel tank will cram back here.
 
It would be even cooler if you left the cradle whole and hooked up the DS for 4X dual axle action.
 
  • Like
Reactions: DMG
Edit, now you need the back half of another bus.....
 
I'm just trying to see what you're doing here.

If you're going to run a leading link in the back you'll have extra squat under acceleration, but the big one is it jacking under braking.
If you're going to run the engine and transaxle behind the trailing links then everything rotates the wrong way.
 
I'm just trying to see what you're doing here.

If you're going to run a leading link in the back you'll have extra squat under acceleration, but the big one is it jacking under braking.
If you're going to run the engine and transaxle behind the trailing links then everything rotates the wrong way.
I have been considering that. The control arm links should help, and they are set up for shocks on the rear (now front) end. It's something to consider for sure and I'll cycle it all virtually before I commit to it.

Edit, further research does show some leading arm designs, even OEM on the citreon 2CV. It seems like the triangulated upper links will help with dive. For sure a good point, and one that I need figure out.
 
Last edited:
Well...here we go. I figured there was no time like the present, so onto the lift it went.
20231210_134629.jpg


And out came the 2.0 Jetta engine and 3 rib bus transmission
20231210_151341.jpg

Rolled the TDI in to see what was up..

20231210_155343.jpg


And here we go....
20231210_162058.jpg


Off with the junk.

20231210_163106.jpg


Trying again, it became painfully obvious that there was no way the torsion tube could stay.
20231210_163453.jpg


Which in hindsight is for the better. I have a bunch of .25 wall 2x3 tube that I can use to make a new crossmember to attach everything to. So out came the torsion tube.
20231210_164522.jpg


And another test fit. Just need to trim the front wall up a bit for clear the front of the engine. Perfect.

20231210_164809.jpg


Now I just need to dig out the rectangular tube, weld it in place and set to building a rear subframe. Since I am not so sure about the leading arm suspension, I went back to my parts pile and pulled out a rear suspension from a Mk7 Golf R. These spindles look pretty easy to adapt to a custom suspension setup using a more traditional trailing arm.
20231210_172337.jpg

20231210_172354.jpg
 
Back at it for a bit today.

Started by stripping apart the Golf R rear suspension to get the spindles.
20231211_123455.jpg
Test fit in the Rabbit wheel I have the 30" tire on.
20231211_124032.jpg


I used to have a table to mount engines to for this sort of thing, but it got killed when my shop burned, so here we are...

20231211_143132.jpg


And some more chopping.
20231211_143136.jpg


Roll it on in..
20231211_143516.jpg


Then I played musical axles to get the right combo that works out of the 40 axles I have up in the rack.
20231211_145858.jpg


Test fit tires, pretty perfect. It's sitting 6" taller at the beltline than my double cab, and has 14" clearance under the engine.

20231211_145734.jpg
20231211_174042.jpg


I'm pretty happy with where everything fits. I'll stare at it a bit more tomorrow and then start building a subframe to hold the engine in place. I think I'll probably build a complete skidplate with tabs to mount the lateral control arms, and use a traditional trailing arm from the front,
 
Time marches on...small update. I try to do one or two things on all of my projects on days I have to do actual work, to at least move them along a bit.

On Wednesday, I ran over to my brother's to use the tire machine and swap one of the 30" tires to a 5x112 wheel so I could mount both up and measure better.
20231212_173343.jpg


This morning I got up early and built a couple of tables. I cut the parts for these on my CNC like 14 months ago and they have been laying in the corner, so I finally welded them up.


20231214_105805.jpg


I need my small trailer tomorrow, so I figured I should haul the beetle this engine came from into scrap. About the time I hooked it up to the truck, I remembered that I hadn't pulled the throttle pedal.....crap...of course the door won't open because of the trailer fenders. Everything is a pain, luckily I have many tools....also, scrap went up some and I got $200 for this turd...

20231214_123430.jpg

Pedal retrieved
20231214_124147.jpg


I have been contemplating how to attach the drivetrain to the bus. I had this piece of 3/16" wall 2x3 laying around from a project that got burned up in my shop fire (tube was not in the barn).
20231214_160517.jpg


I figured the best thing to do was to trim the "framerails" back more, and attach the 2x3 crossmember to an existing crossmember that is stitch welded to the floor structure, and take it out to the pinchwelds at the rocker, so I can tie a rock rail to it, and take that forward and tie into the front frame. I also plan to plate the stamped frame where it meets the new crossmember to give plenty of surface area to weld to. Hopefully this stiffens it up substantially from the giant hole I'm cutting in the roof.
20231214_165424.jpg

By some stroke of luck, the existing 2x3 was exactly the correct width.

20231214_171632.jpg


20231214_171545.jpg


Tomorrow I'll stare at it some more, then probably tack it in place so I can figure out how the hell to build the engine mounts and suspension members.
 
Plodding on bit by bit. I tacked the cross member up and reset the engine in it's final position.
20231215_144306.jpg

Then countersunk and welded some captive nuts in the 2x3 tube and bolted it to the passenger side engine mount.
20231215_153836.jpg

And set everything in place with a few tacks. This is far from the finished product, and I'm going to have to stew quite a bit over changes to it, but at least I have all the placement worked out. I'll tack up the other side tomorrow, then figure out the trailing arm mount placement. I also am not in love with the motor mount fastener arrangement, so that's going to be changed. The rail does follow the wheel tub nicely, and will be extended out to the back of the bus, so I can tie the body structure all back into it, which will keep it all quite stout.
20231215_163359.jpg
 
Went out this morning and looked at how to make the suspension work. The move seems to be flipping the spindles from side to side and using the OEM arms with redrilled mount location, if they bend I can build something with more beef, but these fit pretty well and already exist. This is at ride height.
20231216_074903.jpg

And full bump. about 5" of up travel, which is more than enough for a bus, the OEM might have 2 or 3 inches.

20231216_074907.jpg


I'll figure out links and mounts next, then pull it all back out and make it pretty on the bench, it probably would have been better to draw this all out, but my brain doesn't always work that way I guess. I need to figure out the skid plate situation now, since the lower arms and lower engine mount will connect to it.
 
Trucking right along. A fews a days worth of an hour or so a day compiled.
Pulled the subframe back out and jigged it up on the welding table. I love having the ability to make these squares, whenever I'm cutting 10ga I'll sneak parts in where ever they nest in the scrap, doesn't make me feel bad to tack stuff to them, modify them, whatever. I'm also glad I made two small tables, over one big one, the modular setup is so much more versatile, I just bolted them together and set.
20231217_132321.jpg
20231217_132327.jpg
20231217_154728.jpg

All squared up and tacked together.

I did not like the tacked in nuts on the engine mount, so I redid that section a bit cleaner. Cranked up the baby plasma cutter and made a thing.

20231218_135010.jpg


And made it not straight
20231218_135842.jpg


20231218_140109.jpg

Welded some captive nuts on the bottom, and frenched it into the rail. There are two sets of holes in case I switch to a different style mount. I think I'll probably stick with the 2012 style, but maybe things will change.

20231218_144017.jpg


20231218_144030.jpg


Then I moved to the trans mount. It is offset to the rear of the driver side, and I scratched my head for a minute to figure out how to measure it accurately, then I remembered I had a frickin laser
20231218_145604.jpg


So I sat down and drew a mount for the other side. My dumbass cut the wrong plate for the top though, and I'm out of 3/16" drops in the shop, and it's snowing and 45mph winds, so I will wait to go to my pile out side and hunt up some more. Here's a sneak peak tho...
20231218_175415.jpg


Onward tomorrow I guess
 
Getting close to having this all one unit...

I went out early this morning and scrounged enough plate to finish the transmission mount, I almost tacked it on, then thought better of it. Instead I decided I was tired of looking at the crappy miter frame rails, so I fixed that.

20231219_062348.jpg
20231219_062352.jpg
20231219_062849.jpg

Then I figured I should go fishing for some more raw material before it gets warms and super muddy...off to the boneyard, I bought this drum lifter thing at an auction 8 years ago for $3 just to get a shackle that was on it, figured it's time has come.
20231219_090817.jpg
20231219_091139.jpg

Remember how I was ready to tack the trans mount, in went the drivetrain, I figured it was smarter to square everything up completely in case I had screwed something up.

20231219_111835.jpg

Trans mount fit perfectly.
20231219_133308.jpg


Pretty happy with how everything sits in here. There is plenty of room up front. I have tried to plan a few steps ahead in case this thing ends up with some other engine configuration down the road.
20231219_133340.jpg


And onto figuring out the suspension. I'm not super into this spindle setup, I have been rolling over the prospect of fabbing a trailing arm, and control arms, but that is going against my stated goal of off the shelf parts. I need to stare at this stuff, and a pile of other stuff, then make up my mind.
20231219_163052.jpg


One of my big issues is the spring setup. I had thought about doing a cantilever, but that's over complicating something I want simple as a hammer. The room just isn't there to fit a coilover in between everything using these spindles, and I'm not super sure they will handle the load directly on the spindle ears. Something else to lay awake all night and think about, as if I didn't have enough existential crises to deal with.
20231219_163139.jpg
 
1/4 elliptical leaf spring? Hard mount above the pivot for the trailing arm, with a shackle/link to the top of the spindle?
That thought had actually crossed my mind, and it would probably work well, aside from the lack of space on the spindle to mount a leaf. I wasn't super into the aluminum spindles and how they mounted, so I switched them out for a full cast steel TT arm this morning, which simplified things a bunch. It pushes the wheel out about an inch more, but gains me a good coil mount on the arm and everything is built into it. These were my original plan, but didn't work with he shorter axle I had thought I needed to fit under the bus.
20231220_065650.jpg

20231220_065235.jpg
 
So, as I posted above. I switched back to Audi TT arms. The advantages to this type are they are stout as hell, all one piece trailing arm, and already have a provision for a coil spring. First I cut some mount plates.
20231221_060514.jpg


And tacked them in
20231220_161259.jpg

Finished welding out all the stuff on top, and figured it was time to stab the subframe into the bus. First I removed some more body to accommodate. I could have cut less but this stuff was all rusted out anyhow.
20231221_120507.jpg


I very quickly figured out there is absolutely nothing straight or square on this rusty, 60 year old bus. I tried squaring off the floor members, but they are all out of wack. I ended up squaring off the front beam, since I guess the rest of the body can be out of wack if the front and rear wheels line up. This laser line straight is after about 2 hours of tweaking, ratchet strapping, clamping, and floor jacking the body around
20231221_114918.jpg


Finally satisfied it was as straight as my abilities allow, I tacked up some plates to the wheel wells and the crossmember it's sitting on.
20231221_135422.jpg
20231221_143127.jpg


Tomorrow I'll measure about 23 more times, and if I'm still happy it's mostly square, I will start plating everything out and welding it solid.
 
I'll be back on it this weekend. Christmas kicked my ass, all the running around and what not. I'm building new desks for my kids right now, hope to have them finished up tomorrow and back to building this dumb bus
 
I'm still alive. Had some paying shop work and just life in general. Just finished a 1.8 turbo swap on a MK1 cabby for a customer, so that reloaded my play money cannon.
20240414_182417.jpg


My Buford truck is where my focus is currently, as I have a hard out on it. Also, I'm supposed to have a pool installed at our house by memorial day, so my only shop time is pretty much 4am to 8am before everyone else is up.

That aside. I ran across a guy who figured out what I couldn't, he doesn't have a build thread anywhere or I would link for credit, but he is obviously much smarter than I am.
FB_IMG_1714091812097.jpg


It's rear engine, all toyota stuff, retubed axles, and flipped diffs to get direction correct. I had thought about using a traditional t case, but it never dawned on me to retube and offset the rear diff for engine clearance. I also happen to have a pair of yota axles siting around, so I have a lot to learn about swapping stuff around. Stay with me......
 
Top Back Refresh