What's new

Juggy build

tj-builder

Member
Joined
Mar 13, 2022
Member Number
4926
Messages
18
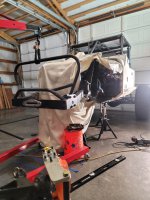
2000 TJ Wrangler build

Documenting build progress, and hoping to get some help and advice from more seasoned builders.

basic specs:
  • 4.0L 6cyl (stock engine)
  • 4.3 twinstick atlas
  • left and right rear cutting breaks
  • 110" wb
  • 40" K-spec trail grapplers
  • 16" ORIs on all 4 corners
  • shaved 14b rear
  • kingpin dana60 front
  • dove tailed to CJ tailgate

2022 trail hero on nasty half
sand-hollow-flex.jpeg


Screen Shot 2022-10-10 at 7.30.59 AM.png


Current work:

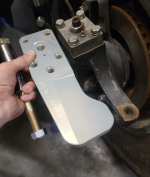
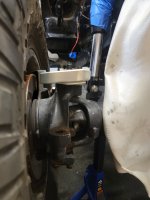
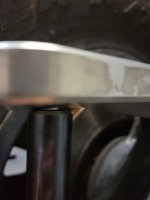
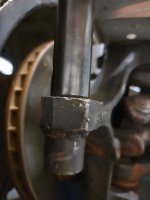
Began tear down on front end, in preparation for:
  • front half, tubed front end
  • ~1" stretch of front axle
  • setup double ended ram

Screen Shot 2022-10-12 at 9.21.13 AM.png
 
Last edited:
More on the front half:
Current thought is to cut off the frame right below the strut towers. Due to how the current frame is plated, kits such as the motobilt front half won't work (the frame is thicker so the sleeves won't fit over without a lot of modification.

Currently planning on bending and fabricated my own tubed front end with 1.75" .188 DOM

Hoping to achieve something similar as what wide open designs did for this TJ build:

Screen Shot 2022-10-13 at 9.06.14 AM.png

  • planning on putting a compact winch in the front, and cut the bottom of the grill to shove it as far back as possible
  • trim ~3 - 4" off bottom of grill for front half
  • grill hoop, which is connected by 1.75" .188 tube, that connects back down to the sliders/frame
  • main tubes all made with 1.75" .188
  • purchased hood TJ RAM AIR STYLE HIGHLINE HOOD WITH FENDERS
  • purchased high steer arms ALUMINUM Artec Industries Ultimate 60 High Steer Arms - Pair to attach to my kingpin knuckles, and plan to connect double sheer as high as I can
  • full hydro mount constructed with 1.75 .25, with 4 clamps onto a 8", 2.5" PSC double ended ram
  • strut towers that connect both across the hood with a removable bar, but also to the tubed fender flates
  • looking to move strut towers forward a bit to work better with a front stretch, and leave open the possibility for up to a 3" stretch in the future.

What i'm trying to figure out:
  • What bushing should I buy to construct new replacement motor mounts?
  • Am I able to easily shift back the engine? Goal to make more room for radiator, fan and shroud and trans cooler to let me pull the winch back further into the grill
  • What radiator should I buy? is 4" shorter too short?
  • whether I should move my PSC reservoir to make more room for the strut towers
 
Last edited:
What i'm trying to figure out:
  • What bushing should I buy to construct new replacement motor mounts?
  • Am I able to easily shift back the engine? Goal to make more room for radiator, fan and shroud and trans cooler to let me pull the winch back further into the grill
  • What radiator should I buy? is 4" shorter too short?
  • whether I should move my PSC reservoir to make more room for the strut towers

I built an LJ for a buddy of mine similar to what you have in mind.....

- I used Ruff Stuff poly bushings for the motor mounts.

-Don't bother to try and move the engine, it's not going back far enough to even be worth the hassle. I did use a 59" fiberglass hood and grill similar to the Jimmy's 4x4 parts and cut 1" out of the back of the hood so I could shorten the nose for winch clearance. I used a dual pass radiator I found online that fit my size needs, ordered a custom fan shroud for it, used a PSC heat sink style P/S cooler mounted in the grill shell towards the top and used a fluid cooler with shroud/fan combo for the trans cooler and mounted it off the tube work in front of the passenger side fire wall.

-To keep it simple and give me the clearance I needed to have a 12" belly height at full bump on 42" PBR's all I had to do was cut the stock frame off directly in front of the motor mount that was the furthest forward, cap the ends with 3/16 box tubing cut in half and then ran a single 1.75×.188 wall "frame rail" forward that was butt welded and gusseted to the caps I made for the frame. Granted, I built this thing to be a buggy disguised as a "street legal" Jeep so it has an extensive cage/chassis that runs from the tip of the front bumper back with at least 14 points of contact along the way, but I never had an issue with the single tube frame rail. In my opinion the double tube frame rail thing is a waste of time and clearance, plus it looks cheezyish. I notched and plated the insides of the upward bends of the frame for lower link clearance, and also mounted the engine off tubing so i had upper link clearance but other than that nothing else was in the way. At full bump the bottom of the harmonic balancer was below the centerline of the axle tube for reference. :smokin:

I built this thing for him close to 10yrs ago and lost a ton of build pictures but here are a few of the ones I still have kicking around to give you some ideas...

20141125_221846_zpsdhbmssfl.jpg

20141228_024619_zpsvohpy7xi.jpg

20150404_190552_zpsvxljarxc.jpg
20151129_105607_zpsa2lrsxbo.jpg
20160512_233423_zpswq0whhlz.jpg
 
I built an LJ for a buddy of mine similar to what you have in mind.....

- I used Ruff Stuff poly bushings for the motor mounts.

-Don't bother to try and move the engine, it's not going back far enough to even be worth the hassle. I did use a 59" fiberglass hood and grill similar to the Jimmy's 4x4 parts and cut 1" out of the back of the hood so I could shorten the nose for winch clearance. I used a dual pass radiator I found online that fit my size needs, ordered a custom fan shroud for it, used a PSC heat sink style P/S cooler mounted in the grill shell towards the top and used a fluid cooler with shroud/fan combo for the trans cooler and mounted it off the tube work in front of the passenger side fire wall.


20150404_190552_zpsvxljarxc.jpg
Damn..... that tj looks sexy right thur. :smokin:

I second the ruffstuff or Barnes poly mounts. Keep it simple.

I also second not trying to move the engine back. See included pic of extensive firewall/ trans tunnel modification required with hatches to access rear of engine. Its what i wanted, but was a pile of work. 17 ish pieces to patch it back in.
20220930_123544.jpg


I also wouldn't bother with the double tube. Single it and tie it into your cage. Good luck with your build.
Thanks for the feedback!

I'm sold on not moving the engine. I've gone ahead and purchased the ruff stuff bushings (Inner Sleeve Length and Bolt Size: 3-3/16" Long x 1/2" ID).

I plan on not doing the 'double tube' design, but I'm not sure how to tie it into the rest of the cage without looking like an exo-caged yota. but would love to tie it into the rest of the cage if there is a clean way to do so.
 
I built an LJ for a buddy of mine similar to what you have in mind.....

- I used Ruff Stuff poly bushings for the motor mounts.

-Don't bother to try and move the engine, it's not going back far enough to even be worth the hassle. I did use a 59" fiberglass hood and grill similar to the Jimmy's 4x4 parts and cut 1" out of the back of the hood so I could shorten the nose for winch clearance. I used a dual pass radiator I found online that fit my size needs, ordered a custom fan shroud for it, used a PSC heat sink style P/S cooler mounted in the grill shell towards the top and used a fluid cooler with shroud/fan combo for the trans cooler and mounted it off the tube work in front of the passenger side fire wall.

-To keep it simple and give me the clearance I needed to have a 12" belly height at full bump on 42" PBR's all I had to do was cut the stock frame off directly in front of the motor mount that was the furthest forward, cap the ends with 3/16 box tubing cut in half and then ran a single 1.75×.188 wall "frame rail" forward that was butt welded and gusseted to the caps I made for the frame. Granted, I built this thing to be a buggy disguised as a "street legal" Jeep so it has an extensive cage/chassis that runs from the tip of the front bumper back with at least 14 points of contact along the way, but I never had an issue with the single tube frame rail. In my opinion the double tube frame rail thing is a waste of time and clearance, plus it looks cheezyish. I notched and plated the insides of the upward bends of the frame for lower link clearance, and also mounted the engine off tubing so i had upper link clearance but other than that nothing else was in the way. At full bump the bottom of the harmonic balancer was below the centerline of the axle tube for reference. :smokin:

I built this thing for him close to 10yrs ago and lost a ton of build pictures but here are a few of the ones I still have kicking around to give you some ideas...

20141125_221846_zpsdhbmssfl.jpg

20141228_024619_zpsvohpy7xi.jpg

20150404_190552_zpsvxljarxc.jpg
20151129_105607_zpsa2lrsxbo.jpg
20160512_233423_zpswq0whhlz.jpg
When you cut the hood, was it easy to still have room for the radiator, shroud and fan? Did the 42s hit the fender-tubes with all that uptravel? or is this hood also narrowed in the front?
 
I laid the radiator back slightly for height clearance but cutting 1" off the back didn't make a difference because the fiberglass grill shell was only about 1.5" thick. Shroud was about 1/2" thick and had a 16" Derale fan bolted to it. It was close to the water pump pulley but it all fit.

Hood is full(ish) width but does narrow down in the front slightly. Tires didn't touch a single thing on that rig even at full articulation and full lock. It's all super close though.

Pics of it on 42" red labels. Second picture shows more of the front frame work......

IMG_29431.jpg

IMG_06061.jpg
IMG_04381.jpg
 
Thanks for the feedback!

I'm sold on not moving the engine. I've gone ahead and purchased the ruff stuff bushings (Inner Sleeve Length and Bolt Size: 3-3/16" Long x 1/2" ID).

I plan on not doing the 'double tube' design, but I'm not sure how to tie it into the rest of the cage without looking like an exo-caged yota. but would love to tie it into the rest of the cage if there is a clean way to do so.
20221001_143543.jpg
you'd end up having to run an engine cage, that's tied through the firewall back to your main cage. How that would fit in a tj.....? That's up to you. Mine was a pain in the ass, and I still have to cut and move stuff here and there. I'm pretty much only tacking things in now, with as many times as I've had to shift mounts and things. Oh well, it's part of the process.
I happen to have an extra fiberglass hood and grill if your looking for something like that.

:grinpimp:
Slowpoke coming in clutch!
 
20221001_143543.jpg
you'd end up having to run an engine cage, that's tied through the firewall back to your main cage. How that would fit in a tj.....? That's up to you. Mine was a pain in the ass, and I still have to cut and move stuff here and there. I'm pretty much only tacking things in now, with as many times as I've had to shift mounts and things. Oh well, it's part of the process.

Slowpoke coming in clutch!
It looks like yours just bolts onto the body, rather than running tube through and welding it directly to the main cage? I thought at first you meant to cut a big hole and put tube through that welds directly to the main roll cage.
My plan is to tie the struts together with a removable tube for some cross support, and bring the tube back down to the frame near the start of the hood at the large welded on body mounts. Looking at many designs, it looked like a lot of people did not attach any tube to the body at all
 
It's bolted to the cage on the other side of the firewall. I just made a bunch of sections removable so I could more easily service components or replace damaged sections if needed. You can see the section in the right side of the pic thats bolted through to the engine cage.
20220912_153114.jpg
 
It's bolted to the cage on the other side of the firewall. I just made a bunch of sections removable so I could more easily service components or replace damaged sections if needed. You can see the section in the right side of the pic thats bolted through to the engine cage.
20220912_153114.jpg
That's exactly how I did mine. I used 2 bolt flanges to sandwich the firewall where your upper tubes run back and then two tubes on each side run from the leg on the A pillar, through the firewall and down to the frame. For those I used tube clamps and made a 1' section of each tube removable.
 
That's exactly how I did mine. I used 2 bolt flanges to sandwich the firewall where your upper tubes run back and then two tubes on each side run from the leg on the A pillar, through the firewall and down to the frame. For those I used tube clamps and made a 1' section of each tube removable.
Gotta make it easy.
 
Gotta make it easy.

Definitely. The customer wanted to make sure he could change the body if ever needed so I kept that in mind as I was building it. I have a feeling a body swap is in his near future so im glad we planned ahead. Here is a picture he sent me last week of it in its current state..... :laughing:

IMG_6418.jpg


He beats it like a red headed step child every chance he gets and it's still going strong after all these years. :smokin:
 
It's bolted to the cage on the other side of the firewall. I just made a bunch of sections removable so I could more easily service components or replace damaged sections if needed. You can see the section in the right side of the pic thats bolted through to the engine cage.
20220912_153114.jpg
thank you for sharing these pictures. This makes a lot of sense to me. I'd like to do something similar with mine
 
My highsteer arms (ALUMINUM Artec Industries Ultimate 60 High Steer Arms - Pair) came in. These things are beefy. Looking forward to putting these on, which will be the first thing I put on instead of tear off of the jeep in this project.

Planning to try to get my double ended ram mounted as high up as possible on this setup, to keep it out of the boulders which are common where we wheel locally.
 

Attachments

  • Screen Shot 2022-10-14 at 2.58.25 PM.png
    Screen Shot 2022-10-14 at 2.58.25 PM.png
    684.5 KB · Views: 3
I happen to have an extra fiberglass hood and grill if your looking for something like that.

:grinpimp:
Got a chris durham rock crawler hood for the TJ, and hoping to use the existing grill (which has the trans cooler in it). Hopefully there will be enough room for everything. I don't think i'll be trimming the hood at all, and instead stretching the front a little bit more so hopefully the approach angle will be enough 🤞 should give me atleast 2" of tire infront of the tires, when the tires are not turned.
 
Definitely. The customer wanted to make sure he could change the body if ever needed so I kept that in mind as I was building it. I have a feeling a body swap is in his near future so im glad we planned ahead. Here is a picture he sent me last week of it in its current state..... :laughing:

IMG_6418.jpg


He beats it like a red headed step child every chance he gets and it's still going strong after all these years. :smokin:
Fawk! I guess so. I just wanted to make mine repairable. I sure as hell don't want to have to hand build another stretched body. I'll just have to keep my dents.
thank you for sharing these pictures. This makes a lot of sense to me. I'd like to do something similar with mine
Welcome. I hope your build goes smoothly.
 
Ran into a snag with the high steer arms. First time installing highsteer arms so its possible im just overthinking.

1. Cant get the arp studs as far in as id like. I ran other bolts in and out to clear the grime, and used sime anti-seize on the studs. There just isnt much to grab onto the studs to get them in as far as id like. The worst one might be missing an 1/8th an inch of thread engagement.
2. The bigger issue, the arm comes with a 9degree tilt, but the arm doesnt run parellel to the lower arm. This is shown in the pictures.

For the arms not running parellel, it seems like i could:
  • weld in metal to fill the existibg hole, re-drill, and then take a grinder to roughly match the angle of the arm
  • throw money at the problem and buy new knuckles (trying not to do this)

If i cant figure it out by monday ill call artec.
 

Attachments

  • InShot_20221015_092014206.jpg
    InShot_20221015_092014206.jpg
    488.5 KB · Views: 21
  • InShot_20221015_092118800.jpg
    InShot_20221015_092118800.jpg
    155.5 KB · Views: 22
  • InShot_20221015_092041371.jpg
    InShot_20221015_092041371.jpg
    361.2 KB · Views: 21
Ran into a snag with the high steer arms. First time installing highsteer arms so its possible im just overthinking.

1. Cant get the arp studs as far in as id like. I ran other bolts in and out to clear the grime, and used sime anti-seize on the studs. There just isnt much to grab onto the studs to get them in as far as id like. The worst one might be missing an 1/8th an inch of thread engagement.
2. The bigger issue, the arm comes with a 9degree tilt, but the arm doesnt run parellel to the lower arm. This is shown in the pictures.

For the arms not running parellel, it seems like i could:
  • weld in metal to fill the existibg hole, re-drill, and then take a grinder to roughly match the angle of the arm
  • throw money at the problem and buy new knuckles (trying not to do this)

If i cant figure it out by monday ill call artec.


That's odd. I used Artec arms on the LJ and they didn't fit like that, the spacers sat flush on the top and bottom. Is it possible that the arms on the spindle are tweaked?
 
That's odd. I used Artec arms on the LJ and they didn't fit like that, the spacers sat flush on the top and bottom. Is it possible that the arms on the spindle are tweaked?
I could see that happening - its already been ran as a full hydro with a tie rod with single sheer.


Im unsure if the kingpin knuckles come drilled as 3/4", but if not, maybe they were drilled and machined (or flap disced) to a different inclination for the tie rod heims.
 
I've called artec, and they were very helpful and confirmed that I have a bent knuckle.
I've gone ahead and purchased https://www.polyperformance.com/rei...rce=google&utm_medium=cse&utm_term=DBP-D60001 which will allow me to have cool looking knuckles plus run a 5th stud on the high arm.

Working out figure out exactly what links to buy. Some tight spaces and clearances due to being flat bellied (rather than a sub-frame). Debating on exact wheel base, considering 112 and stepping up to some 42" reds.
 
TJ progress has been slow, with a lot of effort towards building out the rest of the shop. With the shop now complete (welding table, chop saw, tube bender and tube notcher and 100 new jack stands) back to working on the TJ - just started to begin cutting the frame rails today.

InShot_20221113_211915903.jpeg


Rough test fit of the Chris Durham hood for the TJ. Wanted design the tube work around this style of hood so it was the perfect excuse to buy a new hood :grinpimp:
InShot_20221113_212208026.jpeg


Received the plate that i've been waiting on for almost a year.

InShot_20221113_212232404.jpeg


As part of my process in building my shop in preparation, I needed a stand for my Rogue tube notcher I bought. Making the stand also served as a good practice project being not that experienced in fabrication or welding.

InShot_20221113_212054623.jpeg
InShot_20221113_212141456.jpeg


Before cutting off the front, I've laid down reference lines (marked with tape) so I can compare where my new stuff gets built

I measured out the current winch plate to 7-7/8" wide. Trying to figure out how small i can get away with, in the effort to bring the front inwards as much as possible.
InShot_20221113_211940023.jpeg


air over hydraulic model 32 tube bender and stand setup with the 1.75" die setup in shop
InShot_20221113_211901174.jpeg


For the double ended ram steering setup, I've drilled out the high steer arms and put the knuckles onto the axle. If I knew I was going to have to buy new knuckles, I would have just gone with the 'keyed' 6 stud setup busted knuckle sells. Starting to mock out the steering setup so I can create the mount for it.

InShot_20221113_211927593.jpeg
 

Attachments

  • InShot_20221113_211915903.jpeg
    InShot_20221113_211915903.jpeg
    1.3 MB · Views: 7
Top Back Refresh