What's new

How does the bronco uca pivot?

2big bronco

Og irate
Joined
May 19, 2020
Member Number
188
Messages
4,378
Loc
Prunedale ca
So ive always had a problem with the drivers side upper controll arm comming looses and rattleing. Up untill now ai just throw a wrench on it and tighten it back up ever month or so.

I have things pulled apart to take a closer look and am now trying to figure out where the pivoting is supposed to take place and im not wctually sure where the problem is.

Also im sure its not helping anything but the long through bolt ford used that goes all the way through both uca eyes does not fit the sleeve welded to tye frame befind the shock tower. Like a 1/2" bolt in an almost 5/8 sleeve.


20240903_085051.jpg
20240903_085129.jpg
20240903_085136.jpg


You can see in the seconed pic the nut is backed off. Im thinking that the arm is just spinning the whole assembly when the suspension moves and backing the nut off. Meanwhile the passenger side has been fine.


Yeah yeah, a lot of words to say I dont understand simple shit.
 
I’ve been inside of mine a bunch of times already. I got some alarming flake the first time I drained the oil and not much again any time since. Cannot see any issue inside the portal where that debris could have came from. I just had that one portal 100% disassembled after the prairie city wreck. When I put it back together I still re-used the original bearings because they look brand new. The only parts I’ve had to replace yet are the inner axle seal from taking the thing apart and putting it back together so often.

Edit. I wouldn’t be concerned at all about that fine stuff stuck to the magnet. Looks like everything is working the way it’s intended to

Cool thanks... but you replied to the wrong thread:laughing:

Any input on this one?
 
After more looking they have to be planning on the sleeve spinning inside the bushing... however with the big silver shouder on the sleeve assembly im still confused.
 
are you torquing it or just goodntight?

check to make sure the surface where the arm mates to the coil bucket hasnt deformed at all.
 
Castle nut and cotter pin?

I’m not sure about the 1/2” in 5/8” hole thing. Something wrong there?
 
After more looking they have to be planning on the sleeve spinning inside the bushing... however with the big silver shouder on the sleeve assembly im still confused.

Same concept as Toyotas... that sleeve isn't supposed to turn....
 
are you torquing it or just goodntight?

check to make sure the surface where the arm mates to the coil bucket hasnt deformed at all.

The surface has deformed and stretched the hole a bit... so thats another issue.

I just tighten it whatever feels good... but when I do ive noticed it prevents the suspension from wanting to move because it pinches everything tight.

The only way I see this working correctly is if the sleeve is/was wider then the rubber bushing which clearly it is not.
 
Same concept as Toyotas... that sleeve isn't supposed to turn....

So i need a longer sleeve or narrower bushings... I just called 4wp to see if they sold a bushing kit and they told me that I just have to replace the whole arms when the bushings go bad.
 
So i need a longer sleeve or narrower bushings... I just called 4wp to see if they sold a bushing kit and they told me that I just have to replace the whole arms when the bushings go bad.
:eek:
That seems excessive
 
So i need a longer sleeve or narrower bushings... I just called 4wp to see if they sold a bushing kit and they told me that I just have to replace the whole arms when the bushings go bad.

id fixture the arms, cut the bushing off, convert to a heim or up the bling factor


the arm and bushing should be one unit, the bushing should rotate on the sleeve if its a normal bushing assembly. if the bushing is molded to the sleeve then they are being like toyota and the bushing movement is where the pivoting happens.
 
Those billet upper arms are super nice, wow! :smokin:


So i need a longer sleeve or narrower bushings... I just called 4wp to see if they sold a bushing kit and they told me that I just have to replace the whole arms when the bushings go bad.

Fuck that. There is a reason why they are so cheap now....
 
id fixture the arms, cut the bushing off, convert to a heim or up the bling factor


the arm and bushing should be one unit, the bushing should rotate on the sleeve if its a normal bushing assembly. if the bushing is molded to the sleeve then they are being like toyota and the bushing movement is where the pivoting happens.


Agree... but id you look at the picture/add I linked, then even those the sleeve doesnt protrude past the bushing.... so when you tighten them down you are tightening against the rubber bushing that should be spinning.


Or am I missunderstanding and the tubbing portion of the uca spins around the od of the rubber?
 
Maybe ill tighten the fuck out of it and tack weld the metal collar to the shoch tower, pump a bunch of greese in the zirks, and let weight down on it and see what gives first.
 
Agree... but id you look at the picture/add I linked, then even those the sleeve doesnt protrude past the bushing.... so when you tighten them down you are tightening against the rubber bushing that should be spinning.


Or am I missunderstanding and the tubbing portion of the uca spins around the od of the rubber?

id take the pass side apart and see what it looks like. it could just poor tolerances during mfg

i bet its because when go into compression, its spinning the washer with the bushing and loosening the nut.
 
The design of those is real similar to the Icons a few of us run and are starting to replace bushings on.
That's all I got.
 
Tighten it up and tack the nut.

Find same bolt in left hand thread and hope it doesn't over tighten it.
 
After more looking they have to be planning on the sleeve spinning inside the bushing... however with the big silver shouder on the sleeve assembly im still confused.
Here's the two best photos from the 4WP website, partially because y'all are lazy, and partially because I believe this site will be around longer than the 4WP website.
arms.png

bushing.png


I believe the steel sleeve either welded to a washer, or machined as one piece, then zinc plated, this is the "big silver shoulder" you're talking about.

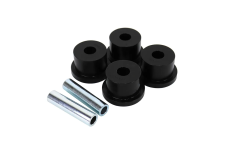
The bushings are most likely what I've always referred to as "Top Hat" style bushings.
tophat.png

In their photos, it looks like the sleeve is about flush with the outside of the bushing. The bushing may be slightly shorter, so there is some compression of the bushing, but it should still go metal to metal when torqued.

I believe the sleeve is intended to be held stationary relative to to the frame, and the bushing should rotate around it. The bolt/nut/washer should also be stationary relative to the frame.

The surface has deformed and stretched the hole a bit... so thats another issue.

I just tighten it whatever feels good... but when I do ive noticed it prevents the suspension from wanting to move because it pinches everything tight.

The only way I see this working correctly is if the sleeve is/was wider then the rubber bushing which clearly it is not.
Nope, not another issue, same issue.

Doesn't seem clear from either your or 4wp's photos that the sleeve is too short, but none are good photos, and none have measurements.

You're just tightening it to FT. When the torque is high enough, you create enough force acting to compress the frame sleeve that it yields. At that point you're not creating any more clamp load, you're just bending shit.

If it were me, I'd torque that bolt to spec, and paint mark it. Then after a trip, inspect it and torque it back to spec. If the paint mark is good, but the nut moves to hit your torque spec, something is yielding (probably from over torquing it). If you can torque it to spec and the marks line up, then some force is causing the nut to spin off, maybe all the friction from the poly bushing rubbing on that big shoulder and/or washer.

After thinking/typing this. I bet the factory washer that goes between the bushing and nut has a pretty rough surface, and you're running it dry, so it's acting to try to loosens the nut. I'd clean up the surface of the washer with a Scotchbrite (don't want to remove the rust preventative coating) and re-assemble with some lube between the washer and bushing. It wouldn't hurt to grease that sleeve next time you have it apart also. I've had good luck with Super Lube on polyurethane bushings, Amazon.com
 
Tighten it to torque spec, then grease the fucking shit out of it with that handy zerk in the picture.

Fuck that bushing bullshit. This is why I went heims on my last rig.
 
Here's the two best photos from the 4WP website, partially because y'all are lazy, and partially because I believe this site will be around longer than the 4WP website.
arms.png

bushing.png


I believe the steel sleeve either welded to a washer, or machined as one piece, then zinc plated, this is the "big silver shoulder" you're talking about.

The bushings are most likely what I've always referred to as "Top Hat" style bushings.
tophat.png

In their photos, it looks like the sleeve is about flush with the outside of the bushing. The bushing may be slightly shorter, so there is some compression of the bushing, but it should still go metal to metal when torqued.

I believe the sleeve is intended to be held stationary relative to to the frame, and the bushing should rotate around it. The bolt/nut/washer should also be stationary relative to the frame.


Nope, not another issue, same issue.

Doesn't seem clear from either your or 4wp's photos that the sleeve is too short, but none are good photos, and none have measurements.

You're just tightening it to FT. When the torque is high enough, you create enough force acting to compress the frame sleeve that it yields. At that point you're not creating any more clamp load, you're just bending shit.

If it were me, I'd torque that bolt to spec, and paint mark it. Then after a trip, inspect it and torque it back to spec. If the paint mark is good, but the nut moves to hit your torque spec, something is yielding (probably from over torquing it). If you can torque it to spec and the marks line up, then some force is causing the nut to spin off, maybe all the friction from the poly bushing rubbing on that big shoulder and/or washer.

After thinking/typing this. I bet the factory washer that goes between the bushing and nut has a pretty rough surface, and you're running it dry, so it's acting to try to loosens the nut. I'd clean up the surface of the washer with a Scotchbrite (don't want to remove the rust preventative coating) and re-assemble with some lube between the washer and bushing. It wouldn't hurt to grease that sleeve next time you have it apart also. I've had good luck with Super Lube on polyurethane bushings, Amazon.com

Ok, found this.

Screenshot_20240903_132300_Drive.jpg


Also found that the torque spec is 122ft lbs. Im betting I was only putting 60-80 on it.
 
The design of those is real similar to the Icons a few of us run and are starting to replace bushings on.
That's all I got.

Sxs I couldnt see a difference in these and the icons when they all first came out. I was convinced they were the same part with different stickers.
 
That's all I've been doing to mine.

They do look the same. I ended up with Icons simply due to availability at the time.

If new bushings and torque to spec doesn't fix it, and you want some fancy billet, my buddy has a a pair of Camburgs for sale.
 
That's all I've been doing to mine.

They do look the same. I ended up with Icons simply due to availability at the time.

If new bushings and torque to spec doesn't fix it, and you want some fancy billet, my buddy has a a pair of Camburgs for sale.

May be up for it. Trying to find a shallow 21mm now to torque it before I cut mine down or head to hf
 
Top Back Refresh