What's new

Bead Rolling - Tips, Tricks, Advice, Show & Tell

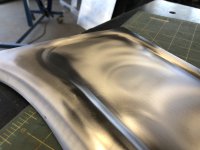
I think I linked the Corvell round-over die and adapter in a previous post, but if I didn't I can put links in here later. Ended up getting the 1-1/2" round over die and it's pretty cool. Did a test piece or two, then went straight for a panel I needed to make.

Happy with the overall performance of the die set, not stoked about the tooling lines or 'tipping edge' that happens on the edge of the die. Probably terrible terminology but not sure how else to describe it. All from how I was holding the material as I rolled it though I'm sure, I'll have to pay attention to what angle I'm holding everything as I roll it more in the future, and see if I can't minimize that - referring to the 'bend' that happens on the edge of the die... That aside though, it's pretty bitchin and will definitely use a lot in the future:grinpimp: Had to get it with the adapter to make it work on my 22mm shafts, but easy enough.

IMG_5592.jpeg


IMG_5584.jpeg


You can see where I first used the tipping die to beadroll a shape into it, then swapped dies to the round over die I just got. Instead of a flat surface gradually turning into a rounded-over shape on the edge, there is the additional tooling transition on the edge of the roundover die that bugs me. I'm sure it's 100% me and I just need to get better at using it - thought it was worth pointing out.

IMG_5588.jpeg


So what are you guys doing about tooling marks left in the sheetmetal after beadrolling? They bug me and I'd like to get rid of them, but hand sanding seems to be the best solution - so I've just left them so far:homer: Not too big of a deal for stuff getting painted, but definitely stands out (at least to me) on aluminum or stainless thats not

IMG_5586.jpeg
 
sanding or polishing (same thing, basically) appear to be the 2 easiest "natural" finishes to get rid of markings. I've never tried the lots of little hammering (planishing?) method.

seems like paint is really the best go to though :homer:

are you using the 1-1/2" rollover edge so that you can lap it up onto the chassis tubes? it's a neat look, for sure. I need to pull some measurements off my bender so that I can make some die sets if/when i get some slow time at work and need a practice project for other people

For this specific panel I was just using it to finish the edge with a larger curve than the other dies can do. Depending on whether it's strong enough to be stepped on or not once welded in, I'll tie into it with sheetmetal at a 90º angle down to the floor but we'll see. Overall I just got it for smooth transition on panel edges or where sheetmetal meets up at a 90º you could roll both edges and have a smooth 90 as opposed to a hard 90 like the brake would give it. I'll have to use it more too see what it ends up being good for though. Rolling sheetmetal over tube seems like a good one though...

For tooling marks - going to try some rotary scotch brite pads tomorrow to see if they'll buff it out. And either shop press of maybe some flat parts of different beadroller dies to see if I can't flatten out the unwanted transition I pointed out (edge of where the round over die was). For nice aluminum or stainless panels I'd love to be able to get those marks out

If you're going to make some die sets and want any measurements off of anything I have, just let me know...
 
Some misc ss exhaust heat shields I made. Overall happy with them for sure, but if you look close some of the lines are kind of sloppy and -again- can see the tooling marks in them:homer:

IMG_5420.jpeg


IMG_5432.jpeg


IMG_5475.jpeg


IMG_5476.jpeg


This piece I had cranked up with too much tension, piece kept getting hung up, to sharp of corners in some spots - I thought I was going to trash it and start over. Ended up cutting it out and bolting it up, and it flattened out and somehow looks fine. And is in a spot that it'll probably never be seen, so as long as it reflects heat I'm good with it:grinpimp:

IMG_5493.jpeg


IMG_5501.jpeg


IMG_5504.jpeg
 

Attachments

  • IMG_5477.jpeg
    IMG_5477.jpeg
    2.3 MB · Views: 4
Out of the way or getting covered shit is the best stuff to mess around with :lmao:

Heat shields came out pimp. Silly question, but why stainless instead of aluminum for heat shield?

Edit: cuz I'm planning AL for all mine, not just since I'm doing most of my jnterior with AL
 
Out of the way or getting covered shit is the best stuff to mess around with :lmao:

Heat shields came out pimp. Silly question, but why stainless instead of aluminum for heat shield?

Edit: cuz I'm planning AL for all mine, not just since I'm doing most of my jnterior with AL

I think aluminum conducts heat in kelvins ~6x as fast as mild steel, obviously mild steel conducts better than stainless. For a heat shield it just seems like it makes more sense to go with stainless. Although I don't quite know how much it matters 'reflecting' heat with air gaps on either side:confused: 
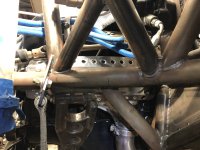
Seems like factory heat shielding is aluminum, so who knows... I think with a big enough air gap it probably doesn't matter that much, but like in the last couple pics, the space between exhaust and heat shield, then heat shield to tube work is less than half an inch, so stainless seems to make the most sense. Seems like every layer of metal with an air gap cuts down more heat, so if the floor still gets really warm back there, I'll add another layer of sheetmetal under the floor:beer:
 
I am a beginner at bead rolling, bought one a couple years ago to do the inner fenders on my jeep, so you can take this advice for what it's worth. To get rid of the tooling marks I used a combination of a DA sander and hand sanding. You have to start with a relatively course grit like 80-100 and then go to 180 and 240. Once you get to that finish. you can use red Scotchbrite or grey hand sanding directionally to give that nice brushed aluminum finish. You can use the DA on the flat areas, but you still have to do some hand sanding.

The tool marks are deep enough that just trying to remove w/ Scotchbrite may not work well. You have to use something that will cut deeper that the marks, hence the 80 grit. I would definitely suggest playing around on some scrap pieces to get the feel of it. I know I was pretty hesitant to start sanding away w/ 80- grit on a piece of aluminum that has that nice shiny factory finish, but I was super happy with the way they came out.

I don't have any close-ups to show the brushed finish, but here's an overall shot of the finished product:
20190420_112735 (1).jpg
 
What thickness of material do you guys generally use when bead rolling?
 
I mentioned the 'tooling marks' I wasn't happy with in the last panel I made - it was more than just a surface mark, there was an actual bend taking place there

IMG_5589.jpeg


I ended up grabbing some other dies to see if I could flatten it out. Made a sharpie line on the bottom of the panel to follow, and ran it through the roller a few times - bend is GONE and it was nice and flat after that:grinpimp:

IMG_5622.jpeg


As for trying to remove the tooling marks on the visible side of the panel, I used a couple 3M surface conditioning pads on the die grinder and was able to move just enough material with them to get the lines out. Pretty stoked about that. Finished it off with a scotchbrite(ish) pad on the angle grinder and the panel is pretty clean and free of any gouges or marks that stand out. Much happier with it now... Lines are still slightly visible but since these will be painted, I don't think they'll show through at all

IMG_5623.jpeg


IMG_5625.jpeg


IMG_5628.jpeg


IMG_5629.jpeg
 

Attachments

  • IMG_5630.jpeg
    IMG_5630.jpeg
    1.8 MB · Views: 5
Second panel with the round over die - I realized that if I let the die suck the metal in and do what it wants, it leaves that 'crease' or bend on the edge of the die (what I had to remove on the last panel). If I push down on the metal and keep it flat while rolling - no crease or bend happens at all, and stays nice and flat. Big part of keeping these clean seems to be hand placement and keeping the panel nice and flat. Second panel came out a lot cleaner, polished out 90% of the tooling marks, and seems like a lot cleaner final product with minimal extra time involved

IMG_5633.jpeg


IMG_5634.jpeg


IMG_5635.jpeg


IMG_5636.jpeg


IMG_5641.jpeg
 
Top Back Refresh