What's new

95 FSB (Farm Sitting Bronco) Build SuperDuty Axles

Socal4x

Member
Joined
Aug 10, 2022
Member Number
5439
Messages
19
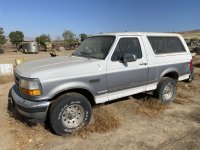
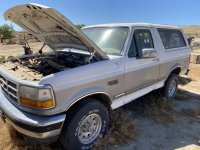
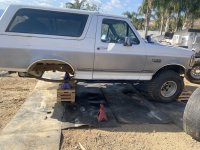
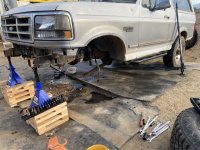
So I acquired this FSB (Farm Sitting Bronco) that had been sitting for 7 years. It was abandoned at my uncles farm up north, Taft, CA. Pretty much stock, after a couple fuel pumps and a new gas tank and tune up its up and running.

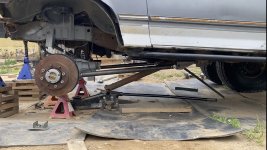
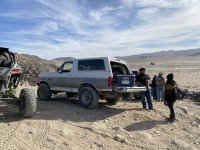
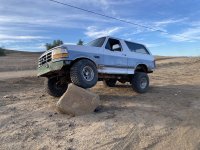
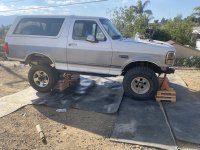
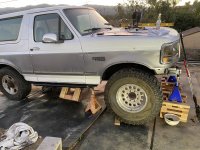
I get the bronco in December 2022, it passed smog, me and my boy slap a front Spartan locker with 33s and it makes it to KOH 2023 and back. At that point, the bronco needed some growing up to do. And then comes along the Super duty Axles idea and the build begins at the end of 2023. It’s a slow build and time restraints from work or the family, but chipping at it little by little here’s a little build progress where it sits.

Disclaimer: Yes it’s not on a perfect level surface where I work on it, but I made due of what I have for my working area. Yes, I built it on dirt, uneven ground, and I don’t know how to weld! But a lot of measurements were taken over and over and this project got me burning metal on my own. A lot of learning has happened and a lot of fun. It’s a budget build and a lot of beers were sacrificed in the making! Here’s the general idea behind the build, can change and will change as time goes by. Enjoy!

-95 Bronco 5.8L , E4OD, BW1356 electric shift

Plans.
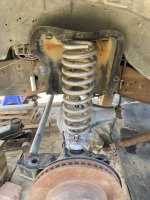
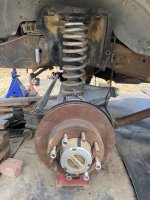
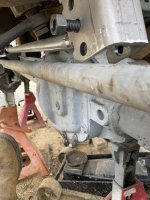
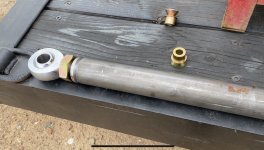
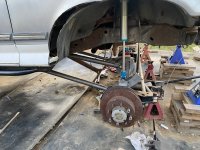
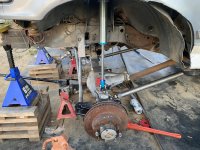
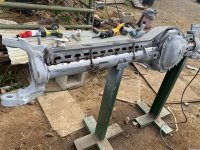
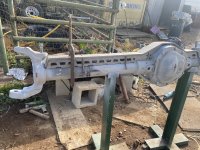
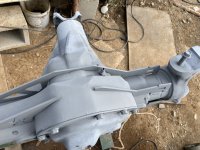
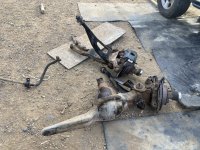
-Front 05 Super 60. 5.38s Spartan locker. 3 Link Banres kit. Barnes truss and weld on steering arms. 14” King 2.5” Coilovers. Artec towers. ball joints for now. Hydro Assist.

-Rear 00 Sterling 10.5, 5.38s, Ford Elocker. Stock leaf springs stretched back 6”. 14” Bilstein 5100s for now

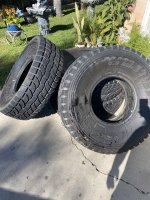
-Run some foedeez or bigger.

-Convert to BW1356 manual shift.
 

Attachments

  • 6363E5AE-7438-445E-B691-655F19950389.jpeg
    6363E5AE-7438-445E-B691-655F19950389.jpeg
    4.3 MB · Views: 5
  • 3EA13986-ABFB-4F11-9978-0F741DFE2F11.jpeg
    3EA13986-ABFB-4F11-9978-0F741DFE2F11.jpeg
    2.8 MB · Views: 8
  • 80D5E5CA-0153-478D-9298-99FF4E02CAE6.jpeg
    80D5E5CA-0153-478D-9298-99FF4E02CAE6.jpeg
    3.5 MB · Views: 7
Awesome Bronco with the best drivetrain IMO.

I'm doing my 1-ton swap in a steep driveway. It's been challenging.. and I made my radius arms too short but you learn a lot making mistakes or working around hurdles!

Excited to see this build come along.
 
Awesome Bronco with the best drivetrain IMO.

I'm doing my 1-ton swap in a steep driveway. It's been challenging.. and I made my radius arms too short but you learn a lot making mistakes or working around hurdles!

Excited to see this build come along.
Are you using 05 up axles?

Mistakes is the way to learn! I almost did leaf springs in the front because that’s all I’ve built in the past. But the only way to learn is to dive right in. I originally was thinking leaves and then contemplated on coil springs and shocks. But I’m very happy I ended up with the coilovers. I’ll 4 link the rear in the future but just want to get this thing running and see what it’s capable of for the time being.
Yeah 05+, WFO radius arms. The part I struggled with the most was setting caster which I imagine would be a bit easier with a 3-link. As for the track bar mount on the axle I would consider leaving that in place and just buy an adjustable track bar designed for that mount. I cut mine off right away because on my F150 the steering-box mounts on the outside of the frame which means I have a long drag-link. For an FSB with the steering box on the inside you have more leeway and don't need to worry as much as I did about maximizing the track-bar length.
 
I chopped everything off the front axle! Barnes4wd truss is what went on. I first bad Barnes leaf spring perches on there but then ended up final decision to link it. So I chopped off the leaf mounts. Did the whole heating up on the cast and everything.
 

Attachments

  • 21BE6408-721F-4FCF-9B91-422E131B62D7.jpeg
    21BE6408-721F-4FCF-9B91-422E131B62D7.jpeg
    4.9 MB · Views: 2
  • 79E5E9C0-51DD-4906-80A5-4EEBE7F96FB4.jpeg
    79E5E9C0-51DD-4906-80A5-4EEBE7F96FB4.jpeg
    4.4 MB · Views: 2
  • 7C88AD0F-6661-4DA9-9709-FD5C884489E2.jpeg
    7C88AD0F-6661-4DA9-9709-FD5C884489E2.jpeg
    3.2 MB · Views: 2
I removed the 8.8 and replaced it with HF Jack stands!

Then I rolled in the Sterling to start getting an idea of where it’s gonna live. And it helped to stabilize the rear so when I start removing the famous ttb everyone loves!
 

Attachments

  • 2CBD8C3E-BBB6-4F99-857B-A65A2F1EB809.jpeg
    2CBD8C3E-BBB6-4F99-857B-A65A2F1EB809.jpeg
    2.1 MB · Views: 1
  • 4042FA88-83E0-4A2E-B13D-EA9E243278B9.jpeg
    4042FA88-83E0-4A2E-B13D-EA9E243278B9.jpeg
    2 MB · Views: 10
  • 7956CC79-AF61-4056-A7BF-F89827664A16.jpeg
    7956CC79-AF61-4056-A7BF-F89827664A16.jpeg
    3.9 MB · Views: 1
Front junk is removed and sold the same day! Rolled in some cheap 37s in place I acquired to start getting a little more motivation an idea of ride height I want to aim for. The frame will get get plated for strength.
 

Attachments

  • 422A79F3-2E5A-4CEA-985A-606EA76FECF3.jpeg
    422A79F3-2E5A-4CEA-985A-606EA76FECF3.jpeg
    3.4 MB · Views: 2
  • 2C06C053-A132-4B38-9913-B658FC4ABB22.jpeg
    2C06C053-A132-4B38-9913-B658FC4ABB22.jpeg
    4 MB · Views: 2
  • 06B0F532-75F5-4120-ADB8-5868D4FE9703.jpeg
    06B0F532-75F5-4120-ADB8-5868D4FE9703.jpeg
    3.7 MB · Views: 2
  • 67364100-5EE7-4448-BDEB-86EECC732FE6.jpeg
    67364100-5EE7-4448-BDEB-86EECC732FE6.jpeg
    1.7 MB · Views: 2
  • A140F3AB-AD7C-4424-AC7D-94EC8840DCC4.jpeg
    A140F3AB-AD7C-4424-AC7D-94EC8840DCC4.jpeg
    5.1 MB · Views: 2
Planning on running wheel spacers in the rear to match the front? What wheel base are you shooting for? I would push the front forward a couple of inches and move the rear back 4-6".
 
Planning on running wheel spacers in the rear to match the front? What wheel base are you shooting for? I would push the front forward a couple of inches and move the rear back 4-6".

Wouldn't that put the bigger pumpkin into the gas tank?


I know that moving the rear axle back would make it better crawling, and goferit on a hammered crawler, but imo it usually looks like ass on anything nice enough to cruise in.

That thing on tons and 37s will be pretty capable

I like pretty trucks that also work well:laughing:

Probably. You'd have to have to notch the fuel tank or do something custom.

He mentioned 40s or bigger. 37" tires are about as big as you can keep in the stock front axle position without severely limiting your up travel and or steering angle. The front is going to need to be pushed out 2-3" to clear the firewall and heater box.

Desert guys stretch the rear all the time and there are fiberglass quarters for stretched wheelbase if you are worried about pretty. However, 40" tires have about 5" more radius than the stock tires, so you can keep the start of the rear fender opening close to where it is stock and move the axle back 5". If you cut out the factory wheel lip altogether, the quarter is just flat and you can center the wheel opening wherever you want within the constraint of the leading edge being close to factory. If you aren't scared of sheet metal work, go and cut the bed side out of a pickup box in the junkyard and put the wheel opening wherever you want. The body lines on the '80-'97 trucks lend themselves well to this.

He mentioned 40"+ tires and going out to the hammers, so I assumed this was a more crawler oriented build, but maybe not. The rear overhang on FSBs sucks if you like to play in the rocks.

Here are some pictures of a desert Bronco with a 5" rear wheelbase stretch I found on a quick google search:

EDIT: I am not sure why the pictures aren't linking correctly, but here's the photo album location if you want to look: https://www.motortrend.com/features/1996-ford-bronco-prerunner-custom/photos/
 
I might do the wheel spacers if needed. The rear is going back 6", The gas tank really bothers me how much it hangs down. I think at 6" stretch the pumpkin can massage its way into the tank :dustin:
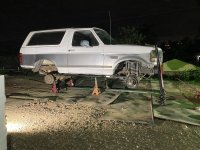
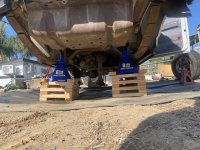
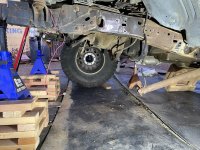
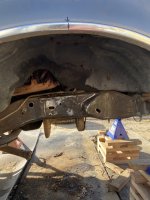
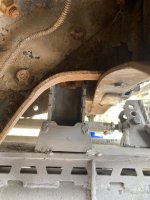
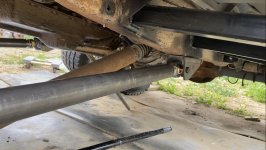
. But I will eventually get the tank raised into the bed where the bottom is flush with the bottom frame rail. I'll cut the rear axle spring hangers and move them back, along with a shackle flip.

I'm not worried about pretty at all, ill be cutting any metal that's in the way. It's definitely going to have 40s or 42s. And for the front it will only be 1-2" as it really gets hard with the steering and pan hard. I'll end up running hydro assist.
 

Attachments

  • 1136EC44-61E0-41B0-B565-19135BBB9998.jpeg
    1136EC44-61E0-41B0-B565-19135BBB9998.jpeg
    2.7 MB · Views: 3
Last edited:
Here’s some of the limiting factors for up travel. I’m going to run my upper link on the passenger side. I’m shootings for 4-5” of up travel and the rest down. Here’s when I was setting up coils which I ditched that route when I got the King Coilovers.
 

Attachments

  • B50AB598-96EA-4454-8077-62BE17DB9030.jpeg
    B50AB598-96EA-4454-8077-62BE17DB9030.jpeg
    1.3 MB · Views: 2
  • 9D6E31E4-21DB-45D7-BE6E-9B429B1E8110.jpeg
    9D6E31E4-21DB-45D7-BE6E-9B429B1E8110.jpeg
    2.1 MB · Views: 6
  • A6D6BDB4-F440-4E8B-9935-0B0768E76B25.jpeg
    A6D6BDB4-F440-4E8B-9935-0B0768E76B25.jpeg
    2 MB · Views: 3
  • 18D376CA-B4B4-47BB-8FA7-185EF4BC90AB.jpeg
    18D376CA-B4B4-47BB-8FA7-185EF4BC90AB.jpeg
    1.5 MB · Views: 2
  • A2354DBB-FC5C-4A5E-9EAC-726F85D97F0B.jpeg
    A2354DBB-FC5C-4A5E-9EAC-726F85D97F0B.jpeg
    1.6 MB · Views: 1
The lower links ended up at 41”. They are massive and look bad ass. First time making links and it was very excited when these first went in.
 

Attachments

  • E02B64D1-C727-487A-A968-081EBA57FDE0.jpeg
    E02B64D1-C727-487A-A968-081EBA57FDE0.jpeg
    1 MB · Views: 1
  • F21B930E-7C2B-4F21-89FA-179D07C609D1.jpeg
    F21B930E-7C2B-4F21-89FA-179D07C609D1.jpeg
    1.1 MB · Views: 6
  • 099D1BDA-6F7C-47C1-8001-3454F616088A.jpeg
    099D1BDA-6F7C-47C1-8001-3454F616088A.jpeg
    1.1 MB · Views: 1
  • 99763138-0D72-4574-9D8C-4D383C9109EB.jpeg
    99763138-0D72-4574-9D8C-4D383C9109EB.jpeg
    1,011.6 KB · Views: 1
Is a radius arm setup going to allow 5” of uptravel?
I have maybe 5” on mine and it’s cool but I hit bump stops all the time.
 
No radius arm setup. I’m running a 3 link / pan hard setup. Upper link will be on the passenger side.

Right here I started setting up the towers.
 

Attachments

  • 14D60E45-276B-4EA5-B7C9-198B89A621C4.jpeg
    14D60E45-276B-4EA5-B7C9-198B89A621C4.jpeg
    3.5 MB · Views: 4
  • 0FA21C08-9058-4FAD-8C14-160F85305B92.jpeg
    0FA21C08-9058-4FAD-8C14-160F85305B92.jpeg
    3.7 MB · Views: 4
Last edited:
Top Back Refresh