What's new

Scratch and Dent Special: Dirty Hooker Edition

Burns

Well-known member
Joined
Jul 9, 2020
Member Number
2271
Messages
130
Loc
Portland, ME
Doing a paint job on the Fummins has made me not want to scratch all my money off on trees…..can’t afford a house? That’s fine, we’ll blow our savings on a project. Operation Dirty Hooker Travel….ENGAGE:

As most of you know, I’ve been looking for a single cab, short bed, 2wd, F100 that isn’t rusted through. Most are folks want 7million dollars for their POS….and I’m too cheap for that (sad knowing my suspension package will be 4x the purchase price of the truck).

Found a ‘68 in South Carolina, bought it for $2500, and paid $1000 to have a guy drop it off (UShip).

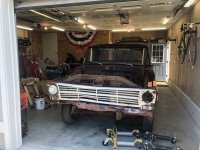
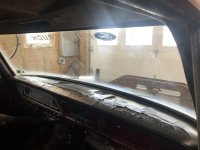
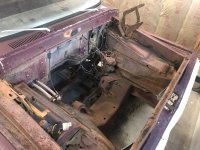
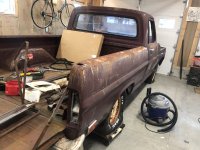
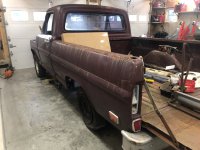
1968 F100, not been on the road since ‘92. Got in an accident, front end collision, end of story. Knowing I had an engine and tranny sitting and waiting (been collecting parts for a while) and that I’d be stripping the suspension off it….VIOLA. Brakes were siezed. Tires were flat. No hood. Pain in the add to get off a trailer and up a driveway 😁

Short term is beams and 4-link, coilovers all four corners. Need to figure out motion ratios to nail down coilover sizing…and start chipping away at….everything.

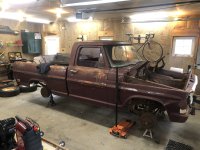
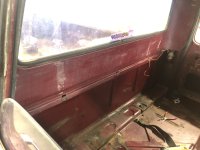
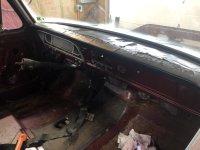
She’s a solid little truck, minus the passenger floor. Drop rails are solid. Frame is mint. All around I’m giving her a 7/10. Doors open and close better than my ‘74. Tailgate handle works (it’s one of those odd sideways swing doodads) and she’s all around got good patina!
 

Attachments

  • IMG_2002.jpeg
    IMG_2002.jpeg
    2.1 MB · Views: 152
  • 73108648556__7870EB09-BE32-4975-AF26-3BB6FC76D70E.jpeg
    73108648556__7870EB09-BE32-4975-AF26-3BB6FC76D70E.jpeg
    1.7 MB · Views: 24
  • IMG_2042.jpeg
    IMG_2042.jpeg
    2.5 MB · Views: 26
  • IMG_2043.jpeg
    IMG_2043.jpeg
    2.2 MB · Views: 26
  • IMG_2041.jpeg
    IMG_2041.jpeg
    2.1 MB · Views: 26
  • IMG_2040.jpeg
    IMG_2040.jpeg
    1.7 MB · Views: 23
  • IMG_2039.jpeg
    IMG_2039.jpeg
    2.2 MB · Views: 24
  • IMG_2017.jpeg
    IMG_2017.jpeg
    2.4 MB · Views: 24
  • IMG_2016.jpeg
    IMG_2016.jpeg
    1.7 MB · Views: 23
  • IMG_2015.jpeg
    IMG_2015.jpeg
    1.9 MB · Views: 22
IMG_2071.jpeg

Rag joints brand fucking new

IMG_2073.jpeg

The brake fluid that came out was black. Looked real tasty but I held off drinking it

IMG_2074.jpeg

Removed what I assume was a pivot for the tranny (looked to be a column shift originally)

IMG_2075.jpeg

Remember kids, when removing a whole set of brake lines from your truck….save the ends for future use 😎
 
IMG_2110.jpeg

Here are the frame rails. I’m the bed of the truck there were two frame horns….so plan was originally to bend the existing ones straight, but after seeing them….fuck that. I’m putting new ones on it.

IMG_2111.jpeg

Pretzel


IMG_2112.jpeg

Half pretzel


IMG_2117.jpeg

Both for reference

IMG_2120.jpeg

Floor pan for those curious. Drivers side window was down for ten years….but for some reason passenger side is rusted out
 
IMG_2154.jpeg

Found a schematic online that lays out dimensions and holes for the entire frame/body, so took some measurements and started scribing some lines

IMG_2155.jpeg

Marked a notch on exterior top corner of both rails, then worked to scribe a straight line down them for my cut

IMG_2156.jpeg


IMG_2157.jpeg

Mimicked the process on my two “new” frame horns. I made sure to take measurements off of a location that carried over to these two frame horns, in hopes of making symmetrical cuts

IMG_2158.jpeg


IMG_2203.jpeg

And the chopping started

IMG_2206.jpeg

Straight as Richard Simmons

IMG_2207.jpeg


IMG_2208.jpeg

In my infinite wisdom….already made a mistake 😁 my attempt to find a uniform feature on the truck and satellite frame rails work…I also used a square for the vertical cut line (which necessitated a flat portion of frame). All worked well….then I realized I didn’t leave myself room for a fish plate, inside the frame rail…very little real estate to play with in there.

IMG_2209.jpeg

Passenger side was obviously the worst. Can’t go back now!
 
This will basically bring us up to last night (only had it since last Friday). Figured while I have the frame horns off, may as well stick the engine and tranny in, and figure out what I have to fuck with to get all that junk to fit. I’ll do a few posts on the build process of that, later down the road….but I got a somewhat fresh LS2 bottom end for $900…..praying to fuck it doesn’t blow up…..and spent money on Black Friday through Texas Speed, Rockauto and Summit (and Amazon of course) buying heads and other parts. Again, details on that later. Tranny is a TR6069 out of a 2015 Camaro. Got rid of the electronic reverse lockout. Plugged off skip shift, along with the tranny cooler ports…..test fit purposes, so didn’t throw flywheel or clutch on.

IMG_2212.jpeg

Here you can see the young tranny eyeing the hole of the block

IMG_2213.jpeg

The block lifts its rear, tempting the tranny….wow this is getting gay.

IMG_2214.jpeg

Annnnd attached with zero issue


IMG_2215.jpeg

Yanked the stock crossmember knowing it would need to be moved….but now boping I can in fact blow new holes in the frame, and reuse it. It would be cool as shit to not have to build a fully new one!

IMG_2216.jpeg


IMG_2218.jpeg


IMG_2217.jpeg

Not a bad looking home for the engine tranny combo. Really hoping the engine doesn’t sit too high, therefore making the tranny sit too high. From what I’ve learned online……I should be good, but as we all know, the internet lies and nothing you see is true. Soooooo, time will tell
 
IMG_2223.jpeg

Set the mounts in, opened up the wholes I needed to open.

IMG_2225.jpeg

Sliding it in went well. Easy enough to balance weight with the engine lift plate. Friends engine stand 👌

IMG_2226.jpeg

Loosely in place

IMG_2229.jpeg

Slid the stock crossmember in. It’ll be usable….after I cut away a good chunk of it 😅.

IMG_2238.jpeg

The TR6060 is basically the T56, version 2. One piece main shaft, as opposed to two. It’s also the cheaper option of the T56 magnum (t56 with a one piece main shaft and three locations for remote shifters). My shifter location matches up pretty good which is nice. Sadly on my ‘74 the tunnel is removable, not so much on the ‘68. Just means I’ll have to get the keyhole saw going!

Need to go get some nuts to tighten those motor mounts in place and get the engine to sit correctly.
 
I see the aluminum block, that'll be nice for keeping the front end light:smokin:

Any thoughts on pulling the powertrain back some?
 
Projectjunkie Initially no. Plan was to plop engine in and use off the shelf parts….. that leave engine in place…..ironically while laying under the truck and staring at the tranny trying to figure out my engine tilt, I realized I need it lower. Well given the mounts I bought…now I realize I should have made some. If the engine sat lower, it wouldn’t be tilted and I wouldn’t be running into tranny hitting the tunnel issues.

Need to figure out how to modify my mounts to lower the engine some

IMG_2244.jpeg

Tilty

IMG_2246.jpeg

Passenger

IMG_2247.jpeg

Driver

IMG_2250.jpeg

Tranny hitting tunnel, so can’t lift tail of tranny to flatten engine out, without cutting tunnel. My goal is to fuck with the floor as little as possible, also I’d like to keep center of gravity lower…so all eyes are on motor mounts 🤔

IMG_2251.jpeg

IMG_2249.jpeg
 
how much space do you need? big fan of cutting the floor, personally.

hack up the hump, put a flange and bolt it back in place, like they did later on. tons of space for whatever and make it big enough, it's easy to "smooth out"

20220911_143459.jpg
 
Update: Fuck Ford rivets 😁

Tried cutoff wheels on a 4.5’’ grinder for the heads, then to try and bang out the back end of the rivets. NOPE.

Cut and X and step up bit sizes to effectively drill it out. NOPE.
IMG_2582.jpeg


Melt the fuckers off with the heat of 1000 suns…..NOPE. Note: have a hypertherm cutmaster 139, and the Hispanic guy I bought it from in Alamogordo NM didn’t have the 220v conversion plug. Was using it on 120v, but got so pissed of it popping breakers and gfci’s that I bought the adapter and finally used it with 220v tonight.
IMG_2585.jpeg

IMG_2586.jpeg


Still in demolition process….as more rivers keep popping their ugly heads up and not allowing me to remove the suspension.

I decided that I want to have the engine lower and not cut into the floor….so I’m going to build a new engine crossmember.

IMG_2598.jpeg


IMG_2600.jpeg

IMG_2583.jpeg
 
IR sells a big bad dude long barrel air hammer I bought for Ford rivits. I had the salesmen bring it out and told him I don't want to cut/drill these I need the air hammer to just wack them
 
Cool build. Agreed, that engine needs to come down and back:flipoff2:. Are you keeping it 2wd or going divorced 205?
 
I am not seeing anyone call out a Crown Vic front end swap.

Eliminates the cross member, it fits and it will make lowering the engine a LOT easier, not to mention updated steering, suspension and brakes.
 
You guys read my mind. No crown vic cause #whoopscissors and #dirtyhookertravel

and spot on with the frame horrn fish plate. More work, but in the end...Ill have exactly what I want and will have made it myself.
.....lots of complaining to follow as I learn how to make it all myself and then curse making it myself :flipoff2:
 
Good weather here on the east coast. Hard to believe last weekend we got 6” of snow and a lot of the state was out of power. Now it’s sunny and 60, no sign of any snow. Cleaned the garage and organized the trailer. Took the Fummins out for a spin and figured out the tranny side driveshaft bolts were loose 😎. Didn’t have a 12mm 12pt socket….so made them finger tight (they were almost all the way out) and finished the drive home 😅

IMG_2724.jpeg

Beams off.
 
Got the final crossmember/radius arm mount off. What a pain in the dick. I think I smoked the electrode in my plasma cutter.
IMG_2733.jpeg


Luckily there is a pic on top of the machine that gives part numbers
IMG_2744.jpeg


IMG_2736.jpeg


She’s been off the road since ‘92, and something tells me she had a leak 🤣
IMG_2737.jpeg


I bolted on the old tranny crossmember as a brace, as it was the perfect distance, hole to hole, as some existing holes on the frame. That’s my “make sure the frame doesn’t move too much” brace
IMG_2743.jpeg


I now need to figure out angles and how to accurately cut the 8”x2” rectangular for the new crossmember, then chop out the beefy boy that’s in place.
IMG_2585.jpeg


IMG_2740.jpeg
 
Top Back Refresh