What's new

Helpful hints for newbies doing Dana 60 gear setup

With .070" of pinion shim, the bearings should require a good amount of preload shims to keep them from crushing. It looks like your pinions dont match in size and yes, that shoulder is longer. Did you order super duty gears and are you 105% sure you have a 60 and not a 50?

My real question is; How did you guys preload the pinion when running the patterns? If it was loose, your patterns were wrong. Your .070" is including the slinger right?

My 60 only took .037" with yukon gears and usa standard master. With the added thickness of the slinger, my total pinion shim stack was .068". (Slinger was .031")
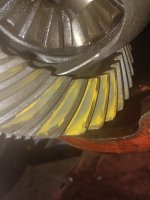
Yea I was going to recheck the pattern since like you said there was probably no preload when putting it together. The axle didn't use the big slinger, so we left it off.

But I'm still at a loss, the bearings are just flat out too far apart. If anything more pinion depth would help because then the shoulder would sit further down and allow it to preload. The pinion is stamped D60 513R, the box is the Yukon part number for 250/350 Dana 60s in this year range (this is an 03), and the sticker on the axle says 248 which should be a 60 and not a 50.
 
Last edited:
.070" is kind of a lot. Could be a "friday" pinion, the inner bearing is too narrow or, you have a 50 housing. I'd compare your inner bearing with the old one since you have both easily accessible. Otherwise, call yukon and see if they know.

My experience with super duty stuff is pretty limited. I do know the castings on the 50/60 look very similar and figured I'd mention that since the pinion snout is slightly shorter on a 50 housing and could cause this issue. They stamped a 50 or 60 on the housing webbing, that will be the dead nuts indicator since its cast with the diff. Some dummy at ford could have slammed the wrong sticker on your axle or the PO did some shady shit to sell a "60"
 
He does not have a 50 I can guarantee that. A 50 pinion is 26spl a 60 is 29spl so this would be about how the pinion doesn’t fit.

A HP60 is a HP60. The SD60 uses a bigger/different axle seal.

I’d like to see the pattern.

0.070” total isn’t too bad. You may need to cut the slinger down and put it under the inner pinion bearing.

0.030” for the slinger
0.020” for the baffle

That only gives you an actual depth of 0.020”
 
.070" is kind of a lot. Could be a "friday" pinion, the inner bearing is too narrow or, you have a 50 housing. I'd compare your inner bearing with the old one since you have both easily accessible. Otherwise, call yukon and see if they know.

My experience with super duty stuff is pretty limited. I do know the castings on the 50/60 look very similar and figured I'd mention that since the pinion snout is slightly shorter on a 50 housing and could cause this issue. They stamped a 50 or 60 on the housing webbing, that will be the dead nuts indicator since its cast with the diff. Some dummy at ford could have slammed the wrong sticker on your axle or the PO did some shady shit to sell a "60"
He does not have a 50 I can guarantee that. A 50 pinion is 26spl a 60 is 29spl so this would be about how the pinion doesn’t fit.

A HP60 is a HP60. The SD60 uses a bigger/different axle seal.

I’d like to see the pattern.

0.070” total isn’t too bad. You may need to cut the slinger down and put it under the inner pinion bearing.

0.030” for the slinger
0.020” for the baffle

That only gives you an actual depth of 0.020”
I found the issue! Long story short since we had gotten confused about the lengths, we had machined down a spare 1350 yoke to try and get a pattern with the new components. And that right there was the issue! For testing we had used a piece of tubing so we didn't need the yoke since it's a tight fit, and that's why there was no slop in the bearings during assembly. Throw the machined down yoke on and the preload nut bottoms out before the yoke touches the bearing. This looks extreme but in actuality the yoke was machined maybe .050" too far and would've worked fine. And on the plus side we have another 1350 yoke.

PXL_20230417_150123028.jpg


So no issues! Just three morons that for all practical purposes have never done gears and learned the hard way! Here is the pattern we settled on with the setup bearings:

PXL_20230417_144004792.jpg


PXL_20230417_144010537.jpg
 
DD3C9FE0-0ECB-4452-884A-800F8D7E5014.jpeg


Red: pinion depth shims. Behind inner pinion race in housing.

Orange: diffuser, goes with the pinion depth shims, during setup I like to use shims that are the same thickness, they’re usually 0.020” then during final install pull the equal shims and install diffuser. It’s easy to mangle when going in an out with the race.

Yellow: carrier shims, under carrier bearings.

Green: diffuser, goes between outer pinion bearing and yoke.

Blue: slinger, goes between pinion head and inner pinion bearing.

Violet: pinion bearing preload shims, goes on pinion stem between outer pinion bearing.

Throw the crush sleeves away.
In the picture you say the orange diffuser goes with the pinion depth shims, but that part matches up perfectly with the outside of the outer pinion bearing. Is it supposed to go between the pinion bearing and the green diffuser? Anywhere else and the orange diffuser is an extremely sloppy fit and seems wrong.
 
In the picture you say the orange diffuser goes with the pinion depth shims, but that part matches up perfectly with the outside of the outer pinion bearing. Is it supposed to go between the pinion bearing and the green diffuser? Anywhere else and the orange diffuser is an extremely sloppy fit and seems wrong.

Behind the inner pinion bearing is where they usually are.


If you’ve already got it set up and are happy with the pattern leave it out. They are they to help keep oil in the pinion bearings in an on road application. Low speed off road use you are getting plenty of oil washed onto the bearings.
 
Yukon zip locker carrier preload question
is a .006 between the race and the case when pushed on with a pry bar enough?
what is optimum with a air locker?
 
adding instruct-ables to this thread, it's easy to find via search :rasta:

also going to give this dana gear setup thing a shot. seems to be pretty straightforward. much less hammer work than toyota gears :laughing:
 

Attachments

  • dana 70 axle rebuild.pdf
    2.3 MB · Views: 6
Lot of good info in here for a beginner, thanks

Any advice on how to torque the ring gear bolts by yourself? I hadn't taken out the spiders yet when doing this yesterday so couldn't get a pry bar through the carrier

All I could come up with was holding it tight in the press, me also holding to prevent rotation, and letting the gf use the torque wrench. 110 ft-lbs is a lot of force and I'd rather do it a better way next time since I have to do my 14 bolt next
 
Stick an oversize open or box end around one of the other bolt heads and let the handle hit the body of the carrier. Basically same shit as if you're fucking around trying to prevent a bolt-on water pump pulley from spinning while you get the bolts off.
 
I'll add that the majority of gears are machined to a tight tolerance and most of the variation in shims is housing related.
So if you can start with the shims you took off the old gears you are probably almost there.
 
Lot of good info in here for a beginner, thanks

Any advice on how to torque the ring gear bolts by yourself? I hadn't taken out the spiders yet when doing this yesterday so couldn't get a pry bar through the carrier

All I could come up with was holding it tight in the press, me also holding to prevent rotation, and letting the gf use the torque wrench. 110 ft-lbs is a lot of force and I'd rather do it a better way next time since I have to do my 14 bolt next

I normally use the press to hold them, typically works okay if your press doesn't bleed off too quick. You can also just get them snug (i've got a small impact that can only do about 40 ft-lb) then final torque them with loctite, removing one at a time, when you have the carrier installed and can hold the pinion yoke. Be careful you are getting the ring gear flat onto the carrier, a lot of guys get hung up on the inner shoulder and try to pull the gear on with the bolts. Some carriers are a lot tighter then others, heating the ring gear helps a ton, but very minimal even heat. 200-250F in a grill or oven.
 
Made a bit of a rook mistake. Went through the hassle of mounting the ring gear as mentioned above, forgetting I had a thick cut gear so I had to take it back off to put the spartan in because I couldn't get the center pin out :homer:

These were brand new ring gear bolts mounted just yesterday, can I really not re use them in this situation?

Stick an oversize open or box end around one of the other bolt heads and let the handle hit the body of the carrier. Basically same shit as if you're fucking around trying to prevent a bolt-on water pump pulley from spinning while you get the bolts off.
Good idea thanks
I'll add that the majority of gears are machined to a tight tolerance and most of the variation in shims is housing related.
So if you can start with the shims you took off the old gears you are probably almost there.
I mangled my shims with the clamshell getting the bearings off :homer: but I kept track of which ones go on which side so I'll measure them before reinstalling and just add new ones the same thickness
I normally use the press to hold them, typically works okay if your press doesn't bleed off too quick. You can also just get them snug (i've got a small impact that can only do about 40 ft-lb) then final torque them with loctite, removing one at a time, when you have the carrier installed and can hold the pinion yoke. Be careful you are getting the ring gear flat onto the carrier, a lot of guys get hung up on the inner shoulder and try to pull the gear on with the bolts. Some carriers are a lot tighter than others, heating the ring gear helps a ton, but very minimal even heat. 200-250F in a grill or oven.
Surprisingly this ring gear slipped right on with zero effort
 
Fuck you dana :lmao:

Some carriers say they won't fit abs, some say they will. This one won't, despite saying it would :shaking:

Guess I'll see if I can get it cut down at work

20240505_125615.jpg
 
alright, more pictures :laughing:

Safety first, rand the jacks down and put some stands in there.

20240505_100215.jpg


big question was going to be if this was enough space, ultimately was

20240505_105756.jpg


everything looks clean, RTV so somebody has probably changed the fluid at some point in the past. That's nice of them

20240505_110848.jpg


Not sure if the pictures show the factory pattern, decently loaded for all of it's life

20240505_110907.jpg


20240505_110942.jpg


could get a good spot to get enough turn on the pinion nut, don't know where my adapter is for the 1/2" impact wrench for the 3/4" drive 1-1/4" socket. Lifted up one side and spun the tire. Worked :laughing:


had to unbolt the brake line tab up on top and set the housing spreader up

20240505_122132.jpg


Clamped it to the web and measured off the spreader, went to 12 thou. max is 15 it says.

20240505_122710.jpg


and wobbled it around a bunch and it came out with some gently pry bar love.

0.119" spacers between each of the outer bearings. 0.020" behind one of the carrier bearings and 0.038 behind the other. Just transferred those over to the new carrier to start with. No shims under the lower pinion bearing, 0.064 worth of shims under the upper pinion bearing for preload. Going to use those numbers at first as well.

20240505_123630.jpg


20240505_150143.jpg


and then that damned ABS tone ring :laughing:

20240505_125031.jpg


Hours, possibly days later it got close. Then lots of test fit and spot grinding to get it to fit, but not slip. Feels like the standard is a 0.0005" interference fit.

 
Now it's got a magical amount and probably won't flail off


20240505_182250.jpg


110 lb ft on the new ring gear bolts. Started to rain, cleaned up for the day

20240505_190605.jpg


Is there any reason why I can't leave the shims as they are under the bearings and if/when I need to shift the carrier left/right to just make that change with the shims external to the bearings?
 
Provience did you not make a set of setup bearings for the new carrier? It makes swapping shims in/out easier than pulling the new bearings every time.

It might be hard to keep some small shims from folding when you try to drop the carrier with the races on the bearings into the axle.
 
Provience did you not make a set of setup bearings for the new carrier? It makes swapping shims in/out easier than pulling the new bearings every time.

It might be hard to keep some small shims from folding when you try to drop the carrier with the races on the bearings into the axle.
No setup bearings and I'm even going so far as to reuse the old bearings
 
No setup bearings and I'm even going so far as to reuse the old bearings
Why? I’ll see what I have stashed around here. Setup bearings are nice. They slide on and off so changing shims is not a hassle. Once you get the shim stack and gear pattern where you want it you can out on the bearings you’ll use. I will see if I have the set I bought for my front axle.
The vevor clamshell puller makes it a little less annoying if you don’t have setup bearings but both cost close to the same price.
 
Well, I didn't figure on the bearings being as tight as they are and the shim kit is much cheaper when not buying bearings :laughing:

Good advice for the future is to buy new bearings so the old ones can be opened up
 
Provience i have these. Send me your address. If you want to cover some stupid high shipping costs I could figure out how to send you the clamshell puller.
 
Provience i have these. Send me your address. If you want to cover some stupid high shipping costs I could figure out how to send you the clamshell puller.
I appreciate the offer. Going to give it a whirl without, realize how much time i've wasted, and then reach out and pay you shipping+time :laughing:

or it just might be good on the second try :rasta:
 
I appreciate the offer. Going to give it a whirl without, realize how much time i've wasted, and then reach out and pay you shipping+time :laughing:

or it just might be good on the second try :rasta:
Do it right or do it twice. :flipoff2:

The bearing puller is really nice for removing old bearings to make cheap setup bearings. Saves you time. Costs you money.
 
20240518_134852.jpg


20240518_134904.jpg


Alright, I'm going with pinion too deep :rasta: going see what it looks like with fewer shims.

Also had just about 0 pinion bearing preload using the factory shim, so going yo increase that. With no bearing spacers on the carrier[stock shims under the bearings] getting just under 10 lb in bearing preload and about/under 5 thou backlash depending on where I check


Attachments

  • 20240518_134904.jpg
    20240518_134904.jpg
    1.6 MB · Views: 1
Alright, notebook from dana above want 5 to 8 for backlash and 5-7 lb in additional tq for carrier bearing preload. Doesn't specify what it wants for used pinion bearings, so I guess I'll shoot for 5-10 or "some" and have more than none.
 
I have never had such a difficult time with a bearing race :shaking:

20240518_151006.jpg


20240518_151350.jpg


Dropped front 62 to 56 thou for the pinion depth shim. Nearly 3 hours of various hammers and pullers and whatever else I can think of later, race is about halfway in. Came right out with the air hammer. Refuses to go back in the same way :rasta:

Thinking some bottles of freezer spray
 
Top Back Refresh