Why are you getting an E4OD for a 5.8? The bellhousing is wrong. A 400 takes the same bellhousing as a 460
How to install the app on iOS
Follow along with the video below to see how to install our site as a web app on your home screen.
Note: This feature may not be available in some browsers.
You are using an out of date browser. It may not display this or other websites correctly.
You should upgrade or use an alternative browser.
You should upgrade or use an alternative browser.
E4OD transmission swap
- Thread starter Provience
- Start date
-
- Tags
- ford swap transmission
Provience
Kill!
The transmission is from the 460, the pcm is from the 5.8.Why are you getting an E4OD for a 5.8? The bellhousing is wrong. A 400 takes the same bellhousing as a 460
The 5.8 pcm was the only one I could find for $50 shipped, every other combo was $100+ into $300 for "refurbished"
Wire harness is going to be just about whatever I can find and get wires moved around if/as needed.
10-4. Misunderstood. Just didn’t want to see you get the wrong parts but you got this.
Provience
Kill!
I'm posting here because I don't got this10-4. Misunderstood. Just didn’t want to see you get the wrong parts but you got this.
 lots of slogging through many forum posts and a bunch of help from this thread already. I appreciate all the feedback
I just hope it works
You’ll make it work, and for cheaper than I ever would. I’m a closet 400 fan. I have the stuff to build a 4V clevified so I’m watching how well you pull this off. An E4OD with some 4R100 diesel guts would be preferred to the ZF5 I was planning on sticking behind a 9000 rpm engine.I'm posting here because I don't got this
I just hope it works
Provience
Kill!
9k rpmYou’ll make it work, and for cheaper than I ever would. I’m a closet 400 fan. I have the stuff to build a 4V clevified so I’m watching how well you pull this off. An E4OD with some 4R100 diesel guts would be preferred to the ZF5 I was planning on sticking behind a 9000 rpm engine.
that's just damned awesome 
Zf is always the default prefer answer, but then you've got to work up a short throw if you are using in something hot or, in my case, want to be able to run 3 wide across the bench.
I've been hoping for years the 6 spd stuff would come down in price. Looks like another decade yet before they get close in price, even then the adapters will stay high.
Certainly seems like it has a good use case still
Skinny
Well-known member
- Joined
- Feb 28, 2023
- Member Number
- 6236
- Messages
- 277
Maybe 15 years ago this statement may have been not true but your wasting your time trying to use a factory standalone computer.
They are all old, you are using an old harness, and probably going to give you no tunability.
Just spend the money on a standalone. I used a US Shift when doing a 4L80 swap on my CUCV. Sure there were a handful of trucks that had a computer that would work but your at the mercy of getting all of it to work and the outcome may not be what you want.
My set up uses a TPS input, the two speed sensors in the trans, and that's it. Doesn't take a lot to program and you can basically tell it what you want it to do. Want butter, you got it. Want rock hard shifts, you got it. Want to switch between the two, you got it. Want to bump all or one of your shift points up or down...you get the picture.
Can't do any of that with an OEM set up. Just something to consider.
Provience
Kill!
For anything other than a 2wd commuter that will be used as close to stock application as possible, I'd fully agree.Maybe 15 years ago this statement may have been not true but your wasting your time trying to use a factory standalone computer.
They are all old, you are using an old harness, and probably going to give you no tunability.
Just spend the money on a standalone. I used a US Shift when doing a 4L80 swap on my CUCV. Sure there were a handful of trucks that had a computer that would work but your at the mercy of getting all of it to work and the outcome may not be what you want.
My set up uses a TPS input, the two speed sensors in the trans, and that's it. Doesn't take a lot to program and you can basically tell it what you want it to do. Want butter, you got it. Want rock hard shifts, you got it. Want to switch between the two, you got it. Want to bump all or one of your shift points up or down...you get the picture.
Can't do any of that with an OEM set up. Just something to consider.
Provience
Kill!
If I'm about $100 into the factory stuff and end up not being able to make it work, it's not so painful to then turn around and get the quick 4 and be done
Skinny
Well-known member
- Joined
- Feb 28, 2023
- Member Number
- 6236
- Messages
- 277
The factory programming is rubbish. The 4L60 in my S10 shifts like an 85 year old man tuned it. I do have a programmer to calibrate everything on the EEPROM but it's low on the list.
If it's all stock stock maybe but mix and match stuff you may be wasting your time and money.
But if you are trying to do it all super cheap you are probably heading in the right direction using OEM junkyard stuff.
If it's all stock stock maybe but mix and match stuff you may be wasting your time and money.
But if you are trying to do it all super cheap you are probably heading in the right direction using OEM junkyard stuff.
Provience
Kill!
I yell at my motorhome's e4od stock programming all the time and force shift it every long trip, but that's the way I'm used to driving automatics otherwise, I drive like I'm 85 
otherwise, I drive like I'm 85 Skinny
Well-known member
- Joined
- Feb 28, 2023
- Member Number
- 6236
- Messages
- 277
There are a handful of trucks out there I haven't minded. The 6R80 in both 2.7 and 3.5 Ecoboost trucks I've had were actually really good. Mostly because it actually held the gear and would hit boost. The 10R80 in our new 3.5 EB drives me up a god damn wall.
90% of shit you drive these days seems to be in like 3rd or 4th gear before you complete the turn.
So when I'm able to program my own 4L80 with a piece of shit 6.2 diesel I have it so it actually holds the gear long enough and downshift fast enough so that I'm not always behind. Makes driving a lot more enjoyable. Unlike the TH400 where anything above 30mph well that's all you get mate 🤣
reptillikus
ate lug
Get a shift kit from Punisher Valve Bodies. Seriously. It comes pre-built in a replacement valve body so no fucking with springs, just drop and swap, super easy. He will build them to shift however you want, however I just order them "for a bronco" (I have 2 of his kits) and they both shift great. Firm but not harsh.I yell at my motorhome's e4od stock programming all the time and force shift it every long trip, but that's the way I'm used to driving automatics
Alternatively (if youre interested), I have a valve body from a 90 with a brand new Superior shift kit installed in it (maybe 25 miles on it) that I'd part with because I don't like how it shifts for a SUV (winds out the gears too long IMO). it would be better in a truck getting used to tow/haul.
Provience
Kill!
I'll check them out and consider it, thanks for the recommendationGet a shift kit from Punisher Valve Bodies. Seriously. It comes pre-built in a replacement valve body so no fucking with springs, just drop and swap, super easy. He will build them to shift however you want, however I just order them "for a bronco" (I have 2 of his kits) and they both shift great. Firm but not harsh.
Alternatively (if youre interested), I have a valve body from a 90 with a brand new Superior shift kit installed in it (maybe 25 miles on it) that I'd part with because I don't like how it shifts for a SUV (winds out the gears too long IMO). it would be better in a truck getting used to tow/haul.
Provience
Kill!
If you own a Punisher Valve Body and you would like it adjusted in any way (firmer or softer), just give me a holler. I offer this service FREE for as long as you own it. COMP valve bodies cannot be adjusted.
About Punisher Valve Bodies
Over 5,000 Punisher Valve Bodies have been sold since 2008. The Punisher Valve Body is a peformance modification and improves overall transmission durability.
 www.punishervalvebodies.com
that's a pretty sweet way to stand behind your product
reptillikus
ate lug
Yeah Paul is a standup guy. Im 100k into the shift kit in our green bronco with zero complaints, which is what prompted me to get one for my wife's 90. We both agree, his shift kit is 100% better than what Superior sells. Of course her trans is rebuilt and as such beefier than my 200k+ stocker, but i cant even see a need to have him tweak either, they just shift good.
reptillikus
ate lug
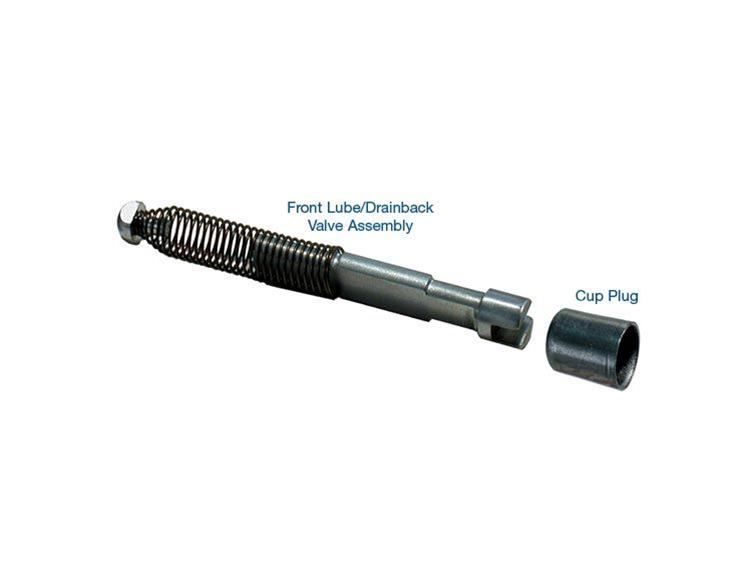
I dont remember if it came up or not, but for the love of god, pull the pump out and replace the snap ring for the OD Apply Piston with the updated one from Sonnax. 75% chance its fallen out, and youre going to smoke the clutches (if theyre not toast already) and lose OD. Its right there behind the pump, not hard to do at all.
Sonnax spiral ring, $12:
pump gasket, $13:
If you think its ever been over-heated, then order a new anti-drainback valve for the pump as they are plastic and melt if the trans was overheated. A melted one will lead to OD planetary failure. The replacement ones are aluminum, and the pump has to be removed to replace it, so IMO id do both of these repairs/upgrades before you put it in.
$7
 www.summitracing.com
Id highly recommend both of these upgrades before putting it in. Theres lot of other things you can do but at that point you might as well rebuild it. But speaking from experience, these 2 cheap upgrades will make a used trans last a lot longer. Well, 3 if you count a shift kit.
Sonnax spiral ring, $12:
pump gasket, $13:
If you think its ever been over-heated, then order a new anti-drainback valve for the pump as they are plastic and melt if the trans was overheated. A melted one will lead to OD planetary failure. The replacement ones are aluminum, and the pump has to be removed to replace it, so IMO id do both of these repairs/upgrades before you put it in.
$7
Sonnax Transmission Company 36425-01K
Free Shipping - Sonnax Transmission Company 36425-01K with qualifying orders of $109. Shop Valve Body Replacement Components at Summit Racing.
Id highly recommend both of these upgrades before putting it in. Theres lot of other things you can do but at that point you might as well rebuild it. But speaking from experience, these 2 cheap upgrades will make a used trans last a lot longer. Well, 3 if you count a shift kit.
Provience
Kill!
I've got this "update book" that i'm going to use to check things out once I get it taken apart. I'm only going to soft count the price of a rebuild into the swap considerations, mostly because it's easy to spend as much as you want, down to very little when going through them.
Attachments
reptillikus
ate lug
I have those in paper form. Very good books to have.
Yeah you can build it with all the updates, and then you can build it with all the upgrades (like the SS planetaries).
So, my DD is my 96 bronco. Bought it non-running, had no idea if the trans was any good. All i did was the spiral ring, Superior's Pump Correction Package (which includes that AL anti-drainback valve) and a shift kit from Punisher. I just hit 100k since then, and the trans still shifts just fine. I do have a weird noise that i think is the converter (at 223k im not surprised), but those 3 items solve most of the problems the E4OD suffers from.
Your 90/91 is going to have the old center support with bushing instead of bearing, and the E9 (or maybe F1) pump which is kinda meh, but IMO the big stuff is the drainback valve and the spiral ring, those will kill the trans quick.
I can get behind just throwing it in and going (and getting lucky like my 96), or saying fuck it and rebuilding it just in case. I blew up the E4OD in my F250 PSD (while towing my bronco no less), and that was a costly rebuild.
Provience
Kill!
Since it's winter this week and i'm trying to stay inside, I've been plucking through both books today. This is the current list of likely to need hard parts from the books, depending on what is broken when I get the trans apart.
oregon performance transmission runs ~$200 for their cheap gasket and clutches kit
At the very least, i'm going to get it open and see what it looks like inside. If the planets are fine, then they won't get replaced. If they are chipped or anything, then might as well go with the 6 instead of 4 gear. Same for O/D carrier and center support.
it's tough because there is lots of easy things to do once you're in there to make it a bunch better, the hard part is not doing them all
edit: i'll probably have to wait until the "rebuild kit" arrives to see if it has the spiral ring and drainback valves in it, or not. Those are cheap and well worth doing.
Overdrive clutch pack F3TZ-7B066-A 3 pack instead of 2 pack (1993+) $15
6 pinion forward & reserve planets ~$80 ea
Front pump F5TP $150-300
Center support ball bearing f4tz-7a130-b ~$100
Steel instead of Al overdrive carrier & input shaft f4tz-7b446-b $100
overdrive roller clutch kit F4tz-7a089-a ~$30
oregon performance transmission runs ~$200 for their cheap gasket and clutches kit
At the very least, i'm going to get it open and see what it looks like inside. If the planets are fine, then they won't get replaced. If they are chipped or anything, then might as well go with the 6 instead of 4 gear. Same for O/D carrier and center support.
it's tough because there is lots of easy things to do once you're in there to make it a bunch better, the hard part is not doing them all
edit: i'll probably have to wait until the "rebuild kit" arrives to see if it has the spiral ring and drainback valves in it, or not. Those are cheap and well worth doing.
reptillikus
ate lug
Let me know if you need parts, I have a 2wd 97 5.8 E4OD sitting in the garage I saved in case I was going to rebuild the E4OD in my 96 bronco, but since I'm going ZF Im just going to scrap this thing.
Provience
Kill!
well dang, i'll see if i can't get mine apart sooner rather than later and let you know.Let me know if you need parts, I have a 2wd 97 5.8 E4OD sitting in the garage I saved in case I was going to rebuild the E4OD in my 96 bronco, but since I'm going ZF Im just going to scrap this thing.
Provience
Kill!
Welp, this is as much as I've ever looked at it before. I think I'm just going to run it as is now
She's been rebuilt at some point in the past 30 years, already has the 1995+ front pump.

Edit more pictures:
1990 case F0TP

89-94 solenoid pack plug, missing plastic sleeve

edit again:
looks like what i've got for pinouts already downloaded should be what I need, adding these links as well just for more
 www.supermotors.net
 www.fordfirst.com
She's been rebuilt at some point in the past 30 years, already has the 1995+ front pump.
Edit more pictures:
1990 case F0TP
89-94 solenoid pack plug, missing plastic sleeve
edit again:
looks like what i've got for pinouts already downloaded should be what I need, adding these links as well just for more
1990 Ford Bronco MAF Upgrade Pin-Outs pictures, videos, and sounds | SuperMotors.net
10 pics, videos, and sounds
www.supermotors.net
EEC-IV Abbreviations Reference : How-To Library : Ford First
Library Article: Commonly used Ford EEC-IV ECU Testing terms. at Ford First
Last edited:
Provience
Kill!
Did some drawing and consolidating from about 4 different wiring sources to get it to make sense in my head. This should be the way to make it work out. After comparing various years, went ahead and dropped the Intake Air Temp Sensor, doesn't seem worth the $5 for a $0.05 resistor.
This is where I started, those should be the factory wire colors and pin locations.

Didn't want to make a bunch of different colors, could probably go back and figure out how to change them to match the wires that should be there.

Set those up by layers so that it is easier to see. Ground circuit

12v positive circuit,probably don't need the Keep Alive Power, will keep an eye and see what kind of drain it uses. Used circles for places it doesn't matter if it joins, obviously these dots are relative to the drawing and not scaled or accurate to real life locations

This is the various sensors that i'm going to give a whirl, based on first page conversations it should be plenty.Well, that's neat. The PCM numbers are on the Ground layer instead of Main 
fixed

transmission main harness

shift select lever. The 1 signal wire for position looks like it goes off variable resistance to know what gear it is in. If you ever need to deceive or troubleshoot the computer/lever.
As Measured Between Pin 3 and Pin 2 (GND) on MPLS, based on position
P is 4189 Ohm
R is 1448 Ohm
N is 733 Ohm
D is 401 Ohm
2 is 211 Ohm
1 is 85 Ohm

This is where I started, those should be the factory wire colors and pin locations.
Didn't want to make a bunch of different colors, could probably go back and figure out how to change them to match the wires that should be there.
Set those up by layers so that it is easier to see. Ground circuit
12v positive circuit,
This is the various sensors that i'm going to give a whirl, based on first page conversations it should be plenty.
transmission main harness
shift select lever. The 1 signal wire for position looks like it goes off variable resistance to know what gear it is in. If you ever need to deceive or troubleshoot the computer/lever.
As Measured Between Pin 3 and Pin 2 (GND) on MPLS, based on position
P is 4189 Ohm
R is 1448 Ohm
N is 733 Ohm
D is 401 Ohm
2 is 211 Ohm
1 is 85 Ohm
Last edited:
reptillikus
ate lug
I don't see anything in there about the 4wd indicator. I have to dig out my books as I could be mistaken, but I thought it got signal from the 4x4 indicator so it could adjust the shifting while in 4 low.
I dont think I'd delete the KAM power. It's only 1 wire, and it means you'll be able to pull codes if the trans ever starts acting weird.
I dont think I'd delete the KAM power. It's only 1 wire, and it means you'll be able to pull codes if the trans ever starts acting weird.
Provience
Kill!
It's going into my 2wd rigI don't see anything in there about the 4wd indicator. I have to dig out my books as I could be mistaken, but I thought it got signal from the 4x4 indicator so it could adjust the shifting while in 4 low.
I dont think I'd delete the KAM power. It's only 1 wire, and it means you'll be able to pull codes if the trans ever starts acting weird.
 otherwise, yes that'd be absolutely required.
good point on the keep alive. it can't possibly draw enough to matter much. everything with memory runs off the aux battery which is disconnected when the truck is off regardless. I think I was just getting into my own head with trying to draw it all out
Provience
Kill!
ECU Pin # 12 is for the Lo-Range sensor, which should be grounded through the case, closed with the shift rail
reptillikus
ate lug
Whoops, forgot it was 2wd 
Provience
Kill!
Need to save some reference pictures. This is the orientation for the TPS from the donor I got wiring from. Purchased a new sensor with different colored wiring.

Went ahead and pulled the 60 pin EEC-IV connector apart, this was off a 5.8? manual 94? truck

You can almost read the numbers along the sides in real life, easiest to remember the 3 black wires along the side are 20 (solid), 40 (stripe), 60 (stripe).

cheap snap ring pliers make good pokey sticks, the back cover has got 2 tabs on the long side to poke, then pops off across the other long side

Straightening out the intermingle is a good time. Wanted to leave the leads long

the orange gasket is also fun to get up, working slowly and around and around, it eventually rises

the snap ring plier worked well for getting the font locking spacer jobber out. Once it's started, it's easy to slide up

Tried of bunch of things that weren't the proper pin removal tool, ended up with the small flat eyeglass screwdriver as the tool of best success

took out everything except for ground 20/40/60 and KAM 1 to help keep my reference positions. The numbers under the orange gasket are easier to read, bright light helps.

used an 1/8" (9/64") drill bit to open up the holes I'll be using. Ford has them blocked off by particular application.

....
Went ahead and pulled the 60 pin EEC-IV connector apart, this was off a 5.8? manual 94? truck
You can almost read the numbers along the sides in real life, easiest to remember the 3 black wires along the side are 20 (solid), 40 (stripe), 60 (stripe).
cheap snap ring pliers make good pokey sticks, the back cover has got 2 tabs on the long side to poke, then pops off across the other long side
Straightening out the intermingle is a good time. Wanted to leave the leads long
the orange gasket is also fun to get up, working slowly and around and around, it eventually rises
the snap ring plier worked well for getting the font locking spacer jobber out. Once it's started, it's easy to slide up
Tried of bunch of things that weren't the proper pin removal tool, ended up with the small flat eyeglass screwdriver as the tool of best success
took out everything except for ground 20/40/60 and KAM 1 to help keep my reference positions. The numbers under the orange gasket are easier to read, bright light helps.
used an 1/8" (9/64") drill bit to open up the holes I'll be using. Ford has them blocked off by particular application.
....
Provience
Kill!
and reinstalled the pins I'll be using.

This is why the white cap comes with block out plugs for the gasket, Form in Place Gasket, room temperature vulcanizing silicone will also work and i'll just fill this thing with that. Also planning on keeping it all inside, under the dash so moisture shouldn't be much of a program.

and then zip tied up my bundles by type

I convinced myself 1 of the wires was in the wrong spot, took it all apart, confirmed it was in the correct location and put it all back together. At the very end, found another wire that "seems" to be in the wrong spot. Not going to take it all apart again, going to see if it works and troubleshoot it later when everything goes to get installed. Pin #26, the reference voltage for MAP/TPS, which will be easy to confirm if it's correct later
In addition to the wiring diagrams consolidated a couple posts up, I added in the following:
Pin 17 is solid Tan wire and is the + triggered side for a Malfunction Indicator Light (not installed, but if i grab that wire and go to ground with a test light, it will flash for me if needed)
Pin 22 is Dark Green and Yellow stripe and is the trigger for the Fuel Pump Relay, in the event I want an easy to access switched 12v+ power source, there it'll be.
Pin 48 is solid GraY and is labeled Self Test Input, it's just a little plug which is probably the thing used to trigger the MIL self test reporting. Also not going to be used, but having the wire/pin in place just might be useful in the future.
Since this was the wrong year and wrong combination, I made a new combination on the right side so that I can track what color wire I put into what pin.

Vehicle Speed Sensor is currently the only plug I've not got, current speedometer is likely too short, driveshaft is too long and crossmember will need redone.
Going to save the full harness putting together until the weather is warm and a couple projects have moved on.
This is why the white cap comes with block out plugs for the gasket, Form in Place Gasket, room temperature vulcanizing silicone will also work and i'll just fill this thing with that. Also planning on keeping it all inside, under the dash so moisture shouldn't be much of a program.
and then zip tied up my bundles by type
I convinced myself 1 of the wires was in the wrong spot, took it all apart, confirmed it was in the correct location and put it all back together. At the very end, found another wire that "seems" to be in the wrong spot. Not going to take it all apart again, going to see if it works and troubleshoot it later when everything goes to get installed. Pin #26, the reference voltage for MAP/TPS, which will be easy to confirm if it's correct later
In addition to the wiring diagrams consolidated a couple posts up, I added in the following:
Pin 17 is solid Tan wire and is the + triggered side for a Malfunction Indicator Light (not installed, but if i grab that wire and go to ground with a test light, it will flash for me if needed)
Pin 22 is Dark Green and Yellow stripe and is the trigger for the Fuel Pump Relay, in the event I want an easy to access switched 12v+ power source, there it'll be.
Pin 48 is solid GraY and is labeled Self Test Input, it's just a little plug which is probably the thing used to trigger the MIL self test reporting. Also not going to be used, but having the wire/pin in place just might be useful in the future.
Since this was the wrong year and wrong combination, I made a new combination on the right side so that I can track what color wire I put into what pin.
Vehicle Speed Sensor is currently the only plug I've not got, current speedometer is likely too short, driveshaft is too long and crossmember will need redone.
Going to save the full harness putting together until the weather is warm and a couple projects have moved on.