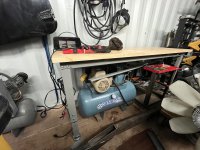
Anybody with an Ingersoll Rand SS5 compressor needs to know about checking/torqueing the head bolts. They loosen off, then you blow the head gasket.
Copied from somewhere:
Yep, good call. Didn't think about checking it for straight.
I couldn't find torue specs for this so I just went by google. 156 inch lbs for 5/16 bolts (torqued to 50, then 100, then 156).
Edit: Well, I found two different recommended torque values for this thing. One place said 22 foot lbs, other is an amazon review that says 30.
This guy had the exact same problem as me, apparently it's "common" Here's the review, mostly so I can find it again.
Overall this compressor is a decent unit and it puts out good air volume when working properly, but it does have some issues that can be dealt with to make it better. Many complain that just after the warranty period the compressor runs but won't create air pressure in the tank. Mine did the same thing after only 16 months of use, probably only 10 hours of total running time, but of course it was beyond the warranty period as my installation was delayed after I made my purchase. A common cause of this compressor pump no longer creating tank pressure is from the valve plate gasket failing right between the two cylinders. When this happens the two pistons just pump air back and forth between the two cylinders rather than developing pressure and pumping air into the tank. The good news is that the valve plate gasket and the cylinder head gasket (you need to replace them both together) are both available from Amazon as "Ingersoll Rand 54429600 Valve Plate Gasket for Compressor Pump" and "Ingersoll Rand 54571617 Head Gasket for Air Compressors", and both were less than $40.00 combined when I purchased them early in 2015. I believe there are at least two reasons the valve plate gasket fails. The first is that the compressor pump is running at 920 rpm's, which is a bit on the high side and thus it creates more heat at the top of the cylinder and in the cylinder head. I also believe the cylinder head bolts lose their torque from these gaskets compressing over time due to the heating up and cooling down. My compressor pump got so hot that you could smell the paint baking if it ran more than six cycles in a row. I believe the combination of these to factors cause the valve plate gasket to fail prematurely, mine lost over an inch of gasket right between the two cylinders. The solution is to check the torque on the cylinder head bolts from time to time, but more important is to add a fan or two that will blow air over the cylinder head to help cool it while it is running. The fan blades on the driven pulley that drives the compressor pump only create airflow along the lower half of the cylinder, cool air is need most up at the top of the cylinder and the cylinder head. To replace these two gaskets, disconnect power to the compressor and then remove the large nut that holds the copper air tank tube to the cylinder head, use two wrenches, one to turn the nut and the other to hold the brass head adapter from turning. Then remove the air filter/silencer from the cylinder head by unscrewing it and remove the bolt that holds the belt guard bracket to the top of the cylinder head. Finally remove the six bolts that hold the cylinder head and the valve plate to the cylinder. Remove the cylinder head and then the valve plate and look for the problem area with the valve plate gasket. Clean all gasket residue from the top of the cylinder, both sides of the valve plate and the bottom of the cylinder head by first scraping with a gasket scraper and then cleaning with some solvent and a rag (lacquer thinner works well for a solvent). Now install the valve plate gasket followed by the valve plate followed by the head gasket and finally the cylinder head. Make sure you orient the valve gaskets, the valve plate and the cylinder head correctly. Install the six head gasket bolts and only finger tighten them. Now you need to begin torquing the cylinder head bolts a little at a time in a crisscross pattern beginning with the two center bolts then going to each opposite outside corner bolt and then the other two remaining outside corner bolts. Increase the torque by 5 foot lbs each time until you get up to 30 foot lbs of torque. Reinstall the belt guard bracket bolt and the large nut that holds the copper air tank tube to the cylinder head being very careful to not cross thread it, and use the two wrenches for this as you did when you removed the large nut. Screw the air filter/silencer back into the cylinder head and you are ready to turn the power back on and test to see if it pumps air again. After a few cycles of compressing air, check the torque on the head bolts and do so fairly often at first. Eventually the new gaskets will compress from the torque and the heating/cooling cycles and you should find the bolts will begin to hold torque. I hope this review and instructions on how to repair this compressor pump have been helpful.

 I have no opinion on the new ir stuff. I’m a Quincy guy.
