What's new

#SteerAndStuff buggy build

SteerAndStuff

Red Skull Member
Joined
Dec 29, 2020
Member Number
3204
Messages
182
Loc
Wyoming
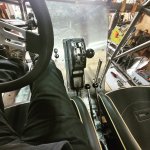
Time to start getting back onto the the forums more. Here is my build thread on the new buggy after selling my old GoatBuilt Ibex that I had cut in half twice and remodeled to make more inline with what I was doing. I first built it with the idea of doing a little of the local racing but after racing twice I decided racing just isn't my thing and retired out with a 100% win ratio. So then making a larger chassis do more rock crawler things was the thing with adding a back seat that rarely got used, redoing the front end for better visibility and aesthetics, and adding rear steer.

So after seeing the other JHF builds I really liked the style of the chassis and with only a one car garage building a chassis at home didn't sound appealing. So got the chassis and axles ordered from JHF and started the parts gathering. Here is a rundown of the parts list so far:

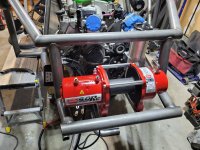
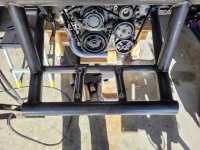
  • Chassis: JHF 2 seat trail chassis
  • Engine: GM 3.9L V6 from 2009 Chevrolet Impala
  • Transmission: 700R4 (60° bellhousing from 1984 2.8 S10)
    • TCI Full manual reverse valve body w/ braking
  • Transfer case: Midnight MetalWorks Dana 300 Rock Box 2.63 low range gears
  • Axles: JHF portal axles using Toyota 8" 3rds
    • 4.88 differnetial gears X 1.92 portal gears = 9.37 overall axle ratio
    • Yukon Grizzly locker front / Yukon Zip locker rear
  • Tires: 42 BFG Krawlers on 20" RBP Cobra beadlock wheels
    • 41.5 Pitbull Rocker radials on recenter H1 double beadlock wheels for winter/snow wheeling


*I should preface the name. Years ago in Moab on Escalator a friend got jammed in and couldn't move. He asked for a spot and at that point I told him to just "steer and stuff" since he was stuck. After that it became a colloquial term and now I'm just running with it. I'll see if I can add a clip of the video sometime.
 
Last edited:
After a marathon trip to western Nevada and back doing 1,974 miles in 35.5 hours I got home with the chassis and axles components from JHF. I had build a temporary wooden table to build on and be able to roll around if needed in anticipation of getting the chassis. Got home and slid onto the table and had no time to wait and went ahead and mocked in the engine, transmission, and transfer case.

20210312_174753.jpg


20210313_125324.jpg


20210313_160945.jpg
 
First thing I had to change was the transfer case adapter. I originally planned on using a factory GM th350-np208 adapter which pilots and bolts up but problem was for my custom clocking the support ribs and casting of the adapter wouldn't allow redrilling for the clocking I desired. Ended up getting an adapter from Novak and was able to redrill the front of the transfer case to get the perfect clocking.

Also got seat mounts built using either double sheer or a bushing on the single sheer tabs to facilitate using pins to mount seats for tool-less removal.

Transmission crossmember ended up using 1.5" square tube since stronger moment of inertial in the direction of hits it would take. I notched one side of the crossmember and half notched the other so it engages the chassis then used some formed shock brackets to retain it and also locks the crossmember in place.

Started building headers. Wasn't as hard as I expected but at least easier to learn how to build headers on a V6. Waiting on backordered muffler to finish building exhaust for now.

20210328_175311.jpg


20210319_170756.jpg


20210409_180602.jpg
 
Started working with the interior panels and thinking of layout for the controls.

Also got a radiator mounted. Wanted small enough to not obstruct visibility, simple to mount, and an off-the-shelf option. The dimensions of a 64-66 Mustang radiator fit pretty decent out of all the options I could find without doing something custom. Could have mounted it over the upper control arm mount but sat the tank higher than I liked so moved it inboard just next to the mount but lower. Mounted using grommet/bushings used on Harley tank mounts.

20210409_184738.jpg


20210416_095809.jpg
 
Last edited:
Each time I see one of the JHF chassis going together I regret not going that route a little more. The shock mount cross member idea is just what I needed also. I have a couple extras laying around and your solution is perfect :smokin:

BTW, How do you like building on a table opposed to the trailer :flipoff2: Seriously though, thanks for sharing. Looking forward to updates.
 
Small update. Have the rear steer valve, transmission shifter, and transfer case shifters done. Wanted to keep the rear steer and transmission close and easy to access back and forth. Starting to mock up the rear cutting brakes as well.
 

Attachments

  • IMG_20210430_093652_974.jpg
    IMG_20210430_093652_974.jpg
    1.1 MB · Views: 181
I also shortened my front to tell the difference after a beer or when in a hurry.
 
Winch mount built today. Did similar mount on last rig and liked how easy it is to transition from front pull to suck down. Neet to build a tube fairlead to finish it off.
 

Attachments

  • 20210506_180433.jpg
    20210506_180433.jpg
    2.9 MB · Views: 179
I like it, clean and simple. Is it essentially an "H" shape with bungs in the mounting tubes?
 
I like it, clean and simple. Is it essentially an "H" shape with bungs in the mounting tubes?
Exactly. I need to figure a way to make a weld on fairlead again like I did on my last rig. Don't have a torch setup anymore to warm up some rod.
 

Attachments

  • 20210506_172418.jpg
    20210506_172418.jpg
    2.3 MB · Views: 211
  • 20190205_052436.jpg
    20190205_052436.jpg
    610.3 KB · Views: 244
Thanks for the pics. I missed it in your IBEX build thread which I still reference (amongst others) from time to time for inspiration/ideas. Def one of my favorite builds/transformations. I don't have an acetylene torch setup either but the propane weed burner worked ok for me when I back halved my motorcycle frame. Just a thought.
 
First thing I had to change was the transfer case adapter. I originally planned on using a factory GM th350-np208 adapter which pilots and bolts up but problem was for my custom clocking the support ribs and casting of the adapter wouldn't allow redrilling for the clocking I desired. Ended up getting an adapter from Novak and was able to redrill the front of the transfer case to get the perfect clocking.

Also got seat mounts built using either double sheer or a bushing on the single sheer tabs to facilitate using pins to mount seats for tool-less removal.

Transmission crossmember ended up using 1.5" square tube since stronger moment of inertial in the direction of hits it would take. I notched one side of the crossmember and half notched the other so it engages the chassis then used some formed shock brackets to retain it and also locks the crossmember in place.

Started building headers. Wasn't as hard as I expected but at least easier to learn how to build headers on a V6. Waiting on backordered muffler to finish building exhaust for now.

20210328_175311.jpg


20210319_170756.jpg


20210409_180602.jpg
Where did you find the flanges for this motor?
 
Using the frame trails for coolant passage to the rear radiator. Since engine side is about under cab I welded in a self centering blind to keep the front 2' of frame from being hot.

Welded on nipples for the inlets and outlets.


IMG_20210615_181856_626.jpg


IMG_20210615_181856_696.jpg

IMG_20210615_181856_729.jpg

20210619_080316.jpg

20210619_080306.jpg

20210619_080252.jpg
Cutting and butt welding frame does not weaken frame?
 
Cutting and butt welding frame does not weaken frame?
My blind disk was 1-5/8 od so left me a bevel for a good weld. I chose that spot between those other tubes with the idea I could make a gusset between them to tie across my cut as well if I felt the need.
 
Top Back Refresh