What's new

SAS- cycling suspension for clearance

eacook1

Red Skull Member
ST4x4
Joined
Feb 25, 2021
Member Number
3550
Messages
212
Loc
Temecula, CA
I just got my new Sky Off road 3f springs. While looking at them I thought it would be a shame to break apart a brand new pack to install the main leaf when I am setting up all my steering and bump stops and what not during my SAS.

36EECF6D-6799-41DC-A75C-3EC3FB66FD1A.jpeg


It got me to thinking of alternatives. How have you done this in the past?

My current thought is to build a solid link that attaches to the front hanger, and to the axle in the exact location the axel would sit during full stuff or maybe when the spring is flat. I could possible make it adjustable to allow for any for/aft movement that actual spring would have so at full droop I could adjust it appropriately.

The one problem I see while typing this out is maintaining the pinion angle to that of what the leaf spring would produce though the suspensions travel.

Also just sitting there the height of the spring are considerably different…about 3/4”. I realize there is likely a right and left but that seems like a lot.
on a Toyota housing the perch heights are different, Some manufactures build different spring packs some ship a shim or spacer to off set that.

my only option has been strip the pack down to the main leaf and cycle it. I used a block of wood to simulate the thickness of the spring pack. then just clamped it all together with u bolts and plates.

What's your concern about breaking the pack apart?
 
What's your concern about breaking the pack apart?

I guess nothing really, just never done it. So with just the main leaf in can you get it fully flat to simulate full stuff?

I have seen the shims some springs come with. Not sure how my diamond housing is set up.
 
IDK anything about a Diamond housing, I've done two in my life both with toyota housings. one on an 87' and my daily on a 97'

Pulling apart the spring pack was not a big deal. and seemed to work well.

It may not be the only way, just the only way I've done it. and it seemed pretty easy.

I might have set them up conservative, but used a flat spring as my full up bump setting, I may have been able to invert them, but I didn't.
 
Quit whining and break em down save yerself the grief...:flipoff2:
What's in the background (auto)?
 
Last edited:
Set up the springs, use a come a long or two and suck the suspension down. I attach it to the front bumper, under the axle and to the t-case skid. That’s the lazy way to do it. :flipoff2:
51640133446_420d46e950_b.jpg
 
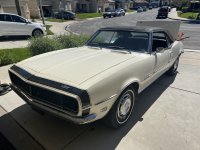
Car is a bone stock 68 Camaro, 250 inline 6 with a 3 speed on the floor and an RS package, my grandma bought it from a dealer here in socal in 68.

I finally got a good look at these springs. There’s some kind of brown crap all over them, like a plastic-dip but it flakes off pretty easy.
 

Attachments

  • 98127F99-320F-473E-9F29-C4587434A7FB.jpeg
    98127F99-320F-473E-9F29-C4587434A7FB.jpeg
    2.9 MB · Views: 35
The Camaro is my retirement project. Besides some re-pop parts it’s all original. Needs a new roof skin and vinyl top but it’s in great shape otherwise and we drive it a few times a month. My wife is setting it up for a trunk or treat tonight.
 

Attachments

  • 9948EDF8-65AE-43B6-AD72-8377E8F80FF1.jpeg
    9948EDF8-65AE-43B6-AD72-8377E8F80FF1.jpeg
    3.7 MB · Views: 30
Car is a bone stock 68 Camaro, 250 inline 6 with a 3 speed on the floor and an RS package, my grandma bought it from a dealer here in socal in 68.

I finally got a good look at these springs. There’s some kind of brown crap all over them, like a plastic-dip but it flakes off pretty easy.
I have a soft spot for late 60's early 70's GM's, Grew up on them, when you could buy a 69' 307 RS for $600 molest the crap out of it and trade it away like nothing.
Sadly I did bad things to way to many great cars.
That's a great example of an unmolested California classic.

As far as the spring pack goes. you can use a come along and pull the whole pack flat or take your time and separate down to the center spring.
use a couple C Clamps to hold the pack together, undo the center bolt then loosen the clamps to release the pressure.

with a single leaf it won't support the weight of the truck, you can use the floor jack to set spring perches.

you mentioned a diamond housing, you'll need to measure spring perches and see if they are the same height or different, sounds like the spring packs you bought are for a Toyota housing and different heights. Thats going to be an issue if the diamond housing does not have standard Toyota perch heights.

hope that made sense.
 
Sorta sounds like a new cosmoline....
sweet project, gotta love grandparents like that:beer:

Bolt together clamps ftw... a pair of big c clamps and yer set
 
in the pic he posted the leafs looks the same height but hard to say for sure

are there part numbers painted on the leaf springs?
In the first post last sentence he mentioned them being different by 3/4" that's considerably more than they would be. but without measuring its a guess.
 
The leaf packs do have different part numbers, they are about 3/4” different in height.
 
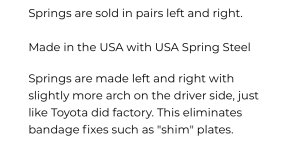
I haven’t had a chance to look at the spring perches. Here is what skys says about their springs.
 

Attachments

  • 89234A00-8C0C-4325-AA29-FEF278D9562F.jpeg
    89234A00-8C0C-4325-AA29-FEF278D9562F.jpeg
    190.3 KB · Views: 42
you mentioned a diamond housing, you'll need to measure spring perches and see if they are the same height or different, sounds like the spring packs you bought are for a Toyota housing and different heights. Thats going to be an issue if the diamond housing does not have standard Toyota perch heights.

hope that made sense.

I"m confused(whats new), My diamond housing has identical height springs pads. If the factory toyota pads are at different heights then Skys comments don't make sense. So did toyota springs have different left and right part numbers? Was the drivers side pad Higher on the factory Toyota housing to allow for the extra weight of the driver?
 

Reinforced and Lengthened Spring Perches:​

The Toyota mini-truck solid front axle is designed with the differential offset to the right hand side of the vehicle. This allows the front driveshaft to pass beside the engine and transmission. One of the consequences of this is that the right hand side spring perch sits up on the side of the differential housing. In order to clear the steering arm on the left side, Toyota chose to place the left hand side spring perch closer to the axle tube, resulting in approx. a 3/8" height difference between the two sides. To compensate for the height difference, the stock front springs are asymmetrical, with the right side having less arch than the left side, On top of that, since the right side is flatter, this means it is inherently "softer" than the more arched left side, so the individual spring leaves are a made a bit thicker to compensate for the loss of stiffness due the the flatter spring.

Many aftermarket front springs also offer this different arch, but many do not make the right hand spring stiffer. This results in a front end lean. Since the spring perches are located approximately halfway out on the axle, a small difference at the spring is magnified by at least a factor of two at the wheel. However, with the stock steering and spring setup, there's not a lot that can be done about this. However, if the steering is modified to eliminate the interference problems of the stock steering arm, then there is a simple fix.

Another problem on Toyota trucks that see a lot of off-road use is that the stock spring perches can become distorted from the forces of rockcrawling. The stock spring perches are a bit weak, and adding a bit of support to them before they are damaged will prevent it from happening.

A last problem with the stock spring perches is that they are only about 4-3/4" long. With the spring over axle configuration, this short perch can contribute to axle wrap. A longer spring perch can help spread the axle torque load over a longer length of the leaf spring, lessening axle wrap. Too long a perch and you can lessen the flexibility of the spring.

FrPerch02t.jpg FrPerch03t.jpg

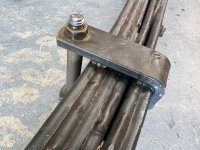
So, there are a couple of issues with the stock Toyota spring perches that can all be fixed at one time. To add some strength to the left hand perch, I cut two pieces of 1/4" wall 2-1/2" square tube and trimmed them to match the profile of the existing perch support. These pieces were then welded to the axle and perch, extending the length of the perch. Then I cut a length of 3/8" ax 2" flat bar approx. 5-1/2" long. In the center, I drilled a 5/8" dia. hole to accommodate the head of the center bolt on the spring and used a spare center bolt to align the spacer to the perch and welded the spacer in place.

FrPerch01t.jpg

It wouldn't do to have a nice beefy left hand perch and keep the stock right hand perch, now would it? I cut two pieces of 3/8" x 2" flat bar long enough to span the gap between the top and bottom perches, and then welded them in place. To fill the gaps, I fashioned pieces of 3/16" flat bar and welded those in place as well. This boxed the whole perch and also extended it 3/4" in length. All in all this project took me about half a day to finish and cost about $10 in materials.

Courtesy of Rodger Browns site
 
I searched, maybe half assed and deserve some flaming.

Will search more later but I would rather be working in the garage right now.
 
  • Like
Reactions: Clb

Reinforced and Lengthened Spring Perches:​

The Toyota mini-truck solid front axle is designed with the differential offset to the right hand side of the vehicle. This allows the front driveshaft to pass beside the engine and transmission. One of the consequences of this is that the right hand side spring perch sits up on the side of the differential housing. In order to clear the steering arm on the left side, Toyota chose to place the left hand side spring perch closer to the axle tube, resulting in approx. a 3/8" height difference between the two sides. To compensate for the height difference, the stock front springs are asymmetrical, with the right side having less arch than the left side, On top of that, since the right side is flatter, this means it is inherently "softer" than the more arched left side, so the individual spring leaves are a made a bit thicker to compensate for the loss of stiffness due the the flatter spring.

Many aftermarket front springs also offer this different arch, but many do not make the right hand spring stiffer. This results in a front end lean. Since the spring perches are located approximately halfway out on the axle, a small difference at the spring is magnified by at least a factor of two at the wheel. However, with the stock steering and spring setup, there's not a lot that can be done about this. However, if the steering is modified to eliminate the interference problems of the stock steering arm, then there is a simple fix.

Another problem on Toyota trucks that see a lot of off-road use is that the stock spring perches can become distorted from the forces of rockcrawling. The stock spring perches are a bit weak, and adding a bit of support to them before they are damaged will prevent it from happening.

A last problem with the stock spring perches is that they are only about 4-3/4" long. With the spring over axle configuration, this short perch can contribute to axle wrap. A longer spring perch can help spread the axle torque load over a longer length of the leaf spring, lessening axle wrap. Too long a perch and you can lessen the flexibility of the spring.

FrPerch02t.jpg FrPerch03t.jpg

So, there are a couple of issues with the stock Toyota spring perches that can all be fixed at one time. To add some strength to the left hand perch, I cut two pieces of 1/4" wall 2-1/2" square tube and trimmed them to match the profile of the existing perch support. These pieces were then welded to the axle and perch, extending the length of the perch. Then I cut a length of 3/8" ax 2" flat bar approx. 5-1/2" long. In the center, I drilled a 5/8" dia. hole to accommodate the head of the center bolt on the spring and used a spare center bolt to align the spacer to the perch and welded the spacer in place.

FrPerch01t.jpg

It wouldn't do to have a nice beefy left hand perch and keep the stock right hand perch, now would it? I cut two pieces of 3/8" x 2" flat bar long enough to span the gap between the top and bottom perches, and then welded them in place. To fill the gaps, I fashioned pieces of 3/16" flat bar and welded those in place as well. This boxed the whole perch and also extended it 3/4" in length. All in all this project took me about half a day to finish and cost about $10 in materials.

Courtesy of Rodger Browns site
Just serve it up on a platter why don't you:lmao::flipoff2:

Honestly, That is the most detailed explanation of why. I've owned Toyotas a year or two, and the answer has always been cause Toyota don't ask it's just the way it is. And you just knew you had to account for it.

:beer::beer::beer:
 
  • Like
Reactions: Clb
I"m confused(whats new), My diamond housing has identical height springs pads. If the factory toyota pads are at different heights then Skys comments don't make sense. So did toyota springs have different left and right part numbers? Was the drivers side pad Higher on the factory Toyota housing to allow for the extra weight of the driver?
So if your perches are identical and your springs are not, some simple math can fix it. This is like a 9th grade Math word problem. :lmao:
 
I searched, maybe half assed and deserve some flaming.

Will search more later but I would rather be working in the garage right now.
:beer:

you will usually be ahead of the game by doing so:flipoff2:
adding one or more leaves to short side should do it.....
Howz THAT fer spoonfeeding:lmao: stingray
 
9th grade????
Oh yea prk schools:lmao:

Btw weren't the factory offset like 3/8" not 3 /4" ???
 
Thanks for the spoon feed Clb. Good info.

The sky’s springs are asymmetric and designed for the factory housing. They recommend a 3/8 shim on the passenger side on my diamond housing which has equal height perches.

All that said. My springs are 3/4” different height just sitting side by side on the ground. This is just an observation and doesn’t mean anything as far as required size of spacers.
 
Top Back Refresh