What's new

Project green truck - 97 4runner

vegask

Active member
Joined
Jul 13, 2022
Member Number
5356
Messages
31
A lot of my build pics over the years have disappeared or were scattered over platforms/forums that do not exist anymore. So figured I would try and start over on a build thread.

Everything started so pretty and simple. Was the 3rd owner of a 97 4runner V6 limited with beat up leather seats and 31” stock tires. This was fun on the trails but I immediately wanted to modify it.

How it started:

wpjnUQ3.jpg


A few years later on 33s after I built my first front bumper.

j0q9dpF.jpg


How its been:

LTMvRSd.jpg


How it is today:

97OYF3o.jpg


I’ll skip all the early stuff where I put 32s on, donahoes/icons, chaos fab arms, ome spacers etc and skip to the good parts. Just about everything I put on the truck was fabricated by myself except for the diamond axle, stubbs sliders and cage.

However, here is a great shot of my old bud builts from when I rolled it on the freeway years ago.


JWd6oOg.jpg


Current setup:
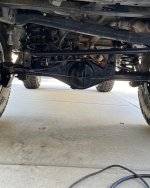
  • Diamond front axle with LC high pinion diff, 4.88 and grizzly locker.
  • Front axle is 61.5" WMS using IFS hubs and FJ-60 shafts (RCV)
  • Front suspension: 80 series arms, 14” Fox coilovers and Fox 2” bumps
  • FJ60 steering box
  • Rear axle is Frontrange offroad full float 4.88 elocker with supra calipers
  • Rear suspension: OME 861 coils, billstein shocks and FOA 2” air bumps
  • Rear lower links are homemade 1.5” .250 wall DOM with heims/poly bushings
  • 4x innovations roll cage
  • Homemade front and rear bumpers
  • Stubbs Sliders
  • Vision beadlocks
  • FJC twin stick converted chain drive t-case
  • Marlin crawl box with 4.7s
 
Rear full float setup from frontrange offroad using supra calipers.

Qm4COPN.jpg

o7GZqDF.jpg

nFOZylF.jpg


wjbsnYW.jpg
sVyQUMS.jpg


I have mixed feelings about this mod. It was expensive and the brakes did not feel any better than stock. However, when it was all said and done I had much strong axles and more trail options if something should break. I also upgraded the wheel studs to ½ for added strength.

The other pros are that the bearings are serviceable and identical to what I run up front. I may end up converting to SFA calipers later on cause the E-brake setup is kinda meh and finding parts or pads for the supra calipers can be tricky.
 
Gears

So Zuk from gearinstalls.com did my rear diff, however he never posted the pics on his site and that made me sad.

4.88 with E-locker and new multi flange (highly recommend)
ku7Gelq.jpg

Sqri2Ze.jpg

2sNCwL3.jpg
mJucgLe.jpg

NxRemIK.jpg
https://i.imgur.com/30nhpSv.jpg
30nhpSv.jpg

1a7N955.jpg
 
SAS

I began the SAS on October 1st of 2011 and drove it out of my garage on Nov 1st 2011. Amazing what you can get done before you have a kid.

Original SAS thread but most the pics are dead. 97 4Runner - cruiser radius arm SAS


For the SAS… when I began the SAS I was riding on 33s and my wife and I were camping quite a bit. So the goal was just to keep it as low as possible, stable as possible. But use good parts that would not break on us.

When I tore out the IFS I found a few broken bolts, one was on the UCA. So I guess it was a good time to remove everything. I moved the axle forward 1.5” cause I had a lofty goal at the time to get 35s. Well this was the beginning of a lot of mistakes I made while doing the SAS. I got everything setup at ride height and had everything in place and squared up. We did this with the front sump oil pan off… Once I put the rear sump pan on I realized I had a whopping 1” of up travel before the diamond made contact with the pan.

So I had to notch the pan. And 3 years later I notched the pan again. And last year I bent a bump stop mount and finally cracked the pan. So version 2 of the pan was made from scratch.

If you are going to SAS your 4runner/Tacoma here are two items of advice.
  • Build at full bump
  • Move the axle forward at least 2” or go home.

The end result with the 80 series arms was super stable and I could daily drive it.

The original setup was 12” FOA coilovers which leaked like crazy on me. 12” FOX coilovers at the time were too tall so I downgraded to 10” Fox coilovers. (add this to the mistake bin) I finally re-did the coil over mounts a few months back and I am now on a respectable set of 14” Fox coilovers with air bumps.

(these pics are from 2011)
Axle
6KK0Wuh.jpg

Note I am using stock steering arms that are reamed out for GM 1 ton TREs
biib7Cp.jpg

FJ80 arms, bushings were drilled out to take ¾” bolts
Deq97PI.jpg


After lots of measuring I made some brackets out of ⅜ plate and welded them on. I think this was about the point in my life where I went from a Hobart 140 (110v) to a Miller 211 (220v)
vdiSaG4.jpg

TfdpOS0.jpg


Pile of IFS parts. Take the time to unbolt these parts. I was able to sell just about everything which ended up paying for the front housing and diff.
IbmPZN9.jpg


Just a few build shots
P3WDRU9.jpg

YqyGfWd.jpg


Cross member and radius arm mount.
uDtsYdY.jpg


FJ60 box installed. (yes I notched and plated the frame)
1fC6oQp.jpg

On the FJ60 box, I saw the guy from sonoran steel use one on his build and thought “Wow that is a great idea. I will just ignore the other 20 builds that use the IFS box and be different” Well mistakes were made and if I could do it again I would have gone with the IFS box. The 60 box is fantastic and strong as hell, but since its a forward swing I have lost the ability to move the axle forward later on without major work. Live and learn.

This last pic is just before I got the panhard bar on. I am still really happy with the reamed stock steering arms. I am not sure if it was Scott Addicted Offroad or Brian from Frontrange that gave me the idea but I am thankful. The arms were literally free and the reamer was like $40.

GH7RD2A.jpg

As for wiring, I had the push button tcase at the time. So shorting the two wires for the ADD sensor together tricked the ECM into thinking the front diff was engaged. So when I hit the button on the tcase shifter the dash light would illuminate and engage. I later swapped this out for a twin stick but was cool that it worked.

When it was done the front drive shaft actually fit and worked with zero modification.

Recently (this past weekend in 2022) I finally upgraded the shafts in the housing. I had been running IFS hubs/lockouts with Marlin 27 spline chromo shafts for the past decade. Now that I am on 37s I decided to finally get a set of 30 spline RCVs.

zCA2Sb5.jpg


And I finally upgraded the wheel studs on the IFS hubs to ½”
h5fY03Z.jpg


Stock M12 IFS hub stud on left, ½ Stud on right. (Dorman 610-073)
Now all 4 corners use the same lug nuts.
EupZ6E3.jpg
 
– Transfer cases

So for some reason I was under the impression the chain drive tcase out of the newer trucks (FJC, 2nd gen tacoma, 4th gen 4runner) were stronger. So to be different I grabbed a tcase out of an 08 FJC and converted it to twin-stick. Since I was planning on adding a crawl box this made installing it into my 3rd gen possible.


3YA21H9.jpg
FH1TvoI.jpg


Before I even began building the crawl box, there was a bunch of posts about bearing failures in the adapters. Not wanting to deal with that I did the upgrade. If anyone knows if this mod is still needed let me know, or did the bearing issue get sorted? Anyways, its been 7 years of driving and wheeling the MRC bearing has held up.

Original thread: Dual Case Rear Adapter Plate Bearing Bad?


MRC bearing MRC 5209CG Angular Contact Ball Bearing, Double Row, Snap Ring, 30 Degree Angle Contact, 45 mm Bore, 85 mm OD, Silver: Deep Groove Ball Bearings: Amazon.com: Industrial & Scientific
qxWp7Yil.jpg

QwRcRudl.jpg

4plB6ivl.jpg

Install note: “Pressing it out was fairly easy, but I still managed to mess that up. No press needed to get the new one in if you pop the new bearing in the freezer for a few hours and the adapter in a 200 degree oven for 15 minutes”

For building the crawl box, I grabbed a top shift gear drive case from a guy that worked at Samco for $100 and tore it apart. Once I got it torn down I added a sight tube.

tILJ8p8.jpg

I ended up going with the 4.7 gears from Marlin cause he ran some crazy christmas eve sale and it was too good to pass up. In hindsight, having 4.7 gears on an automatic is a novelty. I can only think of one time that I needed to use them so far. Putting both cases in low pretty much negates my brakes.

Had a local shop re-tube and shorten/lengthen the stock shafts. Went to .095 wall which has held up pretty well so far.

PJ8Jn8gl.jpg
 
Last edited:
– Magazines

So I made it into a magazine back in 2012.
lY1Q3l.jpg

QjPBIl.jpg


Technically I made it into a second one but I don’t think it counts.
2KaBJ4D.jpg


– Interior

Finally, one of the more recent mods is I gutted the interior, lizard skinned it and made it a 3 seater. Mainly to give my son a better safer view. But to also keep his friends from wheelin with us. His seat is a PRP seat meant for vertically challenged adults (guess calling it a kids seat has legalities) and I went with Corbeau’s up front cause they make a one piece mount/slider that is a direct bolt in.

56viaIZ.jpg

p1AMKe3.jpg

tnplI9U.jpg
EuEiJC5.jpg


Cage is still kind of a work in progress, it was kit from 4x-innovations that I made a few mods to. I need to add a seat bar for the front seats still and get real seat belts. For some reason I only have two pics from when I was putting it together.

vHM3Llh.jpg
Ruivq1R.jpg


So this is the end of the previous projects. Going to be building a new rear bumper to support the 37” spare and also converting to a rear mound ford f150 tank. Hopefully one of these will be done by the end of the year.
 
This build is what inspired me to move forward with SASing my 3rd gen. Most I seen were all really tall, but this gave me confidence that a low rider was possible, and it's a super sweet ride. I have my F150 Eimkeith brackets on the way, I will be doing that mod here soon as well.
 
Do you have a body lift? I have not thought out how I am going to mount the tank. But I figured I would use it as an excuse to make a new rear bumper at the same time.

You have a build thread for your rig I can look at?
 
Do you have a body lift? I have not thought out how I am going to mount the tank. But I figured I would use it as an excuse to make a new rear bumper at the same time.

You have a build thread for your rig I can look at?
Here is my build thread.

I don't have any body lift, I don't plan on any either, from my understanding it will fit without a body lift fairly flush as long as the ribbing on the underside is massaged. I plan on using the Ford sending unit as well, but I will just bend the arm 180* so the gauge reads properly.
 
Looking forward to the F150 tank tech, I'm sure it's out there on the web, but I'd rather read it here. :laughing: Last time I looked it up, it was for a 2nd gen. I'd like a rear tank in my 96 as it's only a 2" lift and 35s, so as mild as it is, the tank gets hit a lot.
 
I am heavily considering getting the Eimkeith brackets now. Did not realize they fit without a BL.

I took apart the ford tanks sending unit last night, I think I found a way to retrofit the toyota one onto it but I wont get any time to mess with it for awhile. I'd also like to swap the ford pump for the toyota Denso one but that might not be worth the work.
One thing you'll also want to look into is what to do venting wise since the pump hat is different. Looks like the Toy one might have a vent line out of the hat, but the Ford does not. The vapor valve I guess kind of works, but filling is super slow. Did some digging and found a post on page 6 of a thread that has a bunch of part numbers for stuff. The guy used FNS160UPR (new part number for one in his post) for an internally vented fuel neck, but its out of stock, I meant to call them but didn't have time. I am looking at other venting options, something I can install into a drilled hole rather than welding a fitting on a tank, something like mpn2534467.

With the references below, hopefully I will be able to tackle this in the coming months, my sliders showed up today, I have to tidy up my new gauges I am installing so it will be a bit, but I will definitely put something together all in one spot on how I will get it done.

Post I am referring to, has lots of part numbers which is good!

Another thread I am referencing just for ideas because why reinvent the wheel.
 
I am heavily considering getting the Eimkeith brackets now. Did not realize they fit without a BL.

I took apart the ford tanks sending unit last night, I think I found a way to retrofit the toyota one onto it but I wont get any time to mess with it for awhile. I'd also like to swap the ford pump for the toyota Denso one but that might not be worth the work.

You ever get around to doing the F150 tank swap? Weather is getting nice so I am gearing up for this years round of projects, I am hoping to do this swap and redo the rear links. Let me know if you did and if you're using the Ford sending unit or went a different direction.
 
Trying to get this thread caught up.

One of the more simple mods I have done is the EimKeith panhard correction brackets. They fit like a glove and made freeway driving 50% less scary.


Also, if you have a 1st gen Taco or 3rd gen 4runner, spend the $80 and do this. (Gas hood strut upgrade)
 

Attachments

  • B36700C8-0356-420C-894A-57B27022CAED.JPG
    B36700C8-0356-420C-894A-57B27022CAED.JPG
    431.8 KB · Views: 8
  • B52AA0AA-1E9B-4A66-97D8-02CECBB9A1D6.JPG
    B52AA0AA-1E9B-4A66-97D8-02CECBB9A1D6.JPG
    642.1 KB · Views: 8
Went to the Bronco only event in my 4runner last weekend out in Sand Hollow Utah (Matt's offroad recovery area). I personally think this park is better than Moab but thats my opinion.

This video is for day 1 which was pretty chill. Day 2 was where I hit my limit.

 
Badass rig man, skipped through all the bronco footage to just watch that yota :smokin: your build is pretty much how I want mine to end up eventually.

Looks like you repainted it? What color did you go with? It looks real good 🤘🏼 (I have a soft spot for green 4runners, on my 3rd)
 
Its actually a factory color, Toyota Dark Army Green (code: 6v7). I did single stage to make it easy to touch up.
 
I’d be interested in a picture of your frame side track bar mount. Running fj60/80 box myself trying to get ideas for packaging.
 
I’d be interested in a picture of your frame side track bar mount. Running fj60/80 box myself trying to get ideas for packaging.
It's tight, there is a reason why everyone uses the IFS box.

Basically its mounted on the bottom of the frame rail with just a hair of drop. I'll try and grab a better pic this weekend.

4runner-pose.jpeg
 
Top Back Refresh