What's new

nobggrnchvy Goatbuilt Ibex

Bggrnchvy

Red Skull Member
Joined
May 20, 2020
Member Number
663
Messages
122
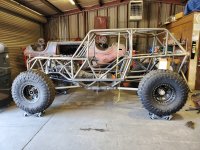
It won't be green and it is not going to be a Chevy, and in comparison to the crawler it's replacing it will be light :laughing:

Hence, nobggrnchvy.

The basics:
Goatbuilt XL 4 seater modded for dual rear shocks
LQ9, probably 706s and a 224/224 112lsa and 42lbhr injectors (mine are all locked up)
4l80e, either Jakes Performance parts or one of Maximums U4 builds if I get lazy
ORD Magnum underdrive
Ford 205
05+ Superduty D60
Late model 14b
14" 2.5 SAWs up front and Fox 2.0 bumps
16" 2.5 SAWs and Fox 2.0 bumps out back with 16" 2.5 3 tube Fox BPs (yes, I'm going to hell for mismatching shock manufacturers)

I got the kit in late February I think. I fit and mig'ed the subframe first. I almost tig'ed but I was convinced by others, including my wife that I shouldn't waste my time. Fit up was very tight and the weld joint design is quite good.

20210217_193400.jpg
20210217_194025.jpg
20210228_235308.jpg
20210313_151245(3).jpg

Shortly after I got the subframe off the table, I built the fixture to assemble the chassis.

20210314_200010(2).jpg

A few more weekends, a lot of tube prep and a crane assisted fixture flip, I had a chassis tacked together.

20210321_223440.jpg
32174.jpg
20210328_162846.jpg
 
At this point before welding it out I was attempting to find a way to fit the bypasses in the back. Drew @ Goatbuilt actually stepped up and designed a different subassembly for the rear section to do it while maintaining the leg room from the standard 4 seater. So I removed the existing parts.

20210424_151850.jpg

And inserted the new parts.

20210425_154059.jpg

Then began the long road of tig'ing out the tube work. A lot of the joints were rooted with 120a and 1/16 filler, then capped with 150a and 3/32. Some got single pass 150a and 3/32 rod. I still need to work on my heat control and consistency, but I definitely got some practice in.

20210509_170943.jpg
20210613_201239.jpg
20210612_142158.jpg
20210626_170024.jpg

This last weekend I finished that up and got started on the more entertaining details, plate gussets all got burned in and the rear seat mount got tacked together (yes the rear cross tube is in the wrong hole, noticed it last night as I was closing up). I split the rub rail and prepped it and the rockers and got one side fit and checked against the boatside skid for hole alignment.

20210627_162623.jpg
20210627_162632.jpg
20210627_164457.jpg
20210627_190019.jpg
 
I had the LQ9 from the last build, a friend donated a late model 4l80e core some years ago and recently I sold the D60/14b from the last build in order to acquire newer model stuff. I was going to retube the Chevy 60 I had with a Ford center section I also had, keep the Chevy length shafts (4340) and ARB but after looking at prices and what I could get for KP stuff, it made more sense to sell and start over.

The Ford 60 came off Ebay, 08 with 100k miles. The 14b is out of an 05, mileage unknown, FB marketplace pickup.
20210503_154239.jpg
20210220_123910.jpg

A friend generously donated this 205. Prior to him, Jason Payne had it so it's a bit sentimental to be able to include it.
20210501_175705.jpg

I purchased an ORD magnum. I live the integrated 205 input and underdrive output shaft and size. I've raced with Stephen a few times as well, so I couldn't cut him out and go Canadistani here:laughing:

20210330_113120.jpg

Last, I was gifted some seats that some PBB'ers may recognize. They're getting recovered, sans the bass boat glitter finish, because they are torn.

20210501_175812.jpg
 
Damn, this is going to be a killer build. Beefy for sure.

What's the plan for tires?
 
14" 2.5 SAWs up front and Fox 2.0 bumps
16" 2.5 SAWs and Fox 2.0 bumps out back with 16" 2.5 3 tube Fox BPs (yes, I'm going to hell for mismatching shock manufacturers)
think ahead with your shocks mounts with provisions for mount rework to fox stuff as they are significantly longer than the SAW or swap lower eyelets to match the length. are the rear shocks on the axle or a trailing arm?
 
Looking GREAT! How did the rear portion fit up? We haven't made one like that before.

The double rear shock rear lower kit went pretty well. Might suck another 1/8" out of the the two long portions of the lower hoop, it was a little fight to get it into the right spot on the fixture.

Nice to see Jason's stuff living on.

Indeed! I've got his mill and lathe in the garage which will be used for this as well.

Damn, this is going to be a killer build. Beefy for sure.

What's the plan for tires?

We will see what I can get my hands on. 39-40 on 17" beadlocks. Probably 8 on 170 so I can just run adapting spacers on the 14 bolt to bring it up to the same width as the front.

think ahead with your shocks mounts with provisions for mount rework to fox stuff as they are significantly longer than the SAW or swap lower eyelets to match the length. are the rear shocks on the axle or a trailing arm?

Not something I was aware of. Is that the same for the newer aFe SAW's and older SAW's? These c/o's are all 07-08 vintage.

Rears are on the axle.
 
Not something I was aware of. Is that the same for the newer aFe SAW's and older SAW's? These c/o's are all 07-08 vintage.

Rears are on the axle.

all manufactures collapsed/extended lengths are different. fox are the longest, saw are the shortest. not sure how accurate the saw information is but, you can measure what you have to verify against the numbers i posted for from the links below. as you can see its a fair significant difference in dimensions.

14" coilover - saw - 35.57” 21.05”
14" coilover - fox - 38.430" 24.430"

16" bypass - fox - 42.430" 26.430"
16" coilover - saw - 40.57” 24.05”
16" coilover - fox - 42.430" 26.430"


Does his dad still have the truck?

Last I heard from Este it was at his brothers house.

all manufactures collapsed/extended lengths are different. fox are the longest, saw are the shortest. not sure how accurate the saw information is but, you can measure what you have to verify against the numbers i posted for from the links below. as you can see its a fair significant difference in dimensions.

14" coilover - saw - 35.57” 21.05”
14" coilover - fox - 38.430" 24.430"

16" bypass - fox - 42.430" 26.430"
16" coilover - saw - 40.57” 24.05”
16" coilover - fox - 42.430" 26.430"


I knew they were a bit different, more than 3" in some cases is more than I suspected. I'll have to dig the 16" out of the box they are buried in to see if they match up.

The rear axle mounts on the axle side are pretty much in horizontal plane with the bypass off the back, but it's modeled for Fox fitment so I should have plenty of room up top. The SAW c/o rear frame mount will just be lower than the Fox bypass. Up front, if anything a shorter compressed length will be helpful, but I will keep it in mind.
 
Slow progress the last couple of weeks. Personal life issues combined with significant professional change at the same time overlapping a holiday weekend. I did get some items knocked out.

I pulled the rear seat and sway bar mount out and cut all the tacks and refit it all. Drew gave me the outside to outside dimension to hit for the bench I will be running so making sure that was locked in was the most important.

20210711_150802.jpg

I welded it out on the bench, which was a really nice change from working at less comfortable heights and angles on the chassis.

20210711_160327.jpg

It was dropped back in and fit very well, just needed a little pull on one corner to lay dead flat. I also dropped in and laid out the mount for the front seats and center console and tacked them in.

20210711_164950.jpg

The real time suck has been welding in the rub rails, just a lot of filler needed to fill the gap between the 2x4 .188w box and .120 round. I ran straight 3/32 @ 200a for most of it. I decided on the bottom of one side to try something I have not done before, walk the cup. I dialed back my amperage to about 180 and actual used a lay wire technique with two 3/32 rods. The motion is hard to be consistent with and is something I'll have to practice more with. I found it difficult to maintain the motion while traveling more than a few inches as I felt I was no longer comfortable. Not the best result, but I am glad I tried it. It really laid down some material. Regardless, they are both welded all the way around now. The belly skid mounting tabs also got fitted, check and welded out but I forgot to take a picture before I flipped the chassis again.

20210711_143141.jpg
20210711_173618.jpg

Next task is fitting the over engine tube with weld in disconnects.

20210711_173704.jpg

On closer inspection I am a little suspect of the actual minimum cross section. I wonder if it's less than the 5/8^2in of a 1-3/4" .12w tube.
 
Why is that?

It's a combination.

-I was already ordering a pair for the front seat bar (but for 1-3/4" tube), as I want to make it removeable to pull the tranny up through the floor instead out the bottom as I have a longer drivetrain. An extra set that also matched made sense.

-The over engine tube is short to hit the node it's coped for. I have it tacked about 1/2" further back than it should land to keep the gaps tight. I want it to fit and putting these in allows me to get the fit tight.

-Serviceability, the 4 shcs's are going to come out a lot faster and easier all from the top than 6 cap screws mounted radially around the tube.

-Aesthetic, cleaner not having flanges and bolts sticking above the tube line.
 
i cant think of it right now, but there is a company that makes one side of the adapter the OD of tubing, so in your case you dont have the little short piece of tube welded to the adapter. if i get some time today ill see if i can come up with it on google.

edit : Notch Ready Interlocking ID Tube Clamp - Round

I had not seen those before. Definitely something I will keep in mind as I continue to modify this chassis. For this situation, as I already have a pre notched crossmember that just needs 3 cuts to fit I think I'm going to continue to use the inserts I have. The stub length will probably be a little longer than positioned in the picture above, but I need to do some more measuring.
 
I haven't touched the chassis in a month. Lots of things going on, but I should have some more content this weekend.

I rode with some friends and did a 4 day Con trip this last weekend. Fun not fixing everything all weekend :lmao:

20210806_114612.jpg
20210807_103951.jpg
20210808_070514(1).jpg
20210808_100230.jpg

I did get the front seats back from PRP after recovering eliminating the glitter finish and tears.

20210811_152243.jpg
 
A few hours of time in the garage this weekend. I finished making the floor tubes removable for easier servicing and pulling of the transmission and cases as well as welded up the shifter mount.

20210814_171600.jpg

The center seat and console mount got welded out to fix the tubes together. Then I taped out the tube that needed to be removed to set the tube disconnects.

20210814_174252.jpg
20210814_180159.jpg
20210814_181300.jpg

I lopped out the center frame and deburred and cleaned up the ends and fit the disconnects. I used the allen key and a torpedo level to get them all facing roughly the same direction. A 3' level and a couple of clamps got it all lined back up and I tacked the ends in.

20210815_135548.jpg
20210815_135535.jpg

Then they all got welded out. I flipped the chassis over and welded the back side in position afterword's which is how it sits at the moment.

20210815_131159.jpg

Lastly I pushed and pulled the shifter mount together and burned it together. It was a little gappy, and it's all laser cut so the edges are pretty sharp so it's going to get a bit of roloc sanding/buffing love this week to make it more presentable.
 
Looking good. I'm working on one myself. This is how it currently sits.

One note on the tubing couplers, that will not go in and out very easy over time. I have a buddy that has the same setup I the floor of his 4400 Jimmy's car and we have to BEAT those things in and out. I want to do the same thing to mine because of all the obvious reasons and my drivetrain is LONG. I'm hesitant on the couplers because of my experience working on my buddy's. Trying to come up with something that will not bind as much.

Yours is looking good. What are the drivetrain plans?

-scott
 

Attachments

  • 20210724_153007.jpg
    20210724_153007.jpg
    1.8 MB · Views: 83
Looking good. I'm working on one myself. This is how it currently sits.

One note on the tubing couplers, that will not go in and out very easy over time. I have a buddy that has the same setup I the floor of his 4400 Jimmy's car and we have to BEAT those things in and out. I want to do the same thing to mine because of all the obvious reasons and my drivetrain is LONG. I'm hesitant on the couplers because of my experience working on my buddy's. Trying to come up with something that will not bind as much.

Yours is looking good. What are the drivetrain plans?

-scott
We will have to see how well they work. I've got a 3t chain puller If I have to get medieval in the future. I imagine it's going to be easier than the skids after a couple of years and having to take it all apart in the rig to drop the drivetrain down.

4l80e/magnum/205. It's a long setup and I will have to see how the clearance works out in the back.

Currently messing around a brushless 850w BMW fan to see if I can make it work for the radiator with a spal thermostat.
 
I had to move my drivetrain fwd an inch and a quarter to get everything cozy. It was hitting the back of the subframe and the adapter bolts on the front seat bar. It all clears nicely now. Went from the 1st 2 pictures to the 2nd 2 pictures.

-scott
 

Attachments

  • 20210724_141115.jpg
    20210724_141115.jpg
    1.5 MB · Views: 52
  • 20210724_141150.jpg
    20210724_141150.jpg
    1.4 MB · Views: 57
  • 20210724_152700.jpg
    20210724_152700.jpg
    1.4 MB · Views: 50
  • 20210724_152729.jpg
    20210724_152729.jpg
    1.3 MB · Views: 51
Last edited:
I had to move my drivetrain fwd an inch and a quarter to get everything cozy. It was hitting the back of the subframe and the adapter bolts on the front seat bar. It all clears nicely now. Went from the 1st 2 pictures to the 2nd 2 pictures.

-scott
I saw that on the ibex bookface group.

It's going to be a challenge, we will see. At least the seat bar unbolts now :laughing:


I had quite a bit of other junk to finish this weekend but I formed up and got the engine crossmember partially welded out.

20210822_153042.jpg
20210822_164544.jpg

Rear seat mount and the lower link bolt hole doubler plates all got welded out as well, forgot to take pictures.
 
I dig these goat built builds. They seem like a fun build and if I ever built a buggy it would probably be one of these!
 
I finished welding the engine crossmember out. It was clamped to the tranny crossmember while I welded out both sides and the exposed edges. When I flipped it to weld the inside seams I tried to fixture it to resist some of the shrink.

20210904_131200.jpg

I was unsuccessful. A fix was required as it drew in almost 5/16".

20210904_153602.jpg

I decided it was time to put the buggy on wheels and make it mobile again. I chopped up the fixture rails and burned them together with some purchased caster plates and reused the casters from all the HF tool boxes to make a cart.

20210905_174255.jpg
20210905_175535.jpg

Back to work on the buggy itself, I started the tedium of panel fitment. So happy I went this route as all the panels I've dropped in so far fit great. A little touch with a 120grit wheel here or there, but no real surgery. Welding in all the tabs is a pain though. They're all premade in the same exact size and most fit up perfect but some miss by 1/8". As a result you have to build a nice little bridge of tacks upside down while you push the panel to get them to hold, in order to pull the panel back out and weld them out from the front. Fit is great though, soo nice being able to bolt in an entire interior more or less.

20210906_162735.jpg
20210906_162421.jpg
20210906_163538.jpg
20210906_174120.jpg
 
Top Back Refresh