What's new

my new tow rig/ RV that needs some new skin...

chaplinfj60

Well-known member
Joined
Nov 17, 2020
Member Number
3057
Messages
3,046
Loc
marshalltown iowa
good morning all,

i think i found the perfect set up for me. it will take a little bit of work, not crazy amount but nothing is easy.
The specs are a 2003 22 or 23 foot class c ford E350 v10 with 41000 miles. little back story,
few weeks back we chatting and buddy was telling us about his projects he has going on and not going on, and he gave us the run down of this RV how he got it about 2.5 years ago knowing it need some lamination repair done, but on the drive to his house the other side he was not gonna work on flew apart. damit man, well back to covered storage it goes, and over the last two years or so he gathered up the side paneling and some kits to fix the other delaminating areas, but never got around to fixing. so he was telling us all about that but not saying he wanted to sell, just saying he did not want to do it and should sell it. well i let that fester in my mind the rest of the weekend while we were wheeling and gave him a call and here is the deal that i ended up with.

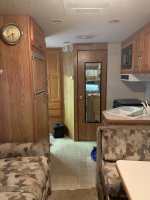
Everything as far as i can tell works, truck AC and roof AC all the gauges for the rv and truck, it will need some cleaning and a new bed but dam this is legit. my rig is light, 4k and my f150 is dam near the exact same length. so my foot print will be the same. that makes me happy.

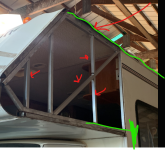
we are pulling the sides off over the cab, that where all the delamination has happened. deleting the two side windows and adding some more strength with aluminum studs and gussets.
the first post is before starting working ,
IMG_6426.JPG
IMG_6428.JPG
IMG_6428.JPG
IMG_6349.JPG
IMG_6350.JPG
IMG_6353.JPG
IMG_6354.JPG
IMG_6355.JPG
IMG_6355.JPG
IMG_6429.JPG
IMG_6349.JPG
IMG_6350.JPG
IMG_6353.JPG
IMG_6354.JPG
IMG_6355.JPG
 

Attachments

  • IMG_6357.JPG
    IMG_6357.JPG
    2 MB · Views: 13
now here is the repairs in process.

the windows on each side are deleted. because who wants more light when you are trying to sleep. these things are made on the quick and cheap, we are adding braces and welding joints all around. with out the windows and the last pic is the basic repair for the new studs


IMG_6431.JPG
IMG_6432.JPG
IMG_6431.JPG
IMG_6433.JPG
IMG_6434.JPG
IMG_6435.JPG
IMG_6436.JPG
IMG_6437.JPG
IMG_6436.JPG
IMG_6438.JPG
IMG_6440.jpg
we will gain alot of strength i feel.
 
Cool project for sure. How common is the aluminum framing vs wood like a bumper pull I wonder? Also you know someone has to bring it up, same footprint and half the MPG I'm guessing?
 
Yup. Triangulate the shit out of that motherfucker while you have it apart. :smokin:
 
Cool project for sure. How common is the aluminum framing vs wood like a bumper pull I wonder? Also you know someone has to bring it up, same footprint and half the MPG I'm guessing?
no clue on the wood vs AL, kinda glad its AL because no dry rot studs.

yep the 150 will get 17 with no load on e85 pulling my trailer i am at 9 -11 depending on wind and such. from the drive i took saturday, about 60 miles or so, v10 likes the gas, i am estimating 7-9 ... and the fuel tank is alot smaller too compared to my f150. so i get more pee brakes. ahhaha
 
i also want a new double din radio that works with apple play so i can navigate like a champ. so much easier than the phone
 
Subscribed. Super lucky that the structure is aluminum. Major win.
 
ohhh WD hitch, i will look into that for sure, i may have one in the shop actually or parts of one, i got it in a trade awhile back.

your talking about this guy?

1657627640745.png
 
got some more done last night, put in the structure and made a few triangles :) welded up lots of little areas that only had small welds on one side and added some strength. yay... added 4 square tubes and one flat at the top to tie the two bars together. it really is amazing how little they actually weld theses things together.

each one of them yellow Xs will be filled with some rigid insulation that will be glued to the walls so that will stiffen things up quite a bit also. last step before sheeting the inside.

next we will lay the filon (fiberglass side panel) flat on the ground for about a week so it will loose its memory of being rolled up (back of pick up picture)

then we will glue the filon to 1/8 plywood and fit to the side of the rv, our thoughts here are treat this as a side of a house. once the panel is pieces have dried then it will get cut to size and fitted in place. it will get glued and screwed with the Loctite stuff pictured below . also going to put a flat bar on the outside to sandwich the panel between the stud and flat bar so it cant fly away again. at least this is the plan, that may all change as i do more research

cheers


1657627961447.png


1657628401877.png


1657628786223.png


1657629095513.png
 
Maybe add another diagonal brace from the bottom corner to the top edge of the roof? To help hold the roof up. That's how a gate would be braced, not from the "fixed" end down.
 
I'd keep the side windows and delete the front window, but it's too late now.
Those front windows always leak, always.
Then make it 4x4 :)
 
Maybe add another diagonal brace from the bottom corner to the top edge of the roof? To help hold the roof up. That's how a gate would be braced, not from the "fixed" end down.
i get what your saying,,,

hmmm....
 

Attachments

  • 1657640104934.png
    1657640104934.png
    505.3 KB · Views: 4
no real update that are picture worthy, i was in alaska for a week.. we did seal the edges that were delaminating with

Loctite PL Marine Fast Cure Adhesive Sealant, 10.1 Ounce Cartridge​


this stuff is amazing, i feel like it could be used underwater. omg sticky..

i used this web page as a guide of sealant to get. https://www.rvshipshape.com/bondingfilon.htm\

we glued the fiberglass to the plywood yesterday and we will cut out and fit the sides this week, one issue is i got 1/4 plywood not 1/8 but not gonna worry about that.
 
got the two side panels made, and set, not glued yet, so far so good.

this plywood went from floppy to a super strong panel with the addition of the fiberglass panel, amazed at how much more strength it added. wow...

and not gonna redo the pin stripes maybe i need a huge irate4x4 sticker on each side........:beer:

1658841380501.png
1658841413483.png
 
Do yourself a favor and tear the roofing off now while you have the trim off. Redo it with pvc. You’ll thank yourself later. If it’s delaminated then the roof is probably leaking in other spots. Ask me how I know. I redid our 30’ fifth wheel this spring with pvc roofing. I was amassed at how many points were leaking that I wasn’t aware of and showed no signs of it yet. Every damn roof on an rv is a leak waiting to happen. It isn’t if but when. 😜
 
Do yourself a favor and tear the roofing off now while you have the trim off. Redo it with pvc. You’ll thank yourself later. If it’s delaminated then the roof is probably leaking in other spots. Ask me how I know. I redid our 30’ fifth wheel this spring with pvc roofing. I was amassed at how many points were leaking that I wasn’t aware of and showed no signs of it yet. Every damn roof on an rv is a leak waiting to happen. It isn’t if but when. 😜
what kind of pvs did you use?
 
what kind of pvs did you use?
PVC is a newer roofing material. Older roofs were tpo or edm. Your roof will probably be one of those. They use pvc on commercial flat roofs. Just thicker material. I think the rv industry has all went to pvc on new rv’s.
 
sides are glued on with lock tight PL marine grade , omg good stuff, i also used screws to help secure the sides down and made a cool clamp to apply pressure to push sides to the frame of the structure. holly shit i suck at putting screws in the same distance from the edge all around, i kept creeping to the inside. sure i could have put a line, but i did not, lol:lmao::lmao::lmao:

cool beans. it has sides now.

1658923221188.png


1658923249879.png


1658923278070.png
 
PVC is a newer roofing material. Older roofs were tpo or edm. Your roof will probably be one of those. They use pvc on commercial flat roofs. Just thicker material. I think the rv industry has all went to pvc on new rv’s.
PVC will wait, i totally get what your saying because i have the front tore apart. but its not in the cards this week. bummer for sure but the good news is now learned there is a newer better product out there. so that makes me happy. :beer:
 
good afternoon, got it all sealed up over the weekend and here is what it looks like

i will take a few pics of all the products i used and where at, so far i love the repair, i think she will work magical. lol


IMG_6857.JPG
IMG_6858.JPG
IMG_6859.JPG
 
at this point we used a two part epoxy that is meant for rv repairs to glue plywood to fiberglass sides. then we used screws and loctight adhesive to attach panel to AL studs.

i feel like i could glue shit underwater with this stuff, holly cow good stuff.
loctite pl marine adhesive.jpg


IMG_6451.JPG
 
to seal up the top edge where the sides meets the roof we used the tapes, under the roof and on top of the roof membrane, and quite a bit of it. dont need more leaks. and once the tapes were all down then the trim piece went on.
and these screws seem to work the best

and for the inside i want to use plastics wall panels so i dont have to worry about rotten plywood again. not sure where to get them at yet, still looking.


crews 410 SS kits.jpg


butyle tape 1 inch.jpg
flex seal tape 8 inch wide.jpg
roof tape 4 inch eternabond .jpg
 
where the old fiberglass meet the new there is a 1/16 inch difference in thickness so we used 1/8 x 2 inch wide AL flat bar with a 1/16" x 1"
the low side allowing us to get even pressure sucking the bar to the fiber glass.
there were two 1" wide vertical studs right there witch made a no brainer on where to make the old meet new and have lots of holding power. under the flat bar we used that caulking
bar side panel .jpg
sealant goecel.jpg
1659359188694.png
the low side allowing us to get even pressure sucking the bar to the fiber glass.
there were two 1" wide vertical studs right witch made a no brainer on where to make the old meet new and have lots of holding power. under the flat bar we used that caulking
1659359188694.png
 
Top Back Refresh