What's new

Mud buggy build

Fl-Krawler

Well-known member
Joined
Dec 3, 2020
Member Number
3107
Messages
81
Loc
Cookeville, Tennessee
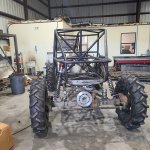
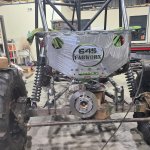
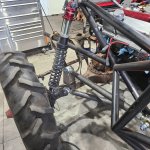
Here is another build we have going on at the shop. Customer came to me and was looking for something like a side by side, but more durable. He was currently wheeling a 1 ton S10lifted sky high (typical florida mud truck). We started with one of our 2 seat chassis, and we are putting a set of steering rockwells under it, with the SBC, TH350 and divorced NP205 from the s10 going in it.

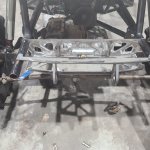
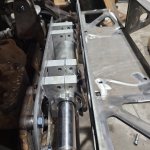
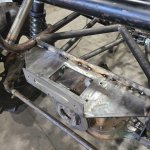
First thing we did was throw a few of our high clearance rockwell diff covers on the axles for a little extra clearance
aGUFRY1.jpg


j6RVIvv.jpg


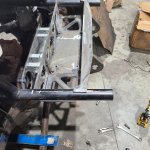
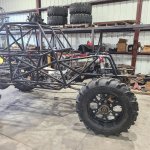
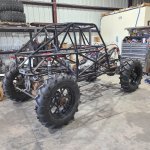
The chassis we are starting with
1PdgWgM.jpg


9qH3FyU.jpg


Since he already had wheels, we put them in our VF3 mill and machined them to fit the rockwells. Here is a little video of us opening up the center bore. Due to the diameter and width of the wheel, we had use less than ideal length endmill and cut speed


If you are gonna machine the wheels, may as well machine the countersink for the factory lug nuts in them as well
XBI46Lj.jpg
 
Should have taken a knee, and thrown the hook 'em horns fingers too.
I think Dio called it a malook (sp). The fangers
 
Who is "our chassis"? I like the look of that chassis!
My 4x4 shop. We just started selling DIY chassis kits as well as other DIY parts 645 Fabworx :blackstar:
:laughing: Beat me too it!

Hopefully he remembers that from the old site :beer:

Should have taken a knee, and thrown the hook 'em horns fingers too.
I think Dio called it a malook (sp). The fangers
Sure do :flipoff2: 
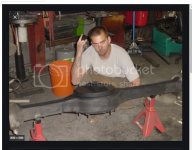
I'll have to remember to pose when this build gets torn down for final weld out and paint
 
Last edited:
The drivetrain is super long on this build. I still need toadd a 3rd poly bushing to the backside of the 205
KSosZQg.jpg


evQS1nc.jpg


I didn't get much of the suspension build. The current brackets are just they so we could get the buggy rolling. We will finish the mounts out in the next few weeks. We are using Summit Machine rod ends and profender shocks on this build
nIv0Dxp.jpg


[ATTACH=full]391291[/ATTACH]

Customer asked for front and rear winch plates, and I always liked the look of the old BTF buggies, so we did the back up like that on this build. We are started prototyping an in house pinion brake setup, and as you can see, at full stuff the rotor just clears up front, as well as the ram clearing the winch plate. I cut off one side of the pinion flange on the front and rear axles, machined the seal housing down flat and welded a plate over the hole, so I could tuck the ram in closer to the axle

[ATTACH=full]391292[/ATTACH]

[ATTACH=full]391293[/ATTACH]

[ATTACH=full]391294[/ATTACH]

[ATTACH=full]391295[/ATTACH]

[ATTACH=full]391296[/ATTACH]

[ATTACH=full]391297[/ATTACH]

[ATTACH=full]391298[/ATTACH]

[ATTACH=full]391299[/ATTACH][ATTACH type="full"]391288[/ATTACH][ATTACH type="full"]391289[/ATTACH][ATTACH type="full"]391290[/ATTACH][ATTACH type="full"]391291[/ATTACH][ATTACH type="full"]391292[/ATTACH][ATTACH type="full"]391293[/ATTACH][ATTACH type="full"]391294[/ATTACH][ATTACH type="full"]391295[/ATTACH][ATTACH type="full"]391296[/ATTACH][ATTACH type="full"]391297[/ATTACH][ATTACH type="full"]391298[/ATTACH][ATTACH type="full"]391299[/ATTACH]
 

Attachments

  • K9KAZg9.jpg
    K9KAZg9.jpg
    1.1 MB · Views: 92
  • XnCoFmk.jpg
    XnCoFmk.jpg
    1.1 MB · Views: 92
  • vRrxIky.jpg
    vRrxIky.jpg
    910.9 KB · Views: 91
  • dQZcNfP.jpg
    dQZcNfP.jpg
    1.3 MB · Views: 93
  • 4fIWqaH.jpg
    4fIWqaH.jpg
    1.3 MB · Views: 112
  • Vzp0r2p.jpg
    Vzp0r2p.jpg
    1.3 MB · Views: 133
  • YpDBUPb.jpg
    YpDBUPb.jpg
    1.4 MB · Views: 108
  • P21PpkV.jpg
    P21PpkV.jpg
    1,017 KB · Views: 101
  • RnQ05A2.jpg
    RnQ05A2.jpg
    1.3 MB · Views: 97
Last edited:
These pics bring the build up to date. Knocked out the front tube work, the aluminum belly skids, and finished up the winch plate today. Customer wants the very bottom of the buggy belly left open so mud will not collect there. We still need to countersink the skid plate bolts

MeIgSLu.jpg


cbrXfGK.jpg


tQBZK0x.jpg


oW6IXQW.jpg


97NMFcB.jpg


qtc9oIQ.jpg


SCJVj7q.jpg
 
I"m really digging this build!! Does he plan to do any trail riding with it? Seems like with a doubler and different set of tires it would be a good trail rig too!.......Heck probably don't even have to have the doubler.
 
I"m really digging this build!! Does he plan to do any trail riding with it? Seems like with a doubler and different set of tires it would be a good trail rig too!.......Heck probably don't even have to have the doubler.
no doubler i think, just a divorced 205 behind a TH350
 
I"m really digging this build!! Does he plan to do any trail riding with it? Seems like with a doubler and different set of tires it would be a good trail rig too!.......Heck probably don't even have to have the doubler.
It will mainly be used at a place called River Ranch here in Florida, and likely go to other mud parks within the state such as Hog Waller. We built the suspension so that with zero preload on the coils, the buggy will sit low, and be suitable for rock crawling, but with with a simple adjustment of the preload, make it sit high and usable for Florida's wet swampy tails.

There is plenty of room between the 205 and th350, but I doubt a doubler would ever be added. Google says the tires are 42" tall, but they are taller than the 45" SXII's on my portal buggy. The owners grandson did mention getting a set of tires for the rocks, and USD stickies were brought up
 
Turning out cool, dig the wrapped 205 mount, shouldnt torque over too hard like that.
 
Ok time for a few updates on the build. Progress has been slow. I have had a hell of a time finding/keeping employees and have spent the last 2 months going behind a few former employees and fixing /finishing work they were supposed to have done

We will start with the fuel cell. I take safety pretty seriously, especially on a rig that may see some alcohol fuels shenanigans. So for this buggy, due to the fuel cells shape I did the vent a little differently than the 3 sides and down route. The cell will vent through a typical rollover valve, go to the roof of the chassis before returning to the fuel cell and running along the bottom to every corner before exiting out a vent that will run to a catch can near the roof of the chassis. The idea is for it not to leak fuel, no matter how many barrel rolls it does

iZtcSge.jpg

EwON8NR


TeRIj6l.jpg


Built a custom header for the drivers side, quite possibly the tightest fit I have had to date. I'll start on the exhaust this next week

mPXzd1G.jpg


BQeij88.jpg


Boxed in the front link mounts and built the front driveshaft

rrfyerq.jpg


Fqz3DWY.jpg


Built some ackerman corrected steering arms to get the best steering possible out of both axles
vpmGOeB.jpg


Also got the bumpstop mounts and upper link mounts on the axles boxed in. I still need to add some more gussets
LuU4zJG.jpg

on53Q5G.jpg
 
Last edited:
Not a lot of updates on this at the moment. We are really short staffed so my time has been spread thin on the various builds we have going. I have also been spending some time on the logistical nightmare of moving all our shop equipment back to my old shop in an effort to scale down enough that the shop will be more manageable with me as the only employee. Here are the pics of the full dual exhaust I built. I'm starting on interior tins today so there will be more updates this week

OEgRnz4.jpg


uJ33SJQ.jpg


GLzh4cu.jpg


xv11c6G.jpg


AsfqFLm.jpg


3vdZmUH.jpg
 
Lets bump this back from the dead. I totally forgot about this build thread. We actually closed the shop in Florida a few months after the last post. High overhead, difficulty finding and keeping employees as well as a host of other stuff just had me over the whole experience. We finished it out to a full roller with tins.
7UpBPXC.jpg


eGhXk8S.jpg


Fuel cell finished. Not pictured is a rack that sits on the lower portion to be able to carry stuff like a cooler. At the front you can see 3 vents. To the right is a rollover vent that will run to the top of the cage, across and back down to the vent on the left, which then runs to the 4 sides of the fuel cell at the bottom, before going to the vent in the middle which again goes to the top of the cage. The idea is that no matter what fuel will have to run uphill in a rollover, and with the vent run high, there is no worry of deep water crossings being an issue
E7oa36u.jpg


lERqiWr.jpg


Qo1huCu.jpg


bdZgA2y.jpg


wYVIHhY.jpg


Since we were a little worried about the hi-steer arms shearing off, we tied them into the factory knuckle
rqGK77i.jpg


WO1CDw4.jpg


Xy96USL.jpg
 
More pics. Most of these are from the day the customer picked up the buggy, a few days before we closed
wsAOj9B.jpg


kwJias5.jpg


92gOVBi.jpg


The buggy was built with rear steer in mind so the remaining components could be added later
NeB2K5G.jpg


Front links boxed in
D4qvjMN.jpg


Firewall that sealed to the fiberglass cowl
8rfHFi4.jpg


Another pic of the steering arm tie in
yd2uQzL.jpg


Hw5MSol.jpg


Custom pedals
n1FJ7g9.jpg


F8APQQ1.jpg
 
Top Back Refresh