Tryloff
Well-known member
- Joined
- May 20, 2020
- Member Number
- 788
- Messages
- 199
Sorry, this whole deal will go slow.
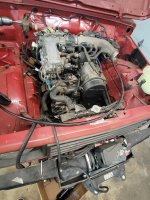
Here it is as i picked it up a few years back. non running but otherwise in decent shape. Not as good as it looks though.

It had a blown out intake manifold gasket keeping it from running. I thought it was the carb, so i rebuilt that too. after i got it running, i did simple things like timing belt, v belts, brake job, flush all fluids, a few u joints, and front and rear wheel bearings. I daily drove it like that for a year or so. Then i decided i needed to go off road. I put a fuel tank skid plate and low profile winch bumper from zuks off road, and a shackle lift from dr z. After that, a buddy and i went to Rush offroad for a long weekend.

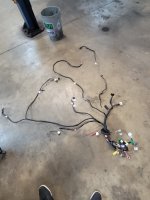
I was surprised at how well it did. It was pretty gutless due to the stock everything. even with that, when the trails were dry as long as my line was reasonable, it was pretty much point and shoot. It rained halfway through and the rig was useless after that. with no power to clean the tires out, and no lockers even if they were cleaned out, I got stuck on the easiest of trails. Even when it was dry, I had to go pretty slow on anything rougher than a paved road, and even then it was rough cruising due to blown out shocks and worn out leaf springs. When I got home I tried to get more power out of the 1.3 and realized that it was a no go. I decided I needed more power. I was torn between an ahu TDI swap or a 1.6 tracker. I had both the engine and unmodified harness, and a 400 buck 96 tracker at my disposal. I decided the tracker was the best decision for various reasons after hours of wasted internet reading. Don't get me wrong, I love diesel. My entire income is maintaining and fixing them. Unfortunately, my goals for the rig didn't line up with that power plant.


I pulled the engine from the tracker and mounted it on a stand. The tracker didn't run right, so I pulled the intake, exhaust, and head to investigate. The exhaust manifold was cracked in a dozen or so places as expected, so that went to the scrap pile. I bought a brand new pre owned manifold from hwy 84 on FB. The intake and gasket were in good shape, so no more money spent there. When I pulled the head, I found the running issue.


Here it is as i picked it up a few years back. non running but otherwise in decent shape. Not as good as it looks though.
It had a blown out intake manifold gasket keeping it from running. I thought it was the carb, so i rebuilt that too. after i got it running, i did simple things like timing belt, v belts, brake job, flush all fluids, a few u joints, and front and rear wheel bearings. I daily drove it like that for a year or so. Then i decided i needed to go off road. I put a fuel tank skid plate and low profile winch bumper from zuks off road, and a shackle lift from dr z. After that, a buddy and i went to Rush offroad for a long weekend.
I was surprised at how well it did. It was pretty gutless due to the stock everything. even with that, when the trails were dry as long as my line was reasonable, it was pretty much point and shoot. It rained halfway through and the rig was useless after that. with no power to clean the tires out, and no lockers even if they were cleaned out, I got stuck on the easiest of trails. Even when it was dry, I had to go pretty slow on anything rougher than a paved road, and even then it was rough cruising due to blown out shocks and worn out leaf springs. When I got home I tried to get more power out of the 1.3 and realized that it was a no go. I decided I needed more power. I was torn between an ahu TDI swap or a 1.6 tracker. I had both the engine and unmodified harness, and a 400 buck 96 tracker at my disposal. I decided the tracker was the best decision for various reasons after hours of wasted internet reading. Don't get me wrong, I love diesel. My entire income is maintaining and fixing them. Unfortunately, my goals for the rig didn't line up with that power plant.
I pulled the engine from the tracker and mounted it on a stand. The tracker didn't run right, so I pulled the intake, exhaust, and head to investigate. The exhaust manifold was cracked in a dozen or so places as expected, so that went to the scrap pile. I bought a brand new pre owned manifold from hwy 84 on FB. The intake and gasket were in good shape, so no more money spent there. When I pulled the head, I found the running issue.
Last edited: