How to install the app on iOS
Follow along with the video below to see how to install our site as a web app on your home screen.
Note: This feature may not be available in some browsers.
You are using an out of date browser. It may not display this or other websites correctly.
You should upgrade or use an alternative browser.
You should upgrade or use an alternative browser.
K5 Cummins/1 ton axles build
- Thread starter KB6Chris
- Start date
mine is built to do chores off road so it uses the flex to do themNo perceptible bumpsteer with my push-pull. I've got some beefy 2" leafs and another 1.5" in static lift. This truck needs to do chores more than flex, so it looks like I'll use the nwf arms on another project instead.
What's OP got for leafs? And clearance under the engine?
Agreed - makes sense to build for the purpose.mine is built to do chores off road so it uses the flex to do them
I got the crossover arms thinking a had to have them for the lift. Now that I've used the truck for 5 more years since lifting, I'm just not convinced it needs them.
CDA 455 II
ANFAQUE2
Whelp, back to the OP's build, eh?
Did you fab the Blazer Cummins engine mounts or store/shop bought?
Sorry I haven't updated this thread but progress hasn't stopped.
I regret I have no new pictures at the moment though.
I struggled with deciding what to do for radiator and intercooler. I really wanted to not cut up the core support and utilize the 6.2 radiator and an ebay intercooler mounted in front of the core support. The extra width of the 6.2 radiator on the drivers side with the location of the battery tray really limited space for intercooler piping without getting really creative. I decided to just do what everyone else does and put in the 2nd gen dodge radiator and intercooler which requires some cut/fab to the core support but once you bite the bullet and do it I think it comes out working the best with plenty of room still for an A/C condenser in the future. I was also able to utilize the factory intercooler pipes just shortening one and leaving the other factory. 2nd gen dodge radiator hoses worked great as well, just had to trim a couple inches off of both hoses.
I should be able to use the Dodge fan shroud but the cooling fan blades are too long and hit my relocated brake proportioning valve. I swapped the 6.2 fan onto the Cummins fan clutch which clears the proportioning valve but the blades are now real close to the engine. Around an 1/8th of an inch from the harmonic balancer and I had to grind the front the water pump pulley dowel down. I may just trim the Dodge fan blades to clear the proportioning valve if I run into trouble with the 6.2 fan...Time will tell.
I didn't like the military battery trays so I installed driver and passenger battery trays from Auto Metal Direct and put two 800 CCA batteries in.
I got driveshafts made at the local shop. Also upgraded the yoke on the T-case to 1410 to match the yoke on the rear axle and upgraded the yoke on the front axle to a 1350.
I put the ORD frame plate on as well as the redhead steering gear with XJ steering shaft. Also put on ORD crossover steering but ran into a problem with the TRE on the pitman arm side of the draglink. Its like the taper isn't correct because it really pulls the TRE too deep into the pitman arm. The pitman arm was the one that came in the ORD kit. I havent taken it back apart yet to really check it yet.

Hooked up the T-case shifter using the factory 208 shifter mounted in the floor. Worked great just had to adjust the linkage a little.
The exhaust still isn't done because I've had a hell of a time finding a 3" downpipe so I can run 3" till at least past the T-case. Everyone and their brother sells 4" except for Diesel Conversion Specialists which make a 3" that they use on Ford swaps.
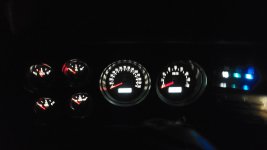
I also decided to go with Dakota Digital for the gauge cluster. Specifically the cluster from Squarebody Syndicate. I really like the classic look of the gauges and the diesel tachometer option.

To make those work I also ordered their cable speedometer to electric conversion kit as well as their tachometer signal converter. I installed a connector on a "W" terminal on the alternator and using the converter I should be able to get a reliable and accurate signal for the Dakota Digital gauge.


I used the factory Dodge airbox mounted on the passenger inner fender. I thought about just using a piece of pipe and silicon elbow with a filter stuck on the end but I think the factory box gives a cleaner look. I don't even like the look of exposed filters under the hood of trucks these engine came in.
Took apart the shifter so I can install a new dust seal. That's one of the last things before I can start putting the interior back together, which I am looking forward to.
Reinstalled the hood and very carefully closed it because I was gunna cry if the hood hit the radiator cap when closed because there wouldn't be much I could do about it without completely re-doing the core support. Luck was on my side, because you can just barely fit your hand between the cap and the hood with it latched.
After I got all the hoses and cooling stack put together I filled with water to check for leaks...In my rush to get the engine set in the frame (many months ago) I never installed the thermostat and seals under the lifting eye so I drained the water and got those put in.
I got Bilstein 5125 shocks from ORD also with their recommended shock lengths for my lift. Maybe I'm in error but I feel 3-4 inches from bottoming out on the shocks is perhaps not good?? Either way I plan on putting bump stops in because I don't have much room between my engine crossmember and the differential housing anyway.
I was able to take the throttle cable out of the dodge and just install it in the Blazer, works like a charm.
I'm currently wiring up stuff in the engine bay at the moment. Going to have functioning grid heaters as well as utilize the fuel shut off solenoid.
That's all I can think of at the moment lol. I'm hoping to be able to move it under its own power before the first of the year. My main goal is to be able to drive it across the country to Johnson Valley, CA for King of the Hammers in early February. Perhaps even stop in Moab for a day and do a trail or two there. That has been motivation to bust my ass on it this month to hopefully have time to give it a proper shakedown before the 4000+ mile round trip.
I regret I have no new pictures at the moment though.
I struggled with deciding what to do for radiator and intercooler. I really wanted to not cut up the core support and utilize the 6.2 radiator and an ebay intercooler mounted in front of the core support. The extra width of the 6.2 radiator on the drivers side with the location of the battery tray really limited space for intercooler piping without getting really creative. I decided to just do what everyone else does and put in the 2nd gen dodge radiator and intercooler which requires some cut/fab to the core support but once you bite the bullet and do it I think it comes out working the best with plenty of room still for an A/C condenser in the future. I was also able to utilize the factory intercooler pipes just shortening one and leaving the other factory. 2nd gen dodge radiator hoses worked great as well, just had to trim a couple inches off of both hoses.
I should be able to use the Dodge fan shroud but the cooling fan blades are too long and hit my relocated brake proportioning valve. I swapped the 6.2 fan onto the Cummins fan clutch which clears the proportioning valve but the blades are now real close to the engine. Around an 1/8th of an inch from the harmonic balancer and I had to grind the front the water pump pulley dowel down. I may just trim the Dodge fan blades to clear the proportioning valve if I run into trouble with the 6.2 fan...Time will tell.
I didn't like the military battery trays so I installed driver and passenger battery trays from Auto Metal Direct and put two 800 CCA batteries in.
I got driveshafts made at the local shop. Also upgraded the yoke on the T-case to 1410 to match the yoke on the rear axle and upgraded the yoke on the front axle to a 1350.
I put the ORD frame plate on as well as the redhead steering gear with XJ steering shaft. Also put on ORD crossover steering but ran into a problem with the TRE on the pitman arm side of the draglink. Its like the taper isn't correct because it really pulls the TRE too deep into the pitman arm. The pitman arm was the one that came in the ORD kit. I havent taken it back apart yet to really check it yet.
Hooked up the T-case shifter using the factory 208 shifter mounted in the floor. Worked great just had to adjust the linkage a little.
The exhaust still isn't done because I've had a hell of a time finding a 3" downpipe so I can run 3" till at least past the T-case. Everyone and their brother sells 4" except for Diesel Conversion Specialists which make a 3" that they use on Ford swaps.
I also decided to go with Dakota Digital for the gauge cluster. Specifically the cluster from Squarebody Syndicate. I really like the classic look of the gauges and the diesel tachometer option.
To make those work I also ordered their cable speedometer to electric conversion kit as well as their tachometer signal converter. I installed a connector on a "W" terminal on the alternator and using the converter I should be able to get a reliable and accurate signal for the Dakota Digital gauge.
I used the factory Dodge airbox mounted on the passenger inner fender. I thought about just using a piece of pipe and silicon elbow with a filter stuck on the end but I think the factory box gives a cleaner look. I don't even like the look of exposed filters under the hood of trucks these engine came in.
Took apart the shifter so I can install a new dust seal. That's one of the last things before I can start putting the interior back together, which I am looking forward to.
Reinstalled the hood and very carefully closed it because I was gunna cry if the hood hit the radiator cap when closed because there wouldn't be much I could do about it without completely re-doing the core support. Luck was on my side, because you can just barely fit your hand between the cap and the hood with it latched.
After I got all the hoses and cooling stack put together I filled with water to check for leaks...In my rush to get the engine set in the frame (many months ago) I never installed the thermostat and seals under the lifting eye so I drained the water and got those put in.
I got Bilstein 5125 shocks from ORD also with their recommended shock lengths for my lift. Maybe I'm in error but I feel 3-4 inches from bottoming out on the shocks is perhaps not good?? Either way I plan on putting bump stops in because I don't have much room between my engine crossmember and the differential housing anyway.
I was able to take the throttle cable out of the dodge and just install it in the Blazer, works like a charm.
I'm currently wiring up stuff in the engine bay at the moment. Going to have functioning grid heaters as well as utilize the fuel shut off solenoid.
That's all I can think of at the moment lol. I'm hoping to be able to move it under its own power before the first of the year. My main goal is to be able to drive it across the country to Johnson Valley, CA for King of the Hammers in early February. Perhaps even stop in Moab for a day and do a trail or two there. That has been motivation to bust my ass on it this month to hopefully have time to give it a proper shakedown before the 4000+ mile round trip.
The Freeak
Pro-Crastinator
Is there a specific year for the XJ shafts? It seems there are two variations - 87 to 94, and then 95 to 2000?The Jeep XJ shaft is a bolt in, no cutting or welding... or rag joint.
EDIT - Nevermind- Borgeson lists the shafts as all the same.
From ORD's website
Last edited:
Grendel
Iron Sharpens Iron
- Joined
- May 19, 2020
- Member Number
- 297
- Messages
- 3,529
Sadly, I don't really remember, but I am willing to bet it's the later one.Is there a specific year for the XJ shafts? It seems there are two variations - 87 to 94, and then 95 to 2000?
84-01 xjSadly, I don't really remember, but I am willing to bet it's the later one.
jeep steering column swap?!? - The 1947 - Present Chevrolet & GMC Truck Message Board Network
jeep steering column swap?!? The 1973 - 1987 Chevrolet & GMC Squarebody Pickups Message Board
67-72chevytrucks.com
Grendel
Iron Sharpens Iron
- Joined
- May 19, 2020
- Member Number
- 297
- Messages
- 3,529
Funny, I got permaband from that site, for posting links to Pirate. I've had a shit ton of 67-72 Chevys over the years.84-01 xj
jeep steering column swap?!? - The 1947 - Present Chevrolet & GMC Truck Message Board Network
jeep steering column swap?!? The 1973 - 1987 Chevrolet & GMC Squarebody Pickups Message Board67-72chevytrucks.com
I also didn't remember a split, but it's been years since I junk yard shopped for parts.
McBastard79
Badical
- Joined
- May 20, 2020
- Member Number
- 681
- Messages
- 257
Sweet build man
Grendel
Iron Sharpens Iron
- Joined
- May 19, 2020
- Member Number
- 297
- Messages
- 3,529

stan1688
Weld it Yourself Bumpers
Nice build! This thing is going to be sweet.
Also put on ORD crossover steering but ran into a problem with the TRE on the pitman arm side of the draglink. Its like the taper isn't correct because it really pulls the TRE too deep into the pitman arm. The pitman arm was the one that came in the ORD kit. I havent taken it back apart yet to really check it yet.
Is it a TRE or DLE you're using? The drag link end has a fatter taper.
Grendel
Iron Sharpens Iron
- Joined
- May 19, 2020
- Member Number
- 297
- Messages
- 3,529
Fab'd them.Did you fab the Blazer Cummins engine mounts or store/shop bought?
It was the end that was already threaded into the drag link when I got it. I assumed it would be correct to fit the pitman arm but I could be wrongIs it a TRE or DLE you're using? The drag link end has a fatter taper.
Grendel
Iron Sharpens Iron
- Joined
- May 19, 2020
- Member Number
- 297
- Messages
- 3,529
They may have had it wrong... it happens.It was the end that was already threaded into the drag link when I got it. I assumed it would be correct to fit the pitman arm but I could be wrong
Got quite a bit more done here in past couple weeks. I talked to ORD and the pitman arm they sent had the wrong taper in it so they're sending me the correct one and I'll send them this one back. I also ordered their upgraded tie-rod setup which only cost about 40 bucks more shipped than the stock replacement stuff from NAPA.
I got my ARB air compressor installed and wired up as well as the lockers plumbed, and tested. Mounted the switches where the factory 24V voltmeter was.
Put the shifter back together and used the Dodge shift boots just flipped around which worked pretty well.
Of course had to install a custom shift knob I never thought I'd like an aftermarket shift knob but this one actually feels much nicer than the factory one.
Wiring is 99% complete with just loom to install after the shakedown run.
The fuel shutoff solenoid and grid heaters are wired up and work as intended. Not using the Dodge ECM I just ran the ground wire for the heater relays to the same switch on the dash that I used to operate the glow plugs on the 6.2
I ended up using the 6.2 fan mounted to the Cummins fan clutch to clear the brake lines going to the proportioning valve. It's not quite as big as the factory fan but I'm not towing goosenecks with this thing so it should be adequate.
I installed the gauge cluster as well as the control boxes for the tachometer and cluster. I ended up not using the aftermarket speedo sender I bought because the gauge cluster came with one. Also had to make a 1/8 NPT to 3/4 NPT bushing for the coolant sender and had to use the port on top of the oil filter because there wasn't enough room to locate the oil sender in the factory location. Right now all the gauges work except for the fuel gauge which I feel is a faulty sender because I was having issues with it before the swap.
I was able to drive it out of the shop on the 2nd of January but with out the correct pitman arm I couldn't take it for a test drive. Let the engine sit and run for 20 minutes and no real issues except for a leaking fuel filter which I have yet to fix.
I installed some aftermarket headlights and also upgraded the headlight circuit to relays. Fought the headlight adjusters for awhile and finally the 2nd set I ordered worked good.
Got the rear shock mounts welded to the axle and rear shocks on.
I was missing one of the CUCV front tow shackle/bumper mount when I bought it so I ordered a civilian bumper mount and my cousin fabbed up the rest of it to be able to attach the tow shackle. We were then able to mount the front bumper and tow/lift shackles.
Right now the last things are the steering components bump stops and full exhaust before its ready for the road. I hope anyways lol
I got some pics this time for you guys
.jpg")
.jpg")
.jpg")
.jpg")
.jpg")
.jpg")
I got my ARB air compressor installed and wired up as well as the lockers plumbed, and tested. Mounted the switches where the factory 24V voltmeter was.
Put the shifter back together and used the Dodge shift boots just flipped around which worked pretty well.
Of course had to install a custom shift knob
I never thought I'd like an aftermarket shift knob but this one actually feels much nicer than the factory one.Wiring is 99% complete with just loom to install after the shakedown run.
The fuel shutoff solenoid and grid heaters are wired up and work as intended. Not using the Dodge ECM I just ran the ground wire for the heater relays to the same switch on the dash that I used to operate the glow plugs on the 6.2
I ended up using the 6.2 fan mounted to the Cummins fan clutch to clear the brake lines going to the proportioning valve. It's not quite as big as the factory fan but I'm not towing goosenecks with this thing so it should be adequate.
I installed the gauge cluster as well as the control boxes for the tachometer and cluster. I ended up not using the aftermarket speedo sender I bought because the gauge cluster came with one. Also had to make a 1/8 NPT to 3/4 NPT bushing for the coolant sender and had to use the port on top of the oil filter because there wasn't enough room to locate the oil sender in the factory location. Right now all the gauges work except for the fuel gauge which I feel is a faulty sender because I was having issues with it before the swap.
I was able to drive it out of the shop on the 2nd of January but with out the correct pitman arm I couldn't take it for a test drive. Let the engine sit and run for 20 minutes and no real issues except for a leaking fuel filter which I have yet to fix.
I installed some aftermarket headlights and also upgraded the headlight circuit to relays. Fought the headlight adjusters for awhile and finally the 2nd set I ordered worked good.
Got the rear shock mounts welded to the axle and rear shocks on.
I was missing one of the CUCV front tow shackle/bumper mount when I bought it so I ordered a civilian bumper mount and my cousin fabbed up the rest of it to be able to attach the tow shackle. We were then able to mount the front bumper and tow/lift shackles.
Right now the last things are the steering components bump stops and full exhaust before its ready for the road. I hope anyways lol
I got some pics this time for you guys
Attachments
The ORD kit uses TRE's. The guy at ORD said my pitman arm was machined with a DLE taper after I sent them the measurements and they are sending one with a TRE taper. I don't know what their reason is they use a TRE instead of a DLE for their drag links but I'm sure there is one.Is it a TRE or DLE you're using? The drag link end has a fatter taper.
RunningProblem
Red Skull Member
- Joined
- Sep 12, 2020
- Member Number
- 2860
- Messages
- 2,731
Did you find a 3 inch down pipe, or did you switch to a 4 inch exhaust?
I found a 3 inch from diesel conversion specialists but had to put more of a bend in it to clear the firewall but i think its going to workDid you find a 3 inch down pipe, or did you switch to a 4 inch exhaust?
WaterH
Well-known member
Nice build man!
350TacoZilla
Well-known member
Looks good for stance and I bet its a good driver with that combo.
Thank ya!Nice build man!
Thank ya, that's what I'm hoping forLooks good for stance and I bet its a good driver with that combo.
Made some bump stops. I just measured the distance from the top of my ARB air fitting and the bottom the of the crossmember and made a spacer to go between the factory bump stops and the mounts on the frame. Got the pitman arm sorted out and the ORD tie rod installed. I took it for a short drive down the driveway. Truck drives pretty well and rides decent but I have been chasing a misfire issue every since I got it running again and I kept hoping it was air and would clear up.
Well it never cleared up and while the engine ran it would misfire most of the time while accelerating. Now I drove the parts truck a little bit and never noticed a misfire so it must've been something I did while having the engine disassembled. I had previously had the injectors checked out but I thought maybe I got dirt in them or they were sticking from sitting. So I pulled the injectors and had them checked out. They came back good and after I reinstalled them, no change in engine running was noticed.
Next I thought the lift pump as I hadn't replaced it yet. Got one from the local NAPA which while it functioned appeared to be a lower quality one than the one I took off. There was remnant casting in the bolt holes that had to be drilled out. The fittings in the ports were not tight. And when I tightened down the outlet fitting it caved in the seat for the ferrule on the pump fitting. So I had to swap the fitting off the old pump onto the new one. After about 4 hours of fighting the new lift pump between junk fittings and it not wanting to prime the engine still ran the same.
Everywhere I read said retarded timing was the cause of the misfire but I checked the pump/engine timing multiple times and it was always spot on so that's why I chased everything else. Even had a hose in a bucket thinking the tank pickup was messed up.
I didn't have a way to check the pump timing other than using the pins on the engine and pump. So I said screw it and just decided to advance the timing and see what happens.
I don't know if any of y'all are familiar with changing fuel timing on a 12v but it takes some effort, not bad but I don't like doing it lol. I had to pull the fan and fan shroud, remove the oil fill, located the engine at TDC, remove nut and use puller to pop pump gear off the pump. I just marked the balancer pulley and turned it half of an inch which some old forum post said was around 6 degrees of timing. The factory setting on my engine was 11.5 and with the pump apparently set more retarded than that I figured I would be safe with 6 degrees.
I get the pump set, put all back together, fire it up at about 1 in the morning and she runs like a top! I take it for a short test drive this morning and fix a small fuel leak, adjust the drag link a little. I take it on a longer test drive this afternoon. Engine runs good and stays at operating temp. Trans shifts good, no driveline vibration. Ride is decent but there is some room for improvement. Maybe better front springs in the future and a sway bar. Going over bumps in the highway I feel some body sway. All in all though it was a great feeling that those were the only things I noticed after having changed so much on the truck.
Going to tidy up the wires this week and hopefully get it into the exhaust shop.
Yes, have had a few things needing addressed on it but im hoping it holds together lolAre you still shooting for koh?
I figured I left ya'll hanging long enough and I should update this thread. A lot has happened couple weeks so I'll try and put it all down.
Took the truck to the exhause shop and got a 3" exhaust with muffler put on to try and keep it quiet.
After those first short test drives I started to notice a pretty severe oil leak coming from the rear of the engine. It was coming from between the adapter plate and the engine block. Happened after the engine was warmed up and only while at higher rpm.
At first I thought it was the oil pan, so I pulled the crossmember and oil pan and used RTV instead of the gasket to try and get a better seal. The leak persisted so I narrowed it down to the cam plug which I thought was only a freeze plug when I was re-sealing the engine so I didn't mess with it at the time.
Well to fix it requires pulling the tcase, trans, clutch, flywheel, and the adapter plate. I found all this out just a week before we had to leave for KOH. So I buckled down and got it all pulled and put back together in a day.
That fixed the oil leak but I was also having problems with excessive crankcase pressure. At higher RPM it was pushing oil out the dipstick tube. I don't know why this happened all of a sudden, maybe the timing bump? The factory blowby tube wasn't plugged and I didn't have time to diagnose the problem so I just added more crankcase ventilation with a vented valve cover off of an irrigation engine we had on the farm. That alleviated the excess crankcase pressure.
Next I had to fix the faulty fuel sending unit, or so I thought. The military Blazers had a 27 gallon tank so while I had it out I opted to just replace it with the 31 gallon tank and new sending unit. Got the tank and sending unit 2 days before we were to leave so I get it all taken down and come to realize I didn't get new fuel tank straps...the old ones were too short so O'Reilly's was able to get me some the next morning. Got the new straps, new tank, and new sending unit put in the day before we go to leave. I found out the wire to the sending unit was cut which is why I didn't have a working fuel gauge facepalm
Whatever we drive into town that afternoon to get the rest of our supplies so we could leave early the following morning.
With less than 100 miles on the build we loaded up a 1000 pound of tools, camping gear, and food and set out on a 4000 mile round trip to King of the Hammers.

We left around 2 AM with the plan being to make the 20 hour drive to Moab, Utah that first day. As we set off my anxiety level is through the roof, I kept telling myself this is the dumbest thing i've ever done. Setting off across the country in a completely untested vehicle that I just finished the day before with completely different drivetrain...etc.etc. Probably not a smart idea.
Well we make it through Illinois, Missouri, and into Kansas before I start to notice a hefty oil leak at a fuel stop. We look around and it's just a loose bolt on the vacuum pump. We breath a sigh of relieve and tighten it up and get back on the road.

Unfortunately we didn't make it to Moab and stopped in Georgetown, Colorado for the night which turned out to be a good decision otherwise we would've driven through the mountains in the dark and not seen a darn thing. The next day we awoke to clear skies, beautiful weather and just a short drive ahead of us. I crawl all over the rig, check all the fluids and we set out on the I70 drive through the mountains.

For having never being any farther west than Missouri, seeing the snow covered mountains for the first time was breathtaking. We took all the pictures we could and just drove with our mouths open the whole time.
We eventually made it into Utah

Took a scenic route off of the interstate to Moab which was well worth the extra time because view was extraordinary

We got into Moab a little later than planned so we just set on finding a campsite close to town and settled in for the night. Tent camping in 19 degree weather was a little rough but we managed just fine. The next morning we decided to try the Kane Creek Road/Hurrah Pass/Chicken Corners trail. Roughly 40+ miles of trail down and back with nice views and cliff roads.


We met up with a fella from Denver who was planning on doing Fins & Things the next morning and talked us into joining him. He also showed us a badass place to camp on the trail for that night.

The next morning we met up and proceeded to do the Fins & Things trail.

This is the only real picture I got because I was spending more time white knuckled on the wheel lol. The trail was a lot of fun. Finally got to use my lockers and was really impressed with how the Blazer performed on the trail. My cousin took some videos which I hope to get off of him soon. Might upload those later.
We finished the trail and ate lunch in Moab and proceeded to Las Vegas for the night. We ended up driving into a bad snow storm and I discovered that LED lights and snow don't mix. The lights don't build enough heat to melt the snow off of them and eventually cover over and you can't see anything. Kind of a rough drive but we made it fine.
We got on the road after lunch the next day for Johnson Valley California and I started to notice a vibration getting worse and worse as time went on. Pulled into a gas station in Baker, CA and found a broken lug stud on the drivers rear. Jacked up the rear and found all the lug nuts to be loose. I guess I didn't torque the lug nuts after installing the wheels.. Luck was on my side as I just lost one stud and didn't loose the whole wheel. No parts stores had any studs so we continued on.
Made it into Hammertown that night in time to see the pit crew challenge and get some Dang Brothers Pizza.
The time at KOH I didn't take many pictures because there was so much to see but did snap this one up on Chocolate Thunder next to a line of Jeeps

Overall the Blazer took getting beat around in Johnson Valley just fine. Tent camping for the week was a little rough but I'm glad I did it.
We left Saturday afternoon and drove all the way to Flagstaff Arizona before getting a hotel. We left the next morning and drove all the way to Adrian Texas where we did another once over on the rig. Tightened a couple loose axle U bolts and checked the lug nuts. It was then we decided to just drive straight through all night the rest of the way home. Got home around 9 AM with no further problems. We woke up in Arizona, saw the sunset in Texas, and saw the sunrise over St. Louis.
Overall the trip was just over 4000 miles. A little longer shakedown than I would've liked but we were able to drive it home so I guess that's a win.
Sorry for the long winded post still pretty pumped about finishing the truck as well as the trip all in one go.
Took the truck to the exhause shop and got a 3" exhaust with muffler put on to try and keep it quiet.
After those first short test drives I started to notice a pretty severe oil leak coming from the rear of the engine. It was coming from between the adapter plate and the engine block. Happened after the engine was warmed up and only while at higher rpm.
At first I thought it was the oil pan, so I pulled the crossmember and oil pan and used RTV instead of the gasket to try and get a better seal. The leak persisted so I narrowed it down to the cam plug which I thought was only a freeze plug when I was re-sealing the engine so I didn't mess with it at the time.
Well to fix it requires pulling the tcase, trans, clutch, flywheel, and the adapter plate. I found all this out just a week before we had to leave for KOH. So I buckled down and got it all pulled and put back together in a day.
That fixed the oil leak but I was also having problems with excessive crankcase pressure. At higher RPM it was pushing oil out the dipstick tube. I don't know why this happened all of a sudden, maybe the timing bump? The factory blowby tube wasn't plugged and I didn't have time to diagnose the problem so I just added more crankcase ventilation with a vented valve cover off of an irrigation engine we had on the farm. That alleviated the excess crankcase pressure.
Next I had to fix the faulty fuel sending unit, or so I thought. The military Blazers had a 27 gallon tank so while I had it out I opted to just replace it with the 31 gallon tank and new sending unit. Got the tank and sending unit 2 days before we were to leave so I get it all taken down and come to realize I didn't get new fuel tank straps...the old ones were too short so O'Reilly's was able to get me some the next morning. Got the new straps, new tank, and new sending unit put in the day before we go to leave. I found out the wire to the sending unit was cut which is why I didn't have a working fuel gauge facepalm
Whatever we drive into town that afternoon to get the rest of our supplies so we could leave early the following morning.
With less than 100 miles on the build we loaded up a 1000 pound of tools, camping gear, and food and set out on a 4000 mile round trip to King of the Hammers.
We left around 2 AM with the plan being to make the 20 hour drive to Moab, Utah that first day. As we set off my anxiety level is through the roof, I kept telling myself this is the dumbest thing i've ever done. Setting off across the country in a completely untested vehicle that I just finished the day before with completely different drivetrain...etc.etc. Probably not a smart idea.
Well we make it through Illinois, Missouri, and into Kansas before I start to notice a hefty oil leak at a fuel stop. We look around and it's just a loose bolt on the vacuum pump. We breath a sigh of relieve and tighten it up and get back on the road.
Unfortunately we didn't make it to Moab and stopped in Georgetown, Colorado for the night which turned out to be a good decision otherwise we would've driven through the mountains in the dark and not seen a darn thing. The next day we awoke to clear skies, beautiful weather and just a short drive ahead of us. I crawl all over the rig, check all the fluids and we set out on the I70 drive through the mountains.
For having never being any farther west than Missouri, seeing the snow covered mountains for the first time was breathtaking. We took all the pictures we could and just drove with our mouths open the whole time.
We eventually made it into Utah
Took a scenic route off of the interstate to Moab which was well worth the extra time because view was extraordinary
We got into Moab a little later than planned so we just set on finding a campsite close to town and settled in for the night. Tent camping in 19 degree weather was a little rough but we managed just fine. The next morning we decided to try the Kane Creek Road/Hurrah Pass/Chicken Corners trail. Roughly 40+ miles of trail down and back with nice views and cliff roads.
We met up with a fella from Denver who was planning on doing Fins & Things the next morning and talked us into joining him. He also showed us a badass place to camp on the trail for that night.
The next morning we met up and proceeded to do the Fins & Things trail.
This is the only real picture I got because I was spending more time white knuckled on the wheel lol. The trail was a lot of fun. Finally got to use my lockers and was really impressed with how the Blazer performed on the trail. My cousin took some videos which I hope to get off of him soon. Might upload those later.
We finished the trail and ate lunch in Moab and proceeded to Las Vegas for the night. We ended up driving into a bad snow storm and I discovered that LED lights and snow don't mix. The lights don't build enough heat to melt the snow off of them and eventually cover over and you can't see anything. Kind of a rough drive but we made it fine.
We got on the road after lunch the next day for Johnson Valley California and I started to notice a vibration getting worse and worse as time went on. Pulled into a gas station in Baker, CA and found a broken lug stud on the drivers rear. Jacked up the rear and found all the lug nuts to be loose. I guess I didn't torque the lug nuts after installing the wheels.. Luck was on my side as I just lost one stud and didn't loose the whole wheel. No parts stores had any studs so we continued on.
Made it into Hammertown that night in time to see the pit crew challenge and get some Dang Brothers Pizza.
The time at KOH I didn't take many pictures because there was so much to see but did snap this one up on Chocolate Thunder next to a line of Jeeps
Overall the Blazer took getting beat around in Johnson Valley just fine. Tent camping for the week was a little rough but I'm glad I did it.
We left Saturday afternoon and drove all the way to Flagstaff Arizona before getting a hotel. We left the next morning and drove all the way to Adrian Texas where we did another once over on the rig. Tightened a couple loose axle U bolts and checked the lug nuts. It was then we decided to just drive straight through all night the rest of the way home. Got home around 9 AM with no further problems. We woke up in Arizona, saw the sunset in Texas, and saw the sunrise over St. Louis.
Overall the trip was just over 4000 miles. A little longer shakedown than I would've liked but we were able to drive it home so I guess that's a win.
Sorry for the long winded post still pretty pumped about finishing the truck as well as the trip all in one go.
WaterH
Well-known member
Wow, a 4000 mile shakedown is definitely a win.
RHTrucks
Well-known member
Y'all had your own little Roadkill episode! Man that sounds fun! I hope one day to camp and wake up to those plateaus. That's so cool.
BustedCrank
Webwheeler
Awesome