What's new

Just another build thread

Eddie315

Well-known member
Joined
May 20, 2020
Member Number
791
Messages
49
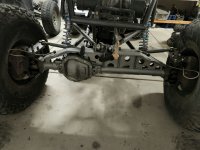
Got tired of my Samurai frame trying to rip itself to shreds on every trip and decided to pick up a Fabn801 Blade chassis. Using all of my existing parts minus the shocks. Going from air shocks to coilovers.

-Kingpin 60 front
-70 rear
-2.0 Suzuki engine
-Th180 3 speed auto
-Midnight Metalworks t-case
-King 2.5" coilovers

Goal is to have maximum up travel for a smooth ride in places like Johnson Valley and some local trails here in Arizona. This is my first buggy build and I'm open to criticism! 20210816_194127.jpg 20220404_084436.jpg 20220404_172753.jpg 20220409_174737.jpg 20220405_183239.jpg
 
Deets on the tcase and adapter?

I actually have a 2.0/th180 and some D60s. I've been trying to figure out what to put in the middle of it all.
 
Deets on the tcase and adapter?

I actually have a 2.0/th180 and some D60s. I've been trying to figure out what to put in the middle of it all.
Look up Keith Rice on Facebook. He makes the adapter. As far as I know he is the only person on Earth that does. You'll need to send him a tracker/sidekick transfer case input shaft as a core.
 
Front shocks have a home. Still need to make the front side of the upper mounts and tie it in and make it all pretty. They are mounted about 8" back from the heim bolt on the lower links. 12" shock stroke gives me about 18" of vertical travel at the wheels. The upper mounts are almost invisible from the drivers seat. I am using 1.25" heims with no misalignment spacers on the chassis side. This allows for just enough movement to avoid binding during articulation but will not rotate enough to max out the lower shock misalignment and bend the shaft. If it works for Bomber cars it will work for me. I will also be making delrin bushings for the lower shock mount.
20220411_175139.jpg
20220411_175126.jpg
20220411_172407.jpg
20220411_172151.jpg
 
Rear shocks have a home and seats are in! The shocks are mounted pretty far back on the lower links and 14" shock stroke gives me just over 18" of vertical travel. Going to be a tight fit for radiator and fuel cell but my free Harbor Freight measuring tape says it will fit. It's off jack stands and on its own weight which means I can roll it out and clean the garage!
20220415_201036.jpg
20220415_201045.jpg
20220415_201258.jpg
20220415_201420.jpg
 
Radiator and fuel cell are in and I have just enough room for a cooler. I am shoving as much stuff as possible under the floor for low COG and an overall clean look with no clutter. Steering cooler and trans cooler are both under the passenger seat and floor with the fans blowing down. I will be getting driveshafts made next week from a local place here in Yuma, Az.
20220417_173754.jpg
20220417_173803.jpg
20220417_173828.jpg
20220417_173848.jpg
 
Lookin good!!!!

How does one decide how far etc.. when mounting the shocks to the lower link?
 
Lookin good!!!!

How does one decide how far etc.. when mounting the shocks to the lower link?
A few things need to be considered. Most of the time down travel will be limited by driveshaft u-joint angles. So that pretty much determines how far forward you can mount on the link. The farther up the link you mount the shock the greater the motion ratio. So a 12" shock could result in 20" of wheel travel. At full compression, you want the shock 90 degrees to the lower link for maximum effectiveness. I chose 12" front shocks to keep the upper mounting point as low as possible. I was able to use 14" rears because they won't be in the way.
 
Been putting a little time in after work every day. Rear is done. I am waiting on a Suzuki Aerio exhaust manifold that dumps straight down instead of pointing back like the current Tracker manifold. That is the only way to clear the brake and gas pedals. I am also waiting on a local driveshaft shop to finish up my mid shaft so I can make a carrier bearing mount and fully weld in the trans cooler. I'm not sure if it will need to move to clear the shaft yet. The interior tubes and panels are all made and secured with 1/4 turn Dzus fasteners. While waiting for parts, I painted the rear Rustoleum hammered black.
20220426_181627.jpg
 
Out of the garage under It's own power! Still needs a few things like the correct springs, heat shield for the exhaust by my feet, shine up the aluminum panels, and rear storage. I'm super stoked about how it came out!!
20220502_184643.jpg
20220502_184650.jpg
20220502_184701.jpg
20220502_184711.jpg
20220502_184725.jpg
20220502_184733.jpg
20220502_184741.jpg
 
I have no idea when the coilover springs I ordered will be delivered so I started to tackle other things. Dashboard is done. I use a Bluetooth Obd2 thing that connects to this cheap phone that I use for engine guages. The app is called Torque pro and you can set whatever guages you want. Zero wiring required. I use the tablet above it for maps and stuff. Also started to make a rear storage bin out of this sheet metal I found from the year 0004. I plan on using a gas strut that will lift the lid with a cooler mounted on top. Of course I'll sandblast it and paint it when its finished.
20220507_143456.jpg
20220507_144647.jpg
20220508_154305.jpg
20220508_154329.jpg
20220508_154344.jpg
 
Looking killer. Planning on the same set up for gauges. Did you use one of those cheapy ELM327 OBD2 readers to send the info to the phone? I think you can use any old phone just need to connect to wifi and load the app?
 
Looking killer. Planning on the same set up for gauges. Did you use one of those cheapy ELM327 OBD2 readers to send the info to the phone? I think you can use any old phone just need to connect to wifi and load the app?
I dont remember the exact model reader it is but it was like $10 on Amazon. And yes, just download the torque app then the phone (or tablet) doesn't need service or anything after that. It just connects with Bluetooth. I also have it hooked up to a charger that is only on when the ignition is on. I found an app that will turn the screen on when the charger is connected and turn the screen off when it's disconnected. So the phone turns on and automatically goes to the guages when I turn the buggy on and it turns off when I turn the buggy off.
 
First test run today! It works great! The shocks will need some valving adjustment but thats it. No leaks, clunks, or strange noises. No body roll either so I won't need a sway bar. Can't wait to hit a trail!
20220510_175842.jpg
20220510_175851.jpg
20220510_175901.jpg
 
I love the passenger just holding a fire extinguisher :laughing:

That was quick, buggy looks sweet. So similar to what I've had in my head forever.

Plans for boost? :evil:
 
I love the passenger just holding a fire extinguisher :laughing:

That was quick, buggy looks sweet. So similar to what I've had in my head forever.

Plans for boost? :evil:
🤣 I haven't mounted one yet and I figured the first drive has a high potential for disaster. And yes. I gave myself a ton of room for a turbo.
 
I'm not sure if the video will show up. I used 2 Mighty Lift 95754 gas struts from autozone. Overkill if you have no weight on the lid but it's perfect for a full cooler and a tool roll.
20220516_173027.jpg
20220516_173016.jpg
20220515_121534.jpg
 
Single ended ram wasn't cutting it. Got this 2.5" x 8" ram from Surpluscenter.com and decided to do something different with the mounting. Flipped the knuckles around and drilled holes in the high steer arms for zero ackerman. I didn't want to experiment with reverse ackerman.
 

Attachments

  • Snapchat-1094069470.mp4
    8.5 MB
  • 20220723_165855.jpg
    20220723_165855.jpg
    1.8 MB · Views: 23
No issues with your fuel boiling with the way you have your radiator mounted in the Arizona summer heat?
 
Top Back Refresh