What's new

Going Commando

Simple'72CJ

Well-known member
Joined
Sep 4, 2021
Member Number
4370
Messages
243
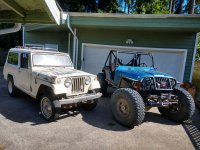
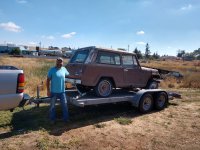
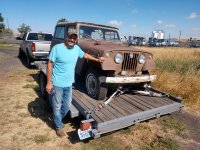
I figured I'm far along enough on this thing that it'd be worth starting a thread and it not seem too painfully slow. On the old forum I did a build thread on my Cj5 in the hardcore section, "Project FIGJAM". I've been jeepin the rig for a couple years now and always tinkering on it but wanted another project to keep me busy and from tearing it apart again. My dad has always been a passenger and just recently has been tagging along more and more on snow runs. After a lot of talking he finally said he wouldn't mind having a rig to go tool around the mountains in. He said he would fund majority of the build as long as it didn't get too outta hand lol The plans were to build something that wasn't too over the top and to keep it relatively low budget while still being very capable and comfortable. Initially, he was wanting to build a scout 800, but finding one decent enough to start with for a reasonable price proved to be very difficult. Long story short, I found a '68 Commando about 5 hrs away so I loaded up the trailer and headed that direction.

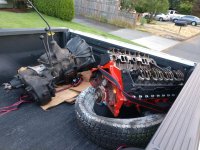
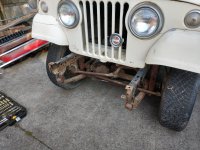
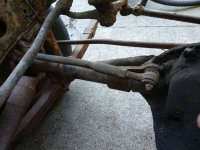
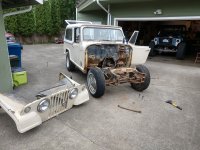
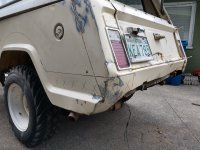
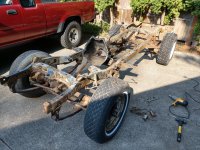
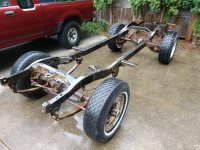
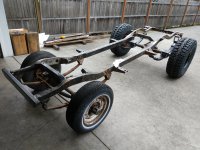
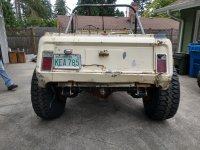
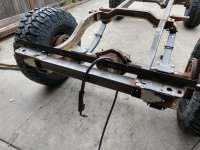
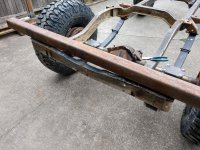
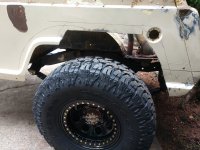
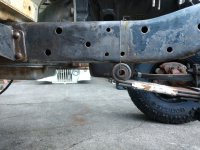
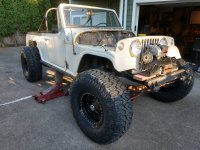
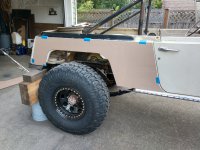
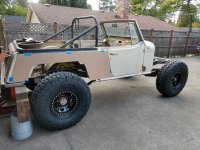
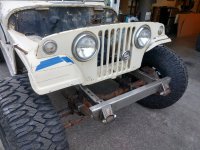
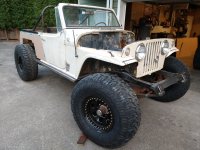
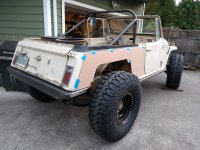
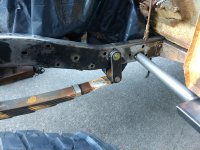
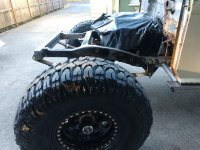
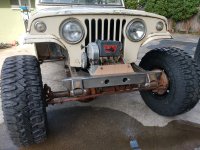
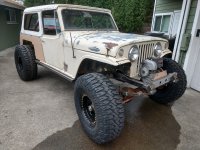
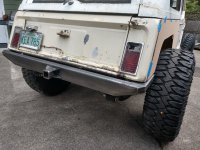
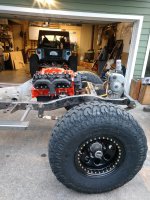
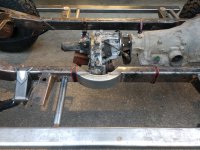
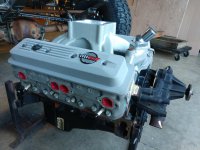
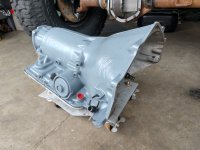
Motor was already pulled and had the factory 3 speed with dana 20 dangling off the crossmember. Body was pretty straight with only a couple dings here and there a rust as usual in the floor boards. All the glass was intact other than the cracked front windshield. All in all, I was very happy with the rig so loaded it up and pulled it home!

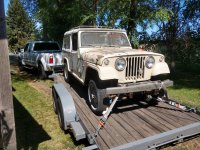
The Day I got it back to my place. June 24th, 2021
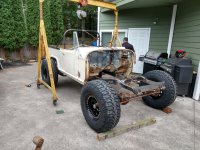
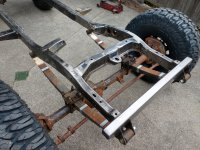
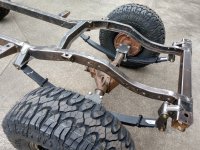
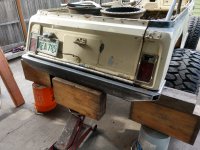
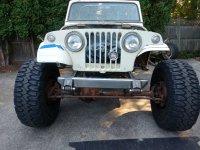
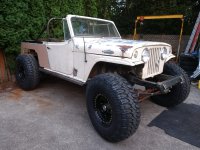
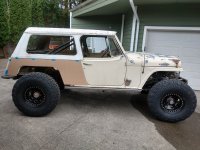
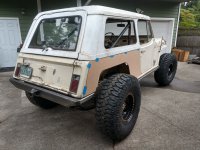
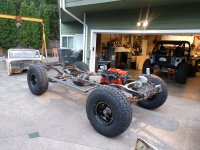
 

Attachments

  • 206039699_4169525673142182_1581499742688143351_n.jpg
    206039699_4169525673142182_1581499742688143351_n.jpg
    262 KB · Views: 955
Good to hear you've been enjoying the CJ with your old man. Those are memories that last forever.

Build plan for the Commando?


I just realized something. At this rate you will have completed TWO builds while I'm still working on my pile.
 
So as I said in my previous post, the build is supposed to be basic. I wanted to do more of a traditional old school jeep and not go the typical route of LS powerplant and th400 with a 205 or whatever. Small block chevy was the only option in this build and I wanted to use a 4 speed of some sort. After about a week or so of searching, a sm465 that was already adapted to a dana 20 popped up! Not only did I not have to deal with the whole adapting thing, but he was also selling a freshened up 350!
 

Attachments

  • IMG_20210711_204421097.jpg
    IMG_20210711_204421097.jpg
    1.2 MB · Views: 38
Once I had the motor and trans I felt I could start the tear down. I had never had the opportunity to look these rigs over up close in the past and always assumed it was essentially a stretch early CJ frame. I was completely wrong lol two piece factory front driveline, goofy shock absorber mount to the back of engine, boxed frame 2/3 the way back, outboarded rear springs, etc.
 

Attachments

  • IMG_20210624_103101457_HDR.jpg
    IMG_20210624_103101457_HDR.jpg
    2.1 MB · Views: 52
  • IMG_20210708_174937311_HDR.jpg
    IMG_20210708_174937311_HDR.jpg
    1.9 MB · Views: 52
  • IMG_20210708_184015654.jpg
    IMG_20210708_184015654.jpg
    1.8 MB · Views: 53
  • IMG_20210716_101623388_HDR.jpg
    IMG_20210716_101623388_HDR.jpg
    2 MB · Views: 55
  • IMG_20210716_102655057_HDR.jpg
    IMG_20210716_102655057_HDR.jpg
    1.4 MB · Views: 56
Got the body pulled off the frame and gave it a quick wash. Started hacking all the unnecessary shit off and getting it prepped for axles. During this process I came across two full sets of waggy springs for 150 bucks and couldn't pass. I was originally gonna run 4runner rear springs up front sprung over, but this changed my plans into running waggy rears. What I forgot to take pics was I had already picked up a part of 4" lift F150 springs for the rear in plans to do spring under out back.
 

Attachments

  • IMG_20210730_170020270_HDR.jpg
    IMG_20210730_170020270_HDR.jpg
    2.6 MB · Views: 35
  • IMG_20210731_144731694.jpg
    IMG_20210731_144731694.jpg
    2.9 MB · Views: 36
  • IMG_20210801_130650581_HDR.jpg
    IMG_20210801_130650581_HDR.jpg
    2.6 MB · Views: 37
The planets aligned and I have some awesome friends because my good buddy then gave me a set of axles. Front axles is a 8 lug GM 44 and matching 14 bolt. Can't beat free!!! Made a mess in the back of my pickup getting them home though...
 

Attachments

  • IMG_20210718_201702691.jpg
    IMG_20210718_201702691.jpg
    1.3 MB · Views: 38
  • IMG_20210719_163338968_HDR.jpg
    IMG_20210719_163338968_HDR.jpg
    1.9 MB · Views: 38
And now a bunch of pics of making some low pro spring plates for the rear. All the hardware is solely mockup, it'll all be changed out for grade 8 fine thread during final assembly.
 

Attachments

  • IMG_20210804_065434993.jpg
    IMG_20210804_065434993.jpg
    1 MB · Views: 39
  • IMG_20210804_065442876.jpg
    IMG_20210804_065442876.jpg
    3 MB · Views: 38
  • IMG_20210805_170034253_HDR.jpg
    IMG_20210805_170034253_HDR.jpg
    1.3 MB · Views: 40
  • IMG_20210806_103955897.jpg
    IMG_20210806_103955897.jpg
    1.5 MB · Views: 41
  • IMG_20210806_124109701.jpg
    IMG_20210806_124109701.jpg
    1.2 MB · Views: 38
  • IMG_20210806_124433846.jpg
    IMG_20210806_124433846.jpg
    1.3 MB · Views: 39
All Bolted up and mocking placement under rails.
 

Attachments

  • IMG_20210810_175308873.jpg
    IMG_20210810_175308873.jpg
    2.5 MB · Views: 46
  • IMG_20210810_175233324.jpg
    IMG_20210810_175233324.jpg
    1.1 MB · Views: 47
  • IMG_20210810_175146361.jpg
    IMG_20210810_175146361.jpg
    1.5 MB · Views: 48
  • IMG_20210809_161126722.jpg
    IMG_20210809_161126722.jpg
    2.7 MB · Views: 48
  • IMG_20210815_140806923_HDR.jpg
    IMG_20210815_140806923_HDR.jpg
    2.2 MB · Views: 45
  • IMG_20210815_140830451_HDR.jpg
    IMG_20210815_140830451_HDR.jpg
    2.3 MB · Views: 39
  • IMG_20210820_094200383.jpg
    IMG_20210820_094200383.jpg
    1.8 MB · Views: 46
Then slung the front axle in there setting the wheelbase to 112". Stretched the wheelbase 10" and no I don't know the front/rear from stock location lol I just did what I though looked decent. Body was tossed on to double check before going any further with burning mounts in.
 

Attachments

  • IMG_20210820_134422067_HDR.jpg
    IMG_20210820_134422067_HDR.jpg
    2.2 MB · Views: 60
  • IMG_20210820_125559002.jpg
    IMG_20210820_125559002.jpg
    2.4 MB · Views: 52
  • IMG_20210820_160303637_HDR.jpg
    IMG_20210820_160303637_HDR.jpg
    1.7 MB · Views: 48
  • IMG_20210820_162010179_HDR.jpg
    IMG_20210820_162010179_HDR.jpg
    1.7 MB · Views: 55
  • IMG_20210820_162101526_HDR.jpg
    IMG_20210820_162101526_HDR.jpg
    1.7 MB · Views: 53
  • IMG_20210820_171929519_HDR.jpg
    IMG_20210820_171929519_HDR.jpg
    1.7 MB · Views: 61
  • IMG_20210820_171934838_HDR.jpg
    IMG_20210820_171934838_HDR.jpg
    1.8 MB · Views: 64
Misc Fab work getting things hammered down. Trying to keep everything pretty simple and low key.
 

Attachments

  • IMG_20210821_125046919_HDR.jpg
    IMG_20210821_125046919_HDR.jpg
    1.9 MB · Views: 51
  • IMG_20210821_191259827.jpg
    IMG_20210821_191259827.jpg
    1.4 MB · Views: 59
  • IMG_20210821_190316122.jpg
    IMG_20210821_190316122.jpg
    1.1 MB · Views: 60
  • IMG_20210821_163556949_HDR.jpg
    IMG_20210821_163556949_HDR.jpg
    2.1 MB · Views: 56
  • IMG_20210821_163543024_HDR.jpg
    IMG_20210821_163543024_HDR.jpg
    1.6 MB · Views: 49
  • IMG_20210821_141038262_HDR.jpg
    IMG_20210821_141038262_HDR.jpg
    1.9 MB · Views: 46
  • IMG_20210821_125506254_HDR.jpg
    IMG_20210821_125506254_HDR.jpg
    2.4 MB · Views: 48
Axles officially hung with all mounts about 95% done. I still went back and plated in front spring hanger.
 

Attachments

  • IMG_20210822_141724100_HDR.jpg
    IMG_20210822_141724100_HDR.jpg
    2.2 MB · Views: 56
  • IMG_20210822_141633391_HDR.jpg
    IMG_20210822_141633391_HDR.jpg
    2.3 MB · Views: 66
  • IMG_20210822_141429947_HDR.jpg
    IMG_20210822_141429947_HDR.jpg
    1.4 MB · Views: 70
  • IMG_20210822_141401814_HDR.jpg
    IMG_20210822_141401814_HDR.jpg
    1.3 MB · Views: 71
  • IMG_20210822_120857966_HDR.jpg
    IMG_20210822_120857966_HDR.jpg
    1.3 MB · Views: 60
  • IMG_20210821_191420581.jpg
    IMG_20210821_191420581.jpg
    1.3 MB · Views: 55
  • IMG_20210821_191406766.jpg
    IMG_20210821_191406766.jpg
    948.3 KB · Views: 53
  • IMG_20210821_191353013.jpg
    IMG_20210821_191353013.jpg
    1.9 MB · Views: 53
  • IMG_20210821_191314160.jpg
    IMG_20210821_191314160.jpg
    984.2 KB · Views: 54
  • IMG_20210822_141833758_HDR.jpg
    IMG_20210822_141833758_HDR.jpg
    1.6 MB · Views: 56
Waited on setting shackles on front end until I had actual weight of motor in the jeep.
 

Attachments

  • IMG_20210827_123750088.jpg
    IMG_20210827_123750088.jpg
    1.4 MB · Views: 39
  • IMG_20210827_112222847.jpg
    IMG_20210827_112222847.jpg
    1.2 MB · Views: 37
  • IMG_20210827_112211389_HDR.jpg
    IMG_20210827_112211389_HDR.jpg
    1.7 MB · Views: 33
  • IMG_20210825_171911053_HDR.jpg
    IMG_20210825_171911053_HDR.jpg
    1.6 MB · Views: 31
  • IMG_20210829_173543317.jpg
    IMG_20210829_173543317.jpg
    1.4 MB · Views: 40
  • IMG_20210829_173559990.jpg
    IMG_20210829_173559990.jpg
    1.1 MB · Views: 41
Picked up an 8274, trimmed rear of tub to tuck bumper, and began mocking sliders.
 

Attachments

  • IMG_20210901_182529300_HDR.jpg
    IMG_20210901_182529300_HDR.jpg
    1.3 MB · Views: 57
  • IMG_20210901_182521816_HDR.jpg
    IMG_20210901_182521816_HDR.jpg
    1.5 MB · Views: 59
  • IMG_20210901_182545073_HDR.jpg
    IMG_20210901_182545073_HDR.jpg
    1.7 MB · Views: 63
  • IMG_20210901_184220505_HDR.jpg
    IMG_20210901_184220505_HDR.jpg
    1.6 MB · Views: 59
Rear bumper taking shape
 

Attachments

  • IMG_20210903_164710086_HDR.jpg
    IMG_20210903_164710086_HDR.jpg
    1.4 MB · Views: 54
  • IMG_20210904_115105587.jpg
    IMG_20210904_115105587.jpg
    2.3 MB · Views: 49
  • IMG_20210904_115253543.jpg
    IMG_20210904_115253543.jpg
    2.5 MB · Views: 46
  • IMG_20210904_115322175.jpg
    IMG_20210904_115322175.jpg
    1.4 MB · Views: 52
  • IMG_20210904_115332721.jpg
    IMG_20210904_115332721.jpg
    1.1 MB · Views: 56
The old man wanted to keep the look of the front fenders so decided to go old school and do a bob job. Still a work in progress lol I spent a quick hour on these just to get a visual and haven't changed since haha Also, got the motor set in there and located shackles on the front.
 

Attachments

  • IMG_20210906_124532416_HDR.jpg
    IMG_20210906_124532416_HDR.jpg
    1.4 MB · Views: 46
  • IMG_20210905_113541667_HDR.jpg
    IMG_20210905_113541667_HDR.jpg
    1.8 MB · Views: 48
  • IMG_20210906_125128538.jpg
    IMG_20210906_125128538.jpg
    1.8 MB · Views: 47
  • IMG_20210907_192825655.jpg
    IMG_20210907_192825655.jpg
    1.5 MB · Views: 47
  • IMG_20210907_193219192.jpg
    IMG_20210907_193219192.jpg
    1.5 MB · Views: 52
  • IMG_20210907_194202339.jpg
    IMG_20210907_194202339.jpg
    1.9 MB · Views: 49
  • IMG_20210908_172004544.jpg
    IMG_20210908_172004544.jpg
    1.8 MB · Views: 50
  • IMG_20210908_181437283.jpg
    IMG_20210908_181437283.jpg
    1.3 MB · Views: 44
  • IMG_20210908_181606917.jpg
    IMG_20210908_181606917.jpg
    1.3 MB · Views: 48
Then my dad and I went and grabbed another '67 Commando for parts!
 

Attachments

  • IMG_20210911_112649816_HDR.jpg
    IMG_20210911_112649816_HDR.jpg
    1.8 MB · Views: 47
  • IMG_20210911_112702761_HDR.jpg
    IMG_20210911_112702761_HDR.jpg
    2.2 MB · Views: 49
More poser shots. Really started to dig the stretch at this point with the top on
 

Attachments

  • IMG_20210912_155713020_HDR.jpg
    IMG_20210912_155713020_HDR.jpg
    1.7 MB · Views: 51
  • IMG_20210912_180237046_HDR.jpg
    IMG_20210912_180237046_HDR.jpg
    1.9 MB · Views: 50
  • IMG_20210912_180259280_HDR.jpg
    IMG_20210912_180259280_HDR.jpg
    1.6 MB · Views: 53
  • IMG_20210912_180314167_HDR.jpg
    IMG_20210912_180314167_HDR.jpg
    1.7 MB · Views: 56
  • IMG_20210912_180332351_HDR.jpg
    IMG_20210912_180332351_HDR.jpg
    1.7 MB · Views: 50
  • IMG_20210912_180342829.jpg
    IMG_20210912_180342829.jpg
    1.2 MB · Views: 52
  • IMG_20210912_180351774.jpg
    IMG_20210912_180351774.jpg
    1.1 MB · Views: 53
A little change of plans happened throughout this process regarding drivetrain. After talking more and more with my dad I could tell the 4 spd manual wasn't really what he wanted. I had to remind him that this was his jeep so tell me what he wanted lol "I want it to drive like your setup" was his reply. That being said, I knew he would want an overdrive cuz he plans to cruise it 2 hrs to go visit my grandparents over in Eastern Washington. We settled on keeping it extremely similar to mine and go with a 700r4 (trying to eliminate trans controller) and a np241 so we both have spare parts to interchange.
 
Are you going to EFI the SBC?

Good move on the auto trans. That will raise the enjoyment level all by itself.
 
Are you going to EFI the SBC?

Good move on the auto trans. That will raise the enjoyment level all by itself.
Absolutely! Pretty set on running the new Holley/MSD Atomic 2 setup. The integrated ecu in the throttle body I think will be super nice to keep wires in the engine bay to a minimum and the added timing control has really swayed me as well.
 
Already went out and had a 700r4 built with RMVB, just need to decide what converter I wanna use. Suggestions?
 
I'd call a known reputable converter builder like Edge or someone else and talk to them. Weight, HP/torque, RPM range, gear ratios, axle ratios, tire size and use are all variables to getting the converter right the first time.

Lean on the experience of a pro for the converter.
 
YES! I have been following it on IG but its not the same lol Glad to see it here man!!!
 
Motor, trans, and t-case mocked in location. The factory position of an unclocked 241 is absolutely horrendous as most know so clocking it flat was the only option. Of course the only issue with that is it wasn't even close to fitting haha Ended up making a little clearance in the rail.
 

Attachments

  • IMG_20210914_182526845.jpg
    IMG_20210914_182526845.jpg
    1.9 MB · Views: 92
  • IMG_20210914_182516579.jpg
    IMG_20210914_182516579.jpg
    1.4 MB · Views: 87
  • IMG_20210914_182458704.jpg
    IMG_20210914_182458704.jpg
    1.8 MB · Views: 87
  • IMG_20210914_182420419.jpg
    IMG_20210914_182420419.jpg
    1.6 MB · Views: 71
  • IMG_20210914_183617393.jpg
    IMG_20210914_183617393.jpg
    1.5 MB · Views: 70
The original motor would've been perfect for what my dad was planning to do for the rig, but another powerplant presented itself in which I couldn't pass on. So the story is my boss was gifted a motor from GM probably mid 2000s to do a build and photoshoot. Motor was tossed in his C1 vette chassis and they snapped a couple pics for Hotrod Magazine and then Art pulled the motor back out. Long story short, GM just told Art to keep the motor so its been stored in his shop ever since. Motor is a ZZ4 small block with zero miles, never even been fired! I already swapped out the intake to an Edelbrock performer to better suit our application. Also, here's the new trans I had built.
 

Attachments

  • IMG_20210924_131138081.jpg
    IMG_20210924_131138081.jpg
    1.3 MB · Views: 19
  • IMG_20220129_131405890_HDR.jpg
    IMG_20220129_131405890_HDR.jpg
    991 KB · Views: 20
Top Back Refresh