How to install the app on iOS
Follow along with the video below to see how to install our site as a web app on your home screen.
Note: This feature may not be available in some browsers.
You are using an out of date browser. It may not display this or other websites correctly.
You should upgrade or use an alternative browser.
You should upgrade or use an alternative browser.
Byro
Lurkin’
Astro box should give you 4” no problem.
HRDROKN
Active member
- Joined
- Oct 17, 2022
- Member Number
- 5643
- Messages
- 36
Ya, I was looking at that. Watched a few you tubes, looked to be extremely flat profile.... but couldn't tell what the net stretch was offered. And TNT price is ridiculous... just saying.tnt makes a front steering box mount. Not sure how much stretch you could get.
HRDROKN
Active member
- Joined
- Oct 17, 2022
- Member Number
- 5643
- Messages
- 36
Truth to that.... just not looking to get that pitman arm out there driving into rocks.Astro box should give you 4” no problem.

TRINDU
PBB Orphan
rotate the box parallel to the frame
RunningProblem
Well-known member
- Joined
- Sep 12, 2020
- Member Number
- 2860
- Messages
- 2,455
are you going to plug up the giant hole in the frame?
giles45shop
Red Skull Member
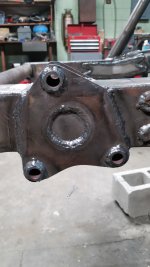
Although it's not a YJ, here's couple pics of how I mounted the box on my 6" TJ front stretch that may give you a few ideas. I am using a Saginaw steering box from a 90's-2000's Chevy half ton truck. It has the same spline size as a TJ/YJ on the output, but a wider/larger bolt pattern so you can span the frame rails. The front frame horns and steering box mounting plates were from Brave Motorsports, but you could probably do something similar.
I've attached a couple pics, you can find more details on the old place if you search in the non-hard core section under "Project Safer Hobby".

I've attached a couple pics, you can find more details on the old place if you search in the non-hard core section under "Project Safer Hobby".
Attachments
Byro
Lurkin’
Truth to that.... just not looking to get that pitman arm out there driving into rocks.
Fair enough. That bumper is pretty bitchin. It be a good way to stub the front end when keeping the WB the same.
HRDROKN
Active member
- Joined
- Oct 17, 2022
- Member Number
- 5643
- Messages
- 36
Although it's not a YJ, here's couple pics of how I mounted the box on my 6" TJ front stretch that may give you a few ideas. I am using a Saginaw steering box from a 90's-2000's Chevy half ton truck. It has the same spline size as a TJ/YJ on the output, but a wider/larger bolt pattern so you can span the frame rails. The front frame horns and steering box mounting plates were from Brave Motorsports, but you could probably do something similar.
I've attached a couple pics, you can find more details on the old place if you search in the non-hard core section under "Project Safer Hobby".
That turned out nice!
HRDROKN
Active member
- Joined
- Oct 17, 2022
- Member Number
- 5643
- Messages
- 36
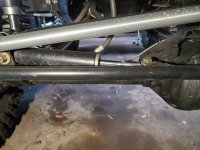
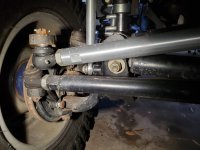
Well crap.... played with this all morning 
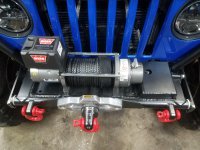
I see some advantages to running flat and some issues it creates with running my track bar and drag link parallel... I can't drop the frame side track bar mount without interference in bump travel. Likewise I can't raise the axle side either So this looks like a compromise.... On the plus side... all hydraulic lines still fit without grill mods and winch plate won't need to be modified.
And yes, I plugged the crossmember hole...


I see some advantages to running flat and some issues it creates with running my track bar and drag link parallel... I can't drop the frame side track bar mount without interference in bump travel. Likewise I can't raise the axle side either
So this looks like a compromise.... On the plus side... all hydraulic lines still fit without grill mods and winch plate won't need to be modified.And yes, I plugged the crossmember hole...
giles45shop
Red Skull Member
Looks like you are well on your way. I know I spent a LOT of time trying to work out the details of the angle of the steering box and how everything worked together (drag link, pitman arm, tie rod, 3rd link, etc.) as the suspension cycled and steering turned.
One of the lessons learned for me, and one thing I would be more aware of going forward, was location of the axle forward/aft in relationship to the forward/aft position of the steering box. On mine, I think I pushed the axle a little too far forward. The result was that as the suspension went to full bump the drag link/pitman arm was running into the tie rod before the coil over bottomed out. This required me to use a raised (instead of a drop) pitman arm to get the clearance so that the axle had enough up travel such that the limiting factor was close contact to the frame and not the steering parts. The downside to this was that now my drag link was now at a little more of an angle. Ideally, you want the drag link & third link to be as flat as possible at ride height.
If I would have pulled the axle back an inch or so, and/or pushed the box forward a bit, then the drag link would have been slightly ahead of the tie rod and could pass in front of the tie rod as the suspension compressed. At that point I could have notched the frame on the passenger side and gained more up travel. At the end of the day, I managed to get the interference points between the axle/frame, link/frame, tie rod/frame, tie rod/drag link, and shock travel all to essentially converge at one point, but it took a LOT of work to get there. This was my first time doing it, and it was definitely a learning experience.

DannyK
Well-known member
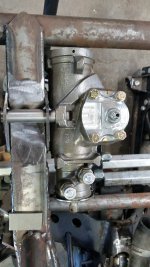
Here are a few pictures of my steering box moved forward on my YJ.


HRDROKN
Active member
- Joined
- Oct 17, 2022
- Member Number
- 5643
- Messages
- 36
Here are a few pictures of my steering box moved forward on my YJ.
Damn, there is not a lot of room there..... how does your drag link tie in? Hydro assist?
DannyK
Well-known member
HRDROKN, here you go. It is still in work, so no proof that it works, LOL.


wvjeepguy81
Active member
That's some cool, creative fabwork.HRDROKN, here you go. It is still in work, so no proof that it works, LOL.
Byro
Lurkin’
Make a tab off the track bar bracket to bring the ram out further.

Looks like you have plenty of draglink clearance to run it like that. I’ve never been a fan of cover mounted rams. Just personal preference.
Looks like you have plenty of draglink clearance to run it like that. I’ve never been a fan of cover mounted rams. Just personal preference.
HRDROKN
Active member
- Joined
- Oct 17, 2022
- Member Number
- 5643
- Messages
- 36
That's a good idea.....Make a tab off the track bar bracket to bring the ram out further.
Looks like you have plenty of draglink clearance to run it like that. I’ve never been a fan of cover mounted rams. Just personal preference.

giles45shop
Red Skull Member
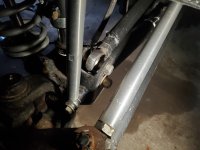
It is definitely a packaging challenge to get everything to fit, my axle side track bar mount is doing triple duty as a mounting point for track bar, ram and sway bar. I am also not a fan of diff cover ram mounts. I looked at using a clamp type tie rod mount, but it basically poked back too far to keep from hitting the diff cover or had excessive angularity when mounted pointing up like yours.
I ended up using a welded double-shear mount on the backside of the tie rod. It does make adjusting toe a little more challenging, but keeps everything as parallel as possible to keep tie rod roll minimized.
Here's a few pics for ideas
I ended up using a welded double-shear mount on the backside of the tie rod. It does make adjusting toe a little more challenging, but keeps everything as parallel as possible to keep tie rod roll minimized.
Here's a few pics for ideas
Attachments

NDCjeepsmith
Red Skull Member
Nice welds too