What's new

FJ62 Adventuremobile

Little advice on the Aussie lockers which I ran for years. Get the hardened cross pin shaft from Randys R n P. I broke several over the years. The locker itself is pretty strong but the stock cross shaft is the weak point. I quit running them because of that.


Thanks, I’ll look into those. I have two friends who run Aussies with great results. Wasn’t necessarily the first choice but it’s better than nothing
 
106DD55C-2F06-47C4-A545-26898F9E77C0.jpeg
Man, that pic is old! I think that's Zach's old blue FJ60...
 
This (and two Aussie lockers) is exactly how many parts you can get for what a set of FJ62 axles sells for :laughing::laughing:. There is a well designed weld in kit to do this specific installation. The reader is welcome to draw their own conclusions as to why I am going this route :grinpimp:


Barnes shock towers. Beef. Way too wide, I wish I had realized that before ordering. I'll probably be cutting them in half and making the outboard sections more vertical to narrow them up. Not a big deal honestly, they're a GREAT start for the money.

Barnes perches for the rear. They're perches, everyone has seen that.

0D710D19-5FC0-46AE-9A10-B8C9753D9207.jpeg


Barnes frame side coil spring towers. I went into these knowing they were iffy. Luckily, they are going to work pretty well. My springs are a bit wider than the advertised recommended fitment for the towers, but I can make them work. Again, a great start for the money for me. CAD is now out of the process. I can just make a few incisions with the angle grinder, heat the bend to move the actual coil mount to a perpendicular plane to the frame rail to eliminate most of the outboard offset of the spring, and weld it all up. Then notch accordingly to set the bucket height.

For me, that is fairly simple as compared to building an entire tower from scratch.


Also got a barnes panhard mount and radius arm mount. I'm happy that the radius arm mounts didn't come pre-welded so that I can set the ID exactly to the Toyota bushing size. I was slightly concerned because the advertised ID is like .1 too large, but now WGAF


AD418BF6-7439-4355-9736-B9AFF79FCC84.jpeg


Slee caster correction plates. Helps me avoid doing a cut and turn for a while


79C07147-FE0D-406B-B1C9-4D23D53FB59E.jpeg


Slee adjustable panhard bungs. I'll use the FJ80 panhard to retain the stock bushings and goofy bend around the front diff that I could never replicate. The stock 80 panhard will be too short even at stock height. This unit adds length even at it's tightest adjustment, so hopefully it will keep me in spec without any further fawkery

9121822E-D825-4B75-8AD6-3EEE319B6F22.jpeg


Actual physical progress is somewhat on hold for a week or two. Wheeling Coppinger Cove this weekend and SMORR the following weekend. The associated prep has kept me busy.

My current plan of attack:

-Strip the front housing down, needs a knuckle rebuild anyway.
-Locate the front axle L/R and center it in the wheel well with radius arms mounted at ride height (hub to fender measurement, cheating off of other people's homework)
-Mount radius arm frame side
-Mount panhard frame side
-Coil tower
-Shock tower
-Rear axle
-Engine
-Hot lap
 
Last edited:
Didn’t expect to make any progress this week between wheeling and wheeling prep

Got these slapped on tonight. Stock frame thickness would probably be fine but this is some cheap and easy peace of mind. Probably should have tapered the aft ends off because of stress risers or whatever. Check back never to say I told you so :flipoff2:
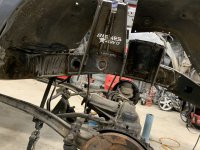
. Not just good but good enough. Ready for the Barnes bracketry to go on hopefully next week

D49B6A9B-4E5B-4A8D-B6F3-CCA00AD15BA7.jpeg


8A53B0EE-4A81-4AB7-B5ED-61A35E939F34.jpeg
 
I know my fans (y’all) are like “dang drew slow the fawk down.


This is kind of where it will live. Going to copy some hub to fender measurements to set the axle close to ride height. Pretty much center it in the wheel well with plumb bobs and place the radius arm brackets. Caster will be handled with some correction plates on the lower radius arm brackets. Can’t do a cut and turn because of the tie rod placement, but that’s ok.

It’s not a 4 link calculator and CAD, but it will work fine

image.jpg


Frame width works almost perfectly with the 80 stuff. Back here. Panhard mount is a different story, but it has to be lengthened anyway with a lift.

image.jpg
 
Last edited:
Dropped the ball for 6 weeks and have posted no updates. Finally sat down with a white claw to bang out a quick status report. I snapped these pictures on my way out of the shop tonight, sorry if quality sucks.

Progress is still being made. Elephant philosophy. One bite at a time, 20 minutes every night or two. I've been fortunate to have been busy doing fun things that have really affected progress, but thats OK.

I can't call the front suspension done, but it is SO. CLOSE. Currently I need to just finish up the top of the shock mounts, get a drag link, mount the swaybar, and throw some paint at it. Possibly going to move the panhard mount but we'll see about that.


Fender cutting was definitely required to fit the Barnes hardware in place. Both the coil bucket and the shock tower were cut to fit, they were both fairly wrong for my application but I expected that going in. I actually fawked up and cut a good bit of material out of the center of the pax shock mount and had to weld it back in place. I honestly forgot the details at this point but we're all good now.

5CA3B03A-52D7-40B9-8D3F-BD5DB8BB6A98.jpeg


Driver's side. Ended up moving the steering box forward an estimated 4" so that I could align the frame coil bucket vertically with the axle bucket/mount. Not a huge deal. Sleeved the frame and added a little doubler. The engineers among you will notice that I accidentally terminated the doubler at a shitty spot on the forward side but I never liked engineers anyway :flipoff2:

Also notice the panhard mount. It is close to the steering box bolts, just about as close as I can get it. Unfortunately, after burning it in, I learned that the pitman arm actually hits the panhard mount when turning passenger. At this time, I do not know if it will hit the steering stops or the panhard mount first. I'm going to leave it in place until i get a replacement (straight) drag link and can test it out.

44AD8D3F-745A-4B47-B65D-A1D915C81E02.jpeg


I may emulate the FJ80 design and run a brace from the panhard mount underneath the oil pan to the passenger side frame rail, just because the legs on that bracket got a little thin when I trimmed it to fit. In hindsight, I wouldn't buy a mount with the speedhole right in the middle of the gusset (Barnes)

6E36DA54-0F76-4C48-8644-19DAAE1325AC.jpeg


The busy corner that takes forever.

Notable interest is my stock FJ80 coil retainer/bumpstop mount that fits perfectly inside of the Barnes coil bucket. I just stuck it in place and welded it everywhere I could reach instead of bolting it in with 2 M8 bolts like the factory.


2D6C579B-CECD-4E64-9C18-A9DE87775D46.jpeg
 

Attachments

  • 2659A486-1E22-4AA4-83F7-6EAF4FC6DC9A.jpeg
    2659A486-1E22-4AA4-83F7-6EAF4FC6DC9A.jpeg
    1.3 MB · Views: 7
Last edited:
I started looking at the rear suspension. Looks like a SOA rear will land it just about perfectly via sheer dumb luck. Assuming my calculations are correct, with the rear leaf and shackle in the position shown below, I will be right around 1 3/8 higher in the rear than the front. Acceptable and/or correctable with a spacer in the front or dropping the rear by fawking with the leaf pack.

I have to get the drivetrain in and fawk around with the leaves to see what combo I actually need, but that is small potatoes

93DDFF7D-47AB-47DA-8DDB-5147BCB24E4F.jpeg


Feeling like an episode of Dirt Everyday

99039986-0D6B-4414-B8D0-6FFB23A37076.jpeg


Out of order pic:


Found one of how the frame side radius arm brackets turned out (they're welded now). I may gusset them up somehow to spread the load up onto the side of the frame rail vs strictly the bottom, but I may also run it. In the picture, it looks like I have more exposed mount area outside of the frame rail than I actually do.

33F5D5BE-5A32-4588-AD05-B274FB18830E.jpeg
 
Last edited:
Going forward:

Began teardown of front axle tonight. Ive been dreading it but Im going to go ahead and get that taken care of. Locker, brakes, wheel bearings, knuckle bullshit all at once. Went ahead and got some RCV shafts on the way, I don't want to open this thing up again for a while or explode a birf halfway across the country

I may luck out and have a complete powertrain locked down, still working on the details there but it could work out to be perfect timing. It won't be terribly long before I am ready for it.
 
I've been creeping looking for updates on this. Should have looked here.
It's for real slow going, but it is going. I bit off exactly as much as I can chew at this current stage of life :laughing:.

Still trying to have it done by the end of the year. Could possibly still happen
 
It's for real slow going, but it is going. I bit off exactly as much as I can chew at this current stage of life :laughing:.

Still trying to have it done by the end of the year. Could possibly still happen
You're telling me. I've got a pile of parts for my 4Runner sitting in the shop and no time to put them on.
 
It was a rainy Sunday with temps at a survivable level today. I was able to get out to the shop and knock out some bitch work. Got the front axle disassembled. Cleaned everything fairly mediocrely, began reassembly.

Need front rotors, so I couldn't put the hubs on.

Realized I didn't do a final torque on the carrier bolts before installing the third and most of the passenger side outer. Whoops, but at least I caught it.

Knuckle kit from Cruiser Outfitters. RCVs because I fawking hate getting back into these axles, Aussie locker because they're simple and have held up great in friends' rigs.

5FDDA421-D876-402B-AD64-E3C33545A7DE.jpeg


5D066122-B715-460A-905A-D1CBFBC4B557.jpeg
D2BEF9BF-2D4F-43AD-8941-44F465E3B77A.jpeg


Goal for the week is to finish up both outers and get the locker in the rear. Don't touch that dial.
 
Last edited:
Update from the other week:

Trucking along. Seeing my post dates and my goals vs the reality is a little discouraging, but I'm still moving along.

I didn't realize that this 80 series rear had an open style carrier, it made throwing the Aussie locker in a breeze. I still found ways to make it hard but that's alright, someone has to do it.


5B6DCB74-95D5-4B5F-A905-3E5374E9909B.jpeg


DD89FEF9-48C2-4257-84C0-0004C4D13621.jpeg


I have both outers and locking hubs up front with new rotors. For some reason, the shiny new rotors just make it look like I am making progress and that's exactly what I need :laughing::laughing:

ADFF645B-DF4A-4311-BEB8-DBBA17D14152.jpeg


I started removing the fuel tank on Wednesday and did a major shop cleanup. I plan to have the fuel tank out this weekend to prep it for a new in-tank pump, and will also cut a hole in the floor to add a panel for pump access. It will never be easier than it is right now with the rear axle removed and the tank completely empty.

A long range fuel tank would be ideal, but I don't have the scratch for that.
 
Last edited:
Fuel tank is out. Going to go back in with a new higher output in tank pump. Went ahead and cut an access panel to make life easy later on. Going to bolt it down with riv-nuts and seal it with some tape or something.

6B266C79-E464-44F5-85A3-7AFED25E4345.jpeg


EE9AF7F6-3F1F-4556-9BDF-26570DD83D14.jpeg


4ACD1170-7231-4843-A722-0CB6C8E622C3.jpeg
 
My mountain bike is broken so this thing has gotten some attention lately.

Check it out. The axles are "in" for the last time for the first time :laughing:. After a quick mock up with some shocks and springs, I went ahead and pulled the front out to finish up some welding and gusseting then painted it. Got the radius arms, panhard, and steering box back in their spots.


I used an Ace Hardware branded rust reformer spray paint for this. Holy fawk, it is the best spray paint that I have ever used and only about $5 for a big can. I can not recommend it enough


E51940A9-B65D-460C-8D56-67712BB2E9A5.jpeg


One of the next steps is to measure for a drag link to replace the bent one that I currently have. Probably just going with a Trail Gear ordered by length.

3711C625-3634-43FA-99D0-CEF923AD6F49.jpeg


Total time of getting the front positioned with plumb bobs, angle finders and all kinds of shit: about two evenings

Total time of getting the rear in position with a 15 year old measuring tape: about 15 minutes.


BF6C5474-1BFE-42AC-BEC4-5AEF9C2DBFB2.jpeg


Planning to run a double cardan driveshaft, but obviously need the tcase in position (and all sorts of other shit) to set the pinion angle. It is centered and will probably drive pretty straight

BC0B4BE9-D235-4095-B9FF-7B85FD1FCDEF.jpeg


I ended up removing 3 leaves from the 8 (?) leaf pack that I had. With any luck, these should flatten out and keep the truck mostly level if my shoebox math from the previous post is close to accurate. If anything it will be too tall. It will be easy to french hangers or go to a different spring, I just need to get the weight of the drivetrain in there before I make any final decisions. The rear will remain untouched, except for shock mounts, until that happens.


Cinder block because I am out of jack stands. It's not holding up the truck, bite me :flipoff2:

11704275-26B0-4CB4-AEFB-2EDF75BC233A.jpeg


I could run the factory 80 lower shock mount and outboard my shocks. To do that I would probably have to french a shock tower into the frame to keep it off of the tire just based on some eyeball measurements.

Instead, I'm probably going to use the factory upper shock mount that is inboard of the frame and run a ruffstuff or barnes lower.

There is a possibility that my shock mount placement will take my used shock inventory into consideration :laughing:


7B336F86-2F67-44A7-91C9-1B72F1C475F8.jpeg
 
Last edited:
The fuel tank is reinstalled. Not a fun job without help.

I'll need to add pictures of the old vs new senders, but the justification for doing this is fairly simple. The stock FJ62 sender has about 12" of hard lines attached to it that prevent it from being removed through any access hole in the floor. Because my truck has so many miles and so few signs of previous maintenance, I planned to swap the fuel pump for a fresh one anyway. While the tank was out, I took a good hard look inside and prayed to Dale Earnhardt, the patron saint of horsepower, that the floaters and rusty spots would just continue to not be a problem as they have been for the last 3.5 decades

By using a smaller sender with AN fittings, I can now easily swap it on the road if necessary.

So I made this adapter out of .250 plate. I think it took me three tries to get it this good, and it only has one extra hole :laughing:. Tapped the adapter for 5/16-24 and plan to run cap screws with a copper gasket or something to seal it up tight. The sender comes with o-rings but this just is not the time or place for them

FF950FB7-2860-4057-BBE2-53AB7829349C.jpeg


my..uh..helper welded in those strips :flipoff2:


1DE2290F-0EFD-4093-8556-36B35B2EFA5E.jpeg
 
Last edited:
Check it mothfuckles.

9CEFE0C8-EACF-4A00-89EF-875CA525FBC9.jpeg


Got a few hours in today. Productive for sure. Going chronologically:


Steering shaft:

Fj62 shaft bolts right into the 80 box. Still enough spline engagement to keep me happy even with the box 4-6" forward

97BA0460-AB91-4EB1-B5FD-E1151425B93B.jpeg


edit: Holy fawk this picture is blurry


Fuel sender is mostly in place. Adapter ring junt checks the boxes on fitment. Trimmed the hoses as necessary, installed new pump, test fitment OK. Need a sender gasket and a couple more 5/16-24 bolts and copper gaskets to seal them up, and we'll be money. It accidentally turned out to be clocked with the fittings pointed aft, but I can live with that.

Access pannel mock up not shown, but you can see the riv nut installation. I was 2 vodka tonics in when I located those units so fitment matches the rest of the truck

17A61868-B773-4A4D-A9E0-503F5FE82CF3.jpeg


Rear brake rotors are installed. Not as simple as it sounds, the backing plates were all fawked from handling at the salvage yard. Have to order caliper bracket bolts and caliper bolts for the rear, then make some lines, but brakes are very close to done.


The important note here is the ride height. I have set the front axle on jack stands roughly where it will be with the spring and drivetrain configuration that I will be using, measurements borrowed from a friend's truck. With the rear lifted off of the jack stands, there is like a 2" difference front to rear. Rear is higher. IMO that means I am damn close with my rear spring estimation, the rear will only go lower with the drivetrain install.

Fingers crossed


D5512BA9-01ED-4644-B0ED-2AF388ABCB08.jpeg


If you have ever ridden in or owned a 60 series truck, you know this rattly boi with the square cup holders. WTF toyota.


D78433B8-D929-41C2-A5E0-DB21DDC1306B.jpeg


~10 years ago, a friend was having a Cj7 "restored." He gave me this Tuffy console that they removed, and I have been tripping over this MFer ever since. I couldn't ever get rid of it, but I could also never bring myself to mess with it.

I swear this thing took 15 minutes to install. Sometimes my laziness is compelling. Presumably less rattly, dope cup holders, and super comfortable positioning. Need to find the pad for the top.

CE3B11A9-F57B-457A-9858-B285F15AAC41.jpeg


Light on funds for a bit to make the impending massive purchases. Jumping on this front bumper in the meantime. There is plenty of inspiration online, it shouldn't be too hard for a hack fabricator like me to mostly match up the square body lines. Planning to install an old Warn XD9000 that I have unless someone wants to trade it for an 8274 :grinpimp:


2F384F23-6F4C-4E87-AC7C-3697DD9A8D67.jpeg
 
Last edited:
enjoying the build, gonna be a sweet right afterwards.

this the paint you used? gonna have to pick some up for the underside of the Yukon if so

1659965739950.png
 
Bumper stuff. About 2 hours in it so far. 1/4 winch plate and center section. The rest is 3/16

893072B6-EF54-4755-A1A2-2661B46C8D1C.jpeg


EB784485-2FDC-4783-BFC0-48B21621CE1F.jpeg


3CCAC977-1F77-4DFB-B6BB-01E15F9E664E.jpeg


Not totally sure if this should be an angle or squared off (fwd and aft) corner. Leaning towards angled since it is already cut :laughing:

5C438B32-4B1C-40B7-9817-6CCB8AAD8666.jpeg
 
Bumper stuff. Have the mounts built and drilled. Just need to make the mount section permanent with the upper cover section, cut out the hole for the winch, and add shackle tabs. I’m using a hand me down XD9000i that my dad ran on his duck hunting truck from as far back as I can remember. Leaving room to fit an 8274 if one falls out of the sky :laughing:

It’s been much quicker and easier to build than I expected.


9031E736-9C21-4A93-9A26-BCBA781A72D2.jpeg


C8185A2A-B2DD-49B7-8C0F-8A37D3A70823.jpeg


3CC87735-A486-488B-83EB-68D81930981E.jpeg
 
Top Back Refresh