What's new

CJ5 wild stretch and full build (Big Booty Judy)

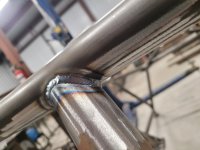
TIG will make it nice. You got to be good with a MIG to make it look the same. (I’m not) But I will say, by the time you get done with that, you will be good.
20190523_145757.jpg

I've got my fair share of pipe practice with stainless, but it'll be nice to get some more time in on carbon.
 
Cage is all reassembled, and finish welding has started.
20230108_175142.jpg
120amps, 1/8" ER70S, single pass, lay wire technique, all position, restricted. Lol. lots to go, but making good progress.
20230108_175118.jpg
20230108_175135.jpg
20230108_175125.jpg
Here, you can see my A pillarthat bolts through the dash and through the firewall to the engine cage.
20230108_175152.jpg
Detail shot, 6 bolts per side on lower clamp bracket. Stub tube passes through front dash plate to help with shearing forces, and another removable 2 bolt clamp so the dash can be removed without pulling the cage.
20230108_175149.jpg
 

Attachments

  • 20230108_175118.jpg
    20230108_175118.jpg
    3.8 MB · Views: 3
20230109_190901.jpg
Got all the tacos tacked in today to strengthen all my 90 degree tube unions. Thats about it for today.
20230109_190911.jpg
20230109_190921.jpg
20230109_190927.jpg
Need to throw the seats back in it and make the harness bar, the door bars and the cross bars behind the drivers cockpit. And I need to add the gussets/grab handles at the front a pillar to make climbing in and out easier.
 
Back for another round of continued fabrication on Judy. The cage is getting closer. Added the harness bar and harness bar supports, added the door bars and the grab handles. What are the weird triangles with all the holes you ask? You'll just have to wait and see.
20230113_162025.jpg
For as much crap as i always hear about the rogue bender, I honestly really enjoy mine. It makes consistent bends and I can easily bend in plane using two clamp blocks.
20230113_170449.jpg
20230113_180725.jpg
Looking a little more race car-ish and will help keep the wife and I better protected.
20230113_201234.jpg
Looks stout without the seats in it.
20230113_203110.jpg
What is it?
20230113_221945.jpg
 
It's been a day. Phew, I'm beat. Managed to weld out the major frame tie-ins, cage connectors, cut out and weld the suspension reinforcement plates, extra gussetsand the last of the tops of the body mount tabs. Finish welded the rear top links and got them reinstalled as well. Then I moved on to the cage and finish welded everything (except the door bars, I want to re-check cage fit after full welding). The cage is done entirely in TIG, with the exception of the rear suspension/coilover top mount brackets. Only a few things left and the body and cage can go back on the frame and I can start adding the fuel, electrical and braking systems.
20230115_213944.jpg
20230115_213446.jpg
She smiled at me today for all the work I've been putting in lately.
20230115_165040.jpg
20230115_165025.jpg
20230115_165018.jpg
20230115_165014.jpg
20230115_164959.jpg
 
Ha! That's what Grinders are for. There's definitely a few on it that aren't my best. Usually when I'm twisted up, running the pedal with my knee and trying to worm the filler rod between other tubes. I call it "welding yoga" :lmao: Need to trademark it.....
 
Ha! That's what Grinders are for. There's definitely a few on it that aren't my best. Usually when I'm twisted up, running the pedal with my knee and trying to worm the filler rod between other tubes. I call it "welding yoga" :lmao: Need to trademark it.....
Boatside the tub before ya put that cage in
 
Did you test fit yourself in the seat and check for elbow clearance with the door bars?

I bent up a set for my ride and shortly realized that as soon as my hands were not holding the steering wheel, my elbow was banging on the door bar. Had to redo it to follow the side of the seat a little closer.


Everything is looking great. You've been busy and it shows.:beer:
 
I sat in it and it didn't seem terrible. Those are the only things I haven't fully welded out. I want to make sure they fit and nothing pulled when I welded it, but I hadn't thought about elbow clearance long term. I'll check when I get the tub back on. I'm usually single hand on the wheel with my left when I drive unless things are crazy.
 
20230109_190901.jpg
Got all the tacos tacked in today to strengthen all my 90 degree tube unions. Thats about it for today.
20230109_190911.jpg
20230109_190927.jpg
Need to throw the seats back in it and make the harness bar, the door bars and the cross bars behind the drivers cockpit. And I need to add the gussets/grab handles at the front a pillar to make climbing in and out easier.
Cage is all reassembled, and finish welding has started.
120amps, 1/8" ER70S, single pass, lay wire technique, all position, restricted. Lol. lots to go, but making good progress.Here, you can see my A pillarthat bolts through the dash and through the firewall to the engine cage.Detail shot, 6 bolts per side on lower clamp bracket. Stub tube passes through front dash plate to help with shearing forces, and another removable 2 bolt clamp so the dash can be removed without pulling the cage.
20230108_175149.jpg


How do you make the tacos?

And is there a stub tube that slides into the engine cage side from the a pillar side? I can't see what's going on in there
 
I ended up just buying the tacos to save fab time. But they could be easily made with a piece of sheet metal and formed around a piece of tubing. You'd just have to make a cut guide out of some card stock and then sharpie em out on your sheet.

No stub through to the engine cage, that tube shouldn't see a vertical shear like the a pillar (there's a stub in that one) so I left the firewall to engine cage a bolted connection. The 4 3/8 bolts have a higher shear factor than the tube anyway.
 
I bought a couple pieces of the Blackfish Fab pre-bent taco material. Seemed like a easy way to knock out the odd sized/shape taco's.

 
Definitely a good resource. Looks like 10ga sheet too.

That's definitely an odd one. Solid work there.
thanks.

i am no engineer but i felt like that joint could use extra help it was at a odd plain compared to the rest. plue i did have a shitty notch. (it happens)
i only had the three in red connections going the distance to the rear and i felt like i needed more so i did the yellow.nodes too

1673987178712.png
 

Attachments

  • 1673987069480.png
    1673987069480.png
    1.2 MB · Views: 5
thanks.

i am no engineer but i felt like that joint could use extra help it was at a odd plain compared to the rest. plue i did have a shitty notch. (it happens)
i only had the three in red connections going the distance to the rear and i felt like i needed more so i did the yellow.nodes too

1673987178712.png
You have really good triangulation throughout your cage. I would have just plated that entire junction both sides if you were concerned, but that taco definitely does it's job there. Any place there's a 90* tube junction it's a good idea to throw a gusset in, as it's the most likely area to have a load moment and bend or kink a tube. Yours is turning out slick.
 
Managed to knock out the rest of the roll cage work today. All the tabs for the overhead console are in, all the comms antenna tabs are in, lighted whip tabs as well. X brace closure/reinforcement plates are manufactured, dimple died and welded. All seat belt tabs are installed. Only thing left ithe removable rear seat belt harness bar for the rear seat and closure plates for the coilover towers. Looks solid. I'm very happy with it.
20230120_201251.jpg
20230120_194658.jpg
20230120_201556.jpg
20230120_134616.jpg
20230120_124545.jpg
All the tabs are completely flush with the tube line so i can do the overhead console inside and have a sheet aluminum roof and all antennas will sit flush and seal well for weather protection. Here's how i cheated. Heavy aluminum solid bar to act as a heat sink and to make sure everything was flush and flat from tube to tube on the O.D. plane.
20230120_114950.jpg
 

Attachments

  • 20230120_194658.jpg
    20230120_194658.jpg
    2.1 MB · Views: 4
Looking good. That's a lot of work.

I think the X brace closure is a great idea and looks pretty slick too. Well done Sir.
 
Top Back Refresh