What's new

Build-RBV 4800 U4 bronco II

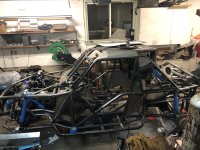
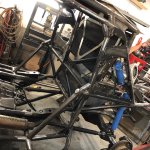
This was the weekend that changed the entire rig fir me. I built this rig to do rec wheelin and race the local stuff. But I am hooked on racing so now the rig is torn back down in pieces.

I think it is called a car at this point but I am not sure l:flipoff2:


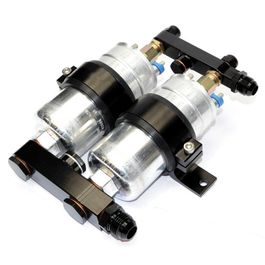
we were trying to get it put back together to do one more fun trip out of it at hammers but we had some runability issues that we just could not figure out. “Turns out the mixer was blown out from the inside and all the mixture adjustments were not working”

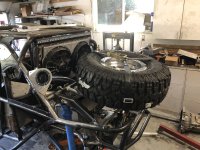
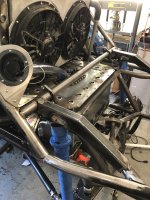
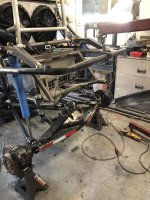
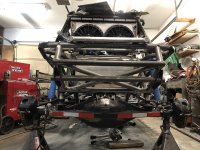
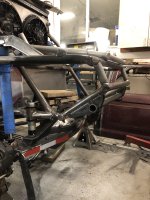
so at this point I am reworking
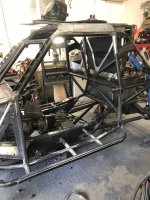
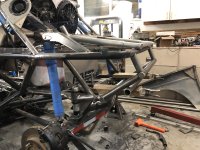
-the top of the cage
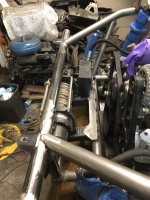
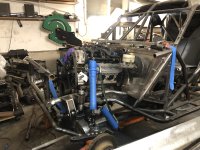
-Rear suspension is getting re worked for more up travel.
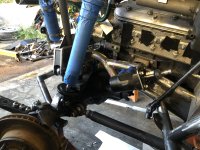
-Front suspension is getting reworked for more travel.
-New 2.5 Carbon 2.5 coilovers all the way around
-4” travel air bumps
-trail ready wheels
-37” tires
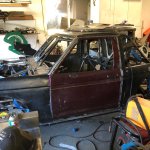
-radios, intercoms, air pumper and I lived the seats up to a less relaxed position.

the goal as of right now is to get it to run a race in idaho and then Montana. It is a bit rough working 14 hour days

then after those two races I am going to be pulling the ranger drivetrain out and going with a tested and proven setup. 5.3/th350 and a atlas.

rear mounted rad and all the works.

Then we will be Racing KOH 2022 in legends class.

selling off my big gooseneck to pick up a enclosed GN race trailer and setting up my Fummins to be a pit truck.


Right now the project has gone into a hold pattern because I am working as much hours as I can to pay for all the stuff.
 
00344390-B962-43EE-BCA8-2B4047C7219E.jpeg
27200BDB-230D-4A9F-BF41-250511C47503.jpeg
5ACED169-9DFF-4F84-8240-C905213BC2DC.jpeg
 
83AD2033-4748-4124-B29E-A5E6F3EBE485.jpeg
79082F42-9C54-4D16-A0C8-935EF83EC5C0.jpeg
CBD88118-818F-432A-8E53-DC04A26967EF.jpeg
ED87F99A-A51F-4802-BB11-7A68FDA9AEF4.jpeg
90D4E97D-8119-4ACD-9EA7-743A4D2B489B.jpeg
I cut out the rear suck down winch and modified the chassis to get another 3.75” of up travel. Rear coil overs wills be axle mounted 16”
 
Got a bit more toob work done! Have not figured out what I want to do with the rear yet. Will be a rear mounted radiator in there and would like to possibly mount the spare on the propane tank hatch.

Click image for larger version Name:	C53D19B2-A51E-4995-8FA5-DC137351572E.jpeg Views:	0 Size:	262.4 KB ID:	360921


D8552805-B46B-48E2-B74C-00DE17D179F5.jpeg


photo54769.jpg
 
I love the poor-man’s toy hauler. I’ve been tempted to mate my camper and gooseneck like that.
awesome “car”. Great build.
 
8692E21F-B7E3-4571-A5C2-25C0FEB78D74.jpeg
AC606B25-175F-44EF-9150-FECD73CBBA39.jpeg
FC0D9019-F305-4587-9ABA-6F574DDCD855.jpeg
503395AE-6C7B-4270-A3FC-B0726E200374.jpeg
I have been slacking on here! I have changed pretty much everything. Sold my crawler hauler off. Bought a 34’ race trailer that I am completely rebuilding after finding it was not in the shape that I thought it was.

bronco II is getting a 4.8/th400/titan black box Ford np205 and all the supporting parts to make a sweet little race truck.

installed a 25 gallon fuel safe cell with a surge tank, going to run two Bosch 044 pumps so I have a primary and a secondary pump as a back up.

mounted up a 35x19 cbr dual pass radiator with a custom mount and dual volvo 2 speed fans. Plan is to run an expansion tank that is fed by the highest point in the rad and is plumbed into the lower rad hose.


894D40C6-2A57-4A41-A966-D7DCD20B5BB7.jpeg
3ECD06F0-92E2-41FB-9A63-4078E72F9091.jpeg
 
Last edited:
What an awesome build.

Who makes that clamp setup and manifolds for the dual fuel pumps?
 
What an awesome build.

Who makes that clamp setup and manifolds for the dual fuel pumps?

This would be the company I bought it from. I also bought the pumps from summit and the pump seemed to be missing some fittings . So I am currently waiting for a reply back on that.

the part I am missing is the adapter the banjo stud threads into. From what I gathered last night reading without the reducer thing the banjo runs into the pumps internals when it is doing pump things.
 
Got the steering column mounted up. Used a 1” heim joint on top and 1” pillow block at the firewall with the factory bronco II steering shaft. Seems to be super sturdy and super no freely.

I could not find a collapsible steering shaft that I felt would have worked as well as this so I made stuff work!


2E890681-0491-429D-A882-CF2FB589E722.jpeg
2ABC6D59-1D14-49E9-8CA1-C8673D43E61B.jpeg
 
Worked the Dana44 this weekend, installed ball joint eliminators, inspected high steer studs and checked housing straightness.

should be a pretty decent setup for 37s. 5.38 nitros, Yukon 30 spline with rcv shafts and Yukon super hubs with stage8 locking spindle nuts.

started to grow the full hydro mount!


C8AF7FA2-E1DC-4F8B-8A45-794A99355082.jpeg

C2115793-D5B4-4DDE-B9B5-CB52F723FCA6.jpeg


42C5CAC0-4A44-4565-992E-127C2202CEEF.jpeg
 
Got the front axle in, built a bash bar put off 1.5 .188 wall tube and miter cut them so no bends. Started a track bar bracket on the axle and got the air bumps in! Almost gained 5 inches of up
travel.


D9653112-4CC5-4D41-AA02-AADE24056F99.jpeg

959DB3EA-1C6D-43FB-86BF-A1C90125348C.jpeg

83E1224F-D466-4393-BC83-9BA5E4608FF8.jpeg
 
Also wanted to improve the rear up travel so I cut off the vertical bolt style upper link bracket and went with horizontal bolts to loose a little link separation for exchange of some more clearance.


5BF2EAC3-224A-4361-96F6-8EDF3D4404FB.jpeg


436DAD19-5F82-4304-AE06-4B86957AE95F.jpeg
 
Killer build.

I ask this without criticism- it looks like you used grease on the cone washers at the high steer arms?
I was of the understanding that that sort of connection would be dry to prevent movement/ loosening?
 
Killer build.

I ask this without criticism- it looks like you used grease on the cone washers at the high steer arms?
I was of the understanding that that sort of connection would be dry to prevent movement/ loosening?
there is grease on there. That was a late ass night and me and a buddy were slamming them together and I was getting ready to toss some anti seize on them and we started going back and forth on which would be better. He won the argument and we put grease on the out side snd anti seize on the stud.

Now that you are bring that up and it has been a few days that sure seams wrong. It put them together dry last time and everything was seized together.


:question::question::question::question:
 
Got a bit more done! Here is a little photo dump! Got the rear shocks located and spare tire mounted.
632C6279-C23D-407A-B3B1-1EF37D2EAB3E.jpeg

E99F5D39-FE7B-447D-9EF0-229CA443F0BC.jpeg
 

Attachments

  • 8B1D048B-05CF-4247-88ED-57D55E8CF195.jpeg
    8B1D048B-05CF-4247-88ED-57D55E8CF195.jpeg
    4 MB · Views: 28
  • 4C11CDF5-1067-48E2-9B65-23CD12C9104B.jpeg
    4C11CDF5-1067-48E2-9B65-23CD12C9104B.jpeg
    1.8 MB · Views: 23
  • BAB37293-A76E-4D92-9EEF-D48FA04B7AFF.jpeg
    BAB37293-A76E-4D92-9EEF-D48FA04B7AFF.jpeg
    940.2 KB · Views: 26
Cut the front of the car off to rework some of the tubes to be more friendly to mounting the coilovers. Was definitely worth the time.
610C2B16-5053-461B-AE39-308B97875675.jpeg


Built a winch mount, mounted the earl cooler and Howe ps cooler
9E32C7C4-4281-4444-9959-290C1F59F8E8.jpeg


94AF89FB-0E64-4BA9-A54E-2C559C163BBC.jpeg
 

Attachments

  • CDE4291E-0D7E-4A28-A5E3-5D1CE356EA63.jpeg
    CDE4291E-0D7E-4A28-A5E3-5D1CE356EA63.jpeg
    3.2 MB · Views: 21
  • 31ACA575-BA2B-4BB8-AF85-A3F591B2C065.jpeg
    31ACA575-BA2B-4BB8-AF85-A3F591B2C065.jpeg
    828.3 KB · Views: 24
  • 10E8423D-2080-4B1A-A5B2-8AEE7FAA0352.jpeg
    10E8423D-2080-4B1A-A5B2-8AEE7FAA0352.jpeg
    3 MB · Views: 22
Worked on some more small stuff in front. Added gussets and mocked up the orbital.

Also cut out all the door tubes and seat tubes to make room for some composite corbeau seats. Reworked the double b pillar so there is plenty of room for head clearance.

We also mocked up the cab to figure out the new and up coming door bars. Want them high and out board as I can make them.
 

Attachments

  • 657735C1-B67A-4D2D-9BBE-4D3999DEE1D0.jpeg
    657735C1-B67A-4D2D-9BBE-4D3999DEE1D0.jpeg
    437.8 KB · Views: 28
  • 7E041AF4-B0BA-4FD7-A0CA-93ECE9EC4202.jpeg
    7E041AF4-B0BA-4FD7-A0CA-93ECE9EC4202.jpeg
    514.3 KB · Views: 25
  • 6B5812BE-71B8-4C49-8E47-24F5721917A7.jpeg
    6B5812BE-71B8-4C49-8E47-24F5721917A7.jpeg
    1.9 MB · Views: 25
  • 95CCC921-79DA-489E-9327-FF8FC1FD6990.jpeg
    95CCC921-79DA-489E-9327-FF8FC1FD6990.jpeg
    3.5 MB · Views: 26
Cut the back off to make room for the sway bar. Ended up going with a tk1 U4 bar with 16” double shear. Pretty happy with the out come!
F281E3A3-1470-4A39-A361-C64E31DD63AC.jpeg
 

Attachments

  • E8D16577-84AC-408A-8902-D786052A8D40.jpeg
    E8D16577-84AC-408A-8902-D786052A8D40.jpeg
    3.2 MB · Views: 27
  • 157F996C-836B-418F-9BC6-8A5DF697E45F.jpeg
    157F996C-836B-418F-9BC6-8A5DF697E45F.jpeg
    1.9 MB · Views: 24
  • 5297980B-067E-4185-8A4B-0E735AD65364.jpeg
    5297980B-067E-4185-8A4B-0E735AD65364.jpeg
    3.4 MB · Views: 25
  • D165435C-4AB0-49DB-9631-61338D4657BB.jpeg
    D165435C-4AB0-49DB-9631-61338D4657BB.jpeg
    1.6 MB · Views: 24
  • 56E995DB-D550-4653-A426-1F6A81B2C19C.jpeg
    56E995DB-D550-4653-A426-1F6A81B2C19C.jpeg
    881.7 KB · Views: 27
Top Back Refresh