What's new

91 FJ80 Build

Chkn

What Knockers
Joined
May 19, 2020
Member Number
145
Messages
431
Loc
ATL
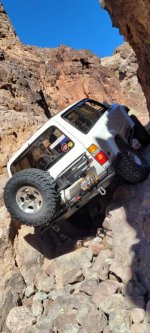
Figured I would finally make a thread for my 91 Cruiser. Its nothing wild when compared to some but it's fun to have.

Ill start at the beginning and eventually catch up to where it's at currently. :homer: Hopefully creating this thread will help me document repairs, fixes and keep me motivated to work on it.

Rewind to 2020... I had been looking for a land cruiser on and off for about a year trying to find a good enough deal to jump on it. Unlike most land cruiser owners I'm cheap and don't like spending money unnecessarily. Finally found one for a good price except it was 2 states away. The only logical thing to do was to take off work rent a trailer and drive 19 hours round trip to get it. From Jacksonville FL to Newport NC and back. :lmao:

IMG_9565.JPG
IMG_9567.JPG
IMG_9568.JPG

Obligatory Bojangles photo :flipoff2:
YAYM5366.JPG
 
Here she sits in all of her glory when she came home. Window off the track on the driver rear side, leaky sunroof, interior was mint with no mold. Guy sold it cheap because it wouldn't idle and he said the front end was broke. The intake tube was half off the throttle body and the drive flanges were worn out. Score
IMG_9574.JPG
IMG_9579.JPG
IMG_9600.JPG
 
First off I cleaned the truck. Then I found why it was leaking water through the sunroof. Turns out the drains had not ben cleared in 400 years and were clogged with debris. So i used a speedometer cable to clean up the drain tubes and they've been leak free since. Also found that the factory roof rack mounts were leaking which is very common on the 80 series. So instead of purchasing the roof rack delete kit from Whitsend or other retailers, I ordered the same parts from McMaster and saved a whopping $3 or $4. Also lucky for me, half of the nutserts just spun in the holes so I slapped some aluminum tape over the holes. That "temporary" repair has held for the entire time i've owned the truck. I keep meaning to tighten up the loose nutserts and install the washer and flange bolt... one of these days... :lmao:
IMG_9601.JPG
AXFP1079.JPG

LIGB6825.JPG
IMG_9595.JPG
IMG_0016.JPG
 
Bear with me... I'm trying to remember the order of events :homer:
Next was cleaning up the inside of the truck. Kilmat on the floors which helped to quiet things down a bit. I still need to go back with some loaded mass vinyl but she's good for now.
IMG_9583.JPG

IMG_9592.JPG

IMG_9802.JPG

TGBH2893.JPG
 
Simple green and a brush attachment for the cordless drill worked awesome. Then for the upholstery I went over it with the carpet cleaner after scrubbing the heck out of it. :smokin: Thought I had more photos of the seats but you'll just have to imagine that all 6 were just like this one. :lmao:
IMG_9765.JPG
IMG_9743.JPG
MNWA8702.JPG
IMG_9632.JPG


IMG_9633.JPG
IMG_9625.JPG
 
I pulled the front and the rear carpets and pressure washed the heck out of them. Then simple green with the brush attachment then used the carpet cleaner. Turnout out pretty good. After I re-assembled the interior I used an Amazon ozone machine to kill any remaining odors inside the truck. It worked awesome.

IMG_9607.JPG
 
After the interior was sorted I moved on to the brakes and the engine.

The 91-92 Landcruiser comes with the semi-float 9.5" rear end :barf:. Full float (and FR/RR lockers) didn't arrive until 93.

One theme of this build will be not taking photos of stuff because I get into the groove and forget about it :homer:

But at some point in the past the wheel on the passenger rear had come off while driving. The backing plate and drum had matching flat spots on the bottom. So I did what any other Irate would have done. Lubricated the drum hardware then adjusted the rear shoes so that the rear brakes actually engaged, verified that the wheel cylinders and the axle seals weren't leaking then moved on. :lmao:

FMMM5457.JPG

GWDN2804.JPG
 
The rear brakes were sorted but the fronts still needed some attention.

The kid before me said he daily drove it until "the front end broke" aka the drive flange splines wore out. The dude should have played the lottery because this is how the passenger front caliper was installed. Coarse threaded bolt into a fine thread hole. Good on the kid for at least keeping it metric and not smashing an SAE bolt in there. Also props because he only cross threaded the first 1 or 2 threads. So I was able to clean up the threads without having to drill it out.
IMG_9845.JPG
 
I fixed up the caliper mounting enough to drive it around the neighborhood and the brakes suckkked. :lmao:

Stationary the brake pedal was solid. When moving the brake pedal was mushy garbage. Some more diag lead to this:


The wheel bearings were shot. They had enough play that the rotor would walk inside the fixed caliper and make the pedal spongy. So time to tear that apart.
EIIJ5898.JPG


Repacked the wheel bearings and the birfs. Replaced the calipers and the rotors with the larger ones found in the 93-97 Cruiser. This also meant that I needed to remove the backing plates since the larger caliper and rotors wont fit in a 15" wheel. So I found some 3rd gen 4runner wheel and tires cheap on Marketplace and was off to the races.

IMG_9814.JPG
 
Dug into the engine sometime around here :lmao:

The air filter was good for at least +15 HP.
IMG_9793.JPG

Compared to a factory replacement. I mean it just makes sense that you would go with blue. Its way cooler...
IMG_0052.JPG

Also jerry rigged the jerry rigged intake to not have a massive vacuum leak at the throttle body which allowed it to idle. :lmao:
IMG_9796.JPG
 
I like the flare delete. I did that on my 70 series
The flares were hanging on for dear life. Just about every fastener was broken. They were mostly held on with silicon caulking. Which is still stuck on it to this day :homer:
 
So at this point the truck runs good but its a little clackity and smokes on start up. So I decided to pop the valve cover off and see what we have. I really dislike removing the valve cover on the 3FE, its a pain.
OYQC2449.JPG

Obviously this engine has been well maintained over its 30 years and 300K miles :lmao:
VPID1609.JPG

I need to pull the rocker arm assembly off to access the valve stem seals to fix my smoky start ups... And don't worry my work bench is always this much of a mess :lmao:
FCTL5180.JPG

Some oven cleaner, scrub brush and some picks to get the baked on goodness
QVZX8963.JPG

HEMD4113.JPG


Even decided to clean up the valve cover too.
IMG_0325.JPG
 
While I was tearing this apart waiting for some part or other to arrive I cut open the oil filter just to see if there were any sparkly bits and to my surprise it was clean. Toyota engineering at its finest :smokin: Or is it GM engineering that Toyota stole and made better? :stirthepot:
IMG_0342.JPG

IMG_0343.JPG
 
Not sure why I have a photo of a pushrod like this, but you can see the poor maintenance really shining. Also the bad boy horn, came free with the truck :lmao:
IMG_0340.JPG
IMG_0341.JPG
 
On to the valve seals. I don't know that they actually seal anymore but they were there and installed.
CSXB2157.JPG

When compared to a new one.
UWYQE3449.JPG

Going back together
IMG_0358.JPG

IMG_0359.JPG

And it running.

 
Perfect time to delete the EGR and the air injection system. In the above post you can see the plugs installed in the cylinder head near the exhaust manifold for the air injectors. I didn't like the EGR blank plates people sell for the 3FE and I thought paying $25+ was dumb so I measure the bore for the EGR with digital calipers then went to Napa and bought a galley plug and whatddyaknow $1 later its plugged. The other thing you need is a large drain plug for a 99 Passat that gets installed on the exhaust manifold. So all in all it was about $10-15 to delete the emissions.
WZRZ7317.JPG
 
So I think it was about this time the Cruiser took over daily driver duties. Only left my wife stranded once. :lmao: The coil had disintegrated to nothingness. New coil and she was right as rain again.
IMG_0377.JPG

IMG_0539.JPG
 
Steering was mint.:homer:
Marlin had a sale on their HD steering links so got that and paired it with the 555 TREs. Also fixed a front pinion seal leak.

IMG_0453.JPG

NNPX5175.JPG
QXBI2824.JPG
 
Went camping in the Okeefenokee swamp. Lots of Gators and canoeing. Would do again.
IMG_1360.JPG
 
Muffler was destroyed so exhaust was next up.


Top Back Refresh