What's new

1978 F250 400 Dual Fuel

Search for gear reduction starter upgrade old ford, or something similar, you'll find a cheat sheet

Windsor engines need Windsor starters
400 engines need 460 starters
MT needs MT, AT needs AT

then you re wire it for direct power

there may be a diode needed somewhere, it's been a bit since I did it

I was getting an old truck with a suspect starter and bad battery cables back on the road, it was a no brainer upgrade

good to know, this current starter is a beast but i do like that the solenoid is on the fender rather than down underneath. as long as it will all clear everything i'd like to reuse it. might have to put a piece of aluminum between it and the header though as a simple heat shield
 
Technical Articles - Ford PMGR Starter Upgrade (bzerob.com)

Ford PMGR Starter Upgrade

PMGR is short for Permanent Magnet Gear Reduction. What exactly does that have to do with an upgrade? Well, it means that when retrofitting the older positive engagement starters it provides a 50% weight reduction (8 vs. 20) and requires less cranking amps. And because the PMGR starter is a smaller size, it provides better header clearance and reduces the effects of a hot start and your vehicle will be easier to jump start too. The only down side is that these starters do cost more than the old style starters.I6 and V8 Applications (Small Block)


For automatic transmissions, the Ford part numbers are E9SZ-11002-A, F7SU-11000-AB, F7SZ-11002-AA. Lester No's: 3205, 3268 (Retrofits Lester No's: 3124, 3153, 3168, 3180)

This part number will retrofit most small block 302/351W applications from 68-91.

For manual transmissions, the Ford part numbers are F2TU-11000-AA, F2TZ-11002-A, F7PU-11000-FA, F7PZ-11002-FA. This part is used on 92-97 Ford Bronco, F Series 4.9L, 5.0L, 5.8L w/ MT. Lester No's: 3223, 3241 (Retrofits 3132, 3176, 3185).

Note: Manual transmission model made after 1979 may need Lester part #3205
John Johnson of the Mustang II forum has amended and verified that the 75-78 Mustang II with 302 and 4 speed can use a 95 Mustang automatic starter Lester #3205. Thanx John!
This part number will retrofit most I6 221/240 and small block 260/289/302/351W from 62-79.V8 460/ 351M


The starters used on 92-97 Ford E/F Series with 460 motors will also work as a higher torque upgrade mini starter on older 460 motors. Lester part no. 3226 upgrades on older 460 motors with automatic transmissions and Lester part no. 3225 upgrades older 460 motors with manual transmissions.
V6 Applications


This part number Lester part no's. 3204 will also work as a higher torque upgrade mini starter on most 86-91 Ford Taurus/Sable 3.0L/3.8L and 88 Lincoln Continental 3.8L
4 Cylinder Applications


Vehicles that use the PMGR starter Lester part no's. 3231 compatible with the 91-02 Ford Ranger 2.3L, 2.5L will also work as a higher torque upgrade mini starter on all older Ford 2.0L and 2.3L engines
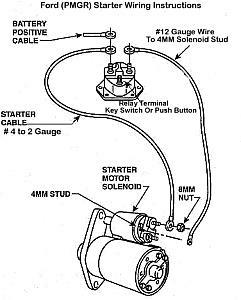
Installation and Wiring

fordstarter_wire.jpg

Installation is actually pretty simple. After replacing the starter the rest is some simple wiring. On the starter solenoid, move the starter cable from its current location to the constant hot terminal (where the battery cable hooks up). The new wire is a length of 12 gauge wire from the stud on the fender mounted unit where the starter cable formerly resided to the start terminal on the starter mounted solenoid. Just add the appropriate connector to each end of this new wire. The starter end connection could be either a 1/4 inch spade or a M6x1.0 post. The conversion is done!

WARNING - Do not install a jumper wire from the battery terminal stud to the solenoid activation stud on the starter in order to avoid installing the 12 gauge wire from the solenoid activation lug from the starter relay. This will cause the starter to stay engaged once the solenoid is activated. This will severely damage the starter and/or flywheel.
A couple of noteworthy functional differences with the new style starter


The FIRST is that the starter seems to "run on" after the switch is released. This is an installation issue. This is a common complaint on Ford permanent magnet starters, although it can occur on any permanent magnet starter in the right conditions. This situation develops when the ignition terminal on the starter is "jumpered" to the battery terminal on the starter and a remote solenoid is used. Permanent magnet starters can actually produce power if they are driven from an outside source (i.e. the starter will act like an alternator once the engine fires and starts spinning). The current produced in the starter for this second or so will flow from the starter’s battery terminal to the starter’s ignition terminal and hold the solenoid in. This will cause the one to two second delay in the solenoid release and an irritating noise. The solution is to wire the starter per the instruction sheet, which will ensure that the ignition switch terminal goes dead the instance the key is released.

The SECOND issue is that the pinion does not retract when it is released. It is normal for a gear reduction starter to hang in the ring gear when the engine is cranked, and yet does not start. Direct drive starters do not do this because they can rotate the small amount necessary to retract the pinion. Gear reduction starters do not retract in this situation because of the resistance of the gears. The tiny amount of rotation necessary to retract the pinion is amplified in the gear ratio inside the starter, requiring four to five times the rotation inside the starter. All of this gear movement results in the pinion remaining in the ring gear until the engine fires.
Reference Page Link - CJ Pony Partshttps://bzerob.com/library/ford/ford-pmgr-starter-upgrade.html
https://bzerob.com/library/ford/ford-pmgr-starter-upgrade.html

tech article with part numbers and diagram and such
 
started off by dropping down and taking out this crossmember

IMG_3301.JPG


turns out, it gave me just enough to have some hope :laughing: The driver side was *close* to going in. I used the grinder to take down some casting nub on the bellhousing, beat a fairly sizeable area into one of the tubes, took off the trans support and lifted it up, dropped it down, all i ever got was *close* :laughing:

So i pulled the steering box out

IMG_3302.JPG


with that out of the way, took the sander to about an inch or two of the frame where it starts to widen out again, only had to go about 1/8" or so back. nothing further than the factory clearanced depth, areas circled in red

IMG_3303_LI.jpg


and after wasting a couple hours trying all the other "easy" ways first, finally got the dang things in place :laughing:

the bolt hole you see here is the lower bolt hole for the front crossmember. I'm not sure yet if i'm going to redo the crossmember to attempt to go Above the collectors or extend it a bunch and go below.

IMG_3304.JPG


they hang a little bit below the suspension but still offer ~10" of ground clearance :laughing:

IMG_3305.JPG
 
no idea why the driver side sits about half an inch lower, but it does

IMG_3306.JPG


amazon uncoated mild steal bends from china via canada. i don't know why i thought "from canada" meant canadian, but they showed up with a "made in china" sticker :shaking: oh well. also, either 1 of the 180* bends was lost in shipping or never put in the box, don't think i'll need it, don't care to file a dispute over it :laughing:

IMG_3307.JPG


and the trifecta of hopefully better sound with certainly better performance

IMG_3308.JPG


jackstands and boxes to mock everything up. real life clearance is much tighter than i had expected

IMG_3310.JPG


front pipes needed about half an inch of rise. slice and dice to the rescue

IMG_3312.JPG
 
and some straight between the sets, this has the magnaflow about as high and far forward as I can get it while still being below the transmission crossmember

IMG_3313.JPG


and need to keep the cherry bombs on their side. there is about an inch of clearance from the driveshaft. plenty. I almost bought the offset/offset rather than offset/center in/outlets for these but i wasn't sure where it was all going to end up

IMG_3315.JPG


and then i've been doing a bit of fiddling on the rear axle hump. After much looking at it, going to go with behind the tire exit on the passenger side for both pipes, rather than cross over right at the tank and fuel lines and such

all in all, not done yet :laughing:

once i get it all tacked into place, need to pull it apart so i can weld it up, add paint, build a few mounts and brackets, figure out if i can reinstall the steering and starter :rasta:
 
Looking good! Looks like this will flow very well!
what type of mufflers are they?

the magnaflow #12568 is their "straight through X" pipe full of glass, soda can for reference, it's big and heavy

MagnaFlow 5" X 11" Oval Dual/Dual Straight Through Performance Muffler


IMG_2021-04-07_16-53-30.jpeg

and this is what it looks like inside, basically a diverter kick to make the X. In theory it is supposed to cross over the streams better than the two bends meeting at the outside edge style X pipe

IMG_2021-04-07_16-54-26.jpeg


Turbo - Cherry Bomb® - Disturbing The Peace, since 1968

and then a pair of cherry bomb turbo's. I was split between these and the "hush thrush" turbo, because the hush thrush has fiberglass inside theirs in addition to the triple pass design, but they were tested on an episode of engine masters, $40 muffler shootout, and the cherry bomb were just barely quieter at idle than the thrush and had marginal performance gain because the thrush neck down inside the muffler and the cherry bomb don't.

for 2 things that are basically the same in my view, i figured i'd go with the marginally better one, even though i like the thrush bird sticker better
 
Exhaust looks good man. I've always liked the Thrush "Turbo" mufflers, they are basically the "Hush Thrush" without the fiberglass packing. Odd part is they don't make them in 3", only up to 2.5" which is basically the core size of the 3" Hush Thrush that you are talking about in the engine masters episode.
 
Exhaust looks good man. I've always liked the Thrush "Turbo" mufflers, they are basically the "Hush Thrush" without the fiberglass packing. Odd part is they don't make them in 3", only up to 2.5" which is basically the core size of the 3" Hush Thrush that you are talking about in the engine masters episode.

thanks, good to know on the thrush, i'll be honest, i was surprised that adding the fiberglass didn't make nearly as much of a difference in the volume that i expected.

made some more progress, took a bit getting the hump about where i think i want it. pretty easy to manipulate to get these level

IMG_3316.JPG


pulled it all off and welded everything in place

IMG_3317.JPG


These slots took for ever to get closed up :laughing: did the first one with the mig thinking it'd be easy, then switched over to the tig and it still was a pain in the arse. varying levels of trash closing those gaps :rasta:

IMG_3318.JPG


and drilled/welded/plugged an M18-1.5 port in the drivers side collector. easier to add now rather than later for an O2 sensor

IMG_3319.JPG


good reason to always keep a yard full of car scraps, never know what can be repurposed :rasta: really didn't want to do black, but it was all they had in 500*+ and 1200*+ paint. don't care enough to wait 2 days for "red" or "silver" to show up

IMG_3320.JPG


and then proceeded to spend a little bit of time trying to get the steering box and header in at the same time. next step will be to mark and pull the pitman arm off and take the brake master cylinder off. once that fails to work, i'm going to have to notch a couple of the header pipes pretty deep.
 
I just wish the stainless do it yourself kits weren't so expensive, steel seems to rust so fast here even if painted.
 
I just wish the stainless do it yourself kits weren't so expensive, steel seems to rust so fast here even if painted.

that's no joke. there are certainly cheap chinese "304" stainless for not much more than the mild steel, but I don't honestly trust their 304 to be real :laughing: much harder to screw up uncoated mild

one of these days i'll build a stianless exhaust for myself. probably on the buggy

edit: for the summit brand 304 2-1/2" stuff just for the parts i used would have been $550 instead of $150 for the mild with some extra bits
 
Last edited:
I just wish the stainless do it yourself kits weren't so expensive, steel seems to rust so fast here even if painted.

90s chevy 2500s had a very nice mandrel bent 3" 409 stainless kit underneath them
with actual straight sections and 90s

next time you're in the junkyard...
 
well, pulled the brake master cylinder off, made it easier to get the steering box in. still had clearance issues, so i beat the ever loving hell out of these two with a hammer

IMG_3321.JPG


and the hammer wasn't enough, so i had to break out the torch to try and shift the one tube over a bunch

IMG_3322.JPG


and it was still about a half inch or more away from clearing, so away she goes. added bonus, this tube was also going to hit the steering link on the bottom, so it needed to be moved a bunch more as well

IMG_2021-04-12_18-49-20 lightened.jpeg


I had such a good time sectioning up the exhaust for a gentle bend, figured i'd do it again :shaking:
IMG_2021-04-12_19-16-36 lightened.jpeg


and now i need to order up some 1-5/8" bends to get this to connect. and that won't happen for a bit, sadly. but tucking this pipe under the last and sending it down will give plenty of space, be much farther from the brake lines, and should be well clear of the steering box.

IMG_2021-04-12_19-19-09 lightened.jpeg


on the passanger side, I put the starter back in place and the header goes on no problem. Need to adjust the trans cooler lines, but that's it :laughing:
 
Last edited:
well, I tried to buy some 1-5/8" pre bent tube to make this go together, everybody online was ~2 weeks out on shipping and nobody local seemed interested in making some bends :shaking: then everything I saw on the hedman website said these should be 1-3/4" primary tubes. Well hell, I may not have any .060 wall, but i've got some 0.090 wall 1-3/4" tube :rasta:

came home, busted out the torch, and made my own damn bend


IMG_2021-04-13_16-57-53.jpeg

not the greatest, but it should work

IMG_2021-04-13_17-10-49 lightened.jpeg


a little bit more slicing and dicing and everything lined up

IMG_2021-04-13_17-24-57.jpeg


and then I took it off and started welding up the seams. got maybe half of them done and taking a break for the day. Went and set it where it goes and it's moved about 1/2" already :laughing: So i'll finish welding it all up, then make another couple slices to get it back into shape, then weld it in place again

whatever, should be done tomorrow...but hey, I saved myself $100 over just buying a different set!
 
Last edited:
holy shit, the pictures went nuts in this thread :lmao:

well....balls :rasta:

Lots and lots of welding, slicing and dicing to make this fit. Took it in to work so that I could use the bandsaw for the relief cuts instead of the grinder, made a huge difference


IMG_2021-04-14_15-58-48.jpeg


And i'm so optimistic that I didn't even bother to test fit. Hit it with the paint again
IMG_2021-04-14_15-59-01.jpeg


and with that tube out of the way, the steering box went in easily! So easy in fact, that I no longer needed the clearance hammering I had done on the other tube :laughing:

IMG_2021-04-14_18-41-48.jpeg


So I went ahead and hooked everything up, feeling all happy for myself until I went underneath
IMG_2021-04-14_18-42-50.jpeg


Not even close! guess I need to see if I can find a 3+" drop pitman arm, or else it's about to be a bunch more hack fab to drop it down and hook it up :homer:

Hooked up the rest of the exhaust all the way back sans the hangers and went to fire it up....dead battery :rasta:

it looks good anyways :flipoff2:
 
sounds fawkin' excellent. Microphone on my telephone doesn't really pick up the deep bass at idle. It isn't loud, but it is there. like a heavy, warm blanket :bounce2::bounce2::bert:

 
called up 4wheelparts, and ordered fabtech FTS309 4" drop pitman arm, it's a drop ship item should be in a couple of weeks. they couldn't confirm if it would work on the 2wd box but said if it didn't fit i could return it with no charge

going to make up a drop pin tomorrow out of aluminum so that i can move it around the yard until then.

edit: found online that it claims to be a 1/2-20 thread, so grabbed some scrap AL out of the drawer and now i've got a ~3-1/2" spacer that should function
 
Last edited:
Welp, moved the truck around the driveway and the way i had wired the exhaust in to place, the rear mufflers pulled off. Just the excuse I needed to play with the DB meter again, this is what it sounds like with just the magnaflow, still prefer it with the cherry bombs as well


also, the 3-1/2" thingamado I made was absolutely incorrect. In addition to not being a 1/2-20 thread that I needed, it was too long. :laughing: So today's submission for ghettofab and hackjob, used a socket on the tied rod and a short extension through the pitman arm, worked well enough


IMG_2021-04-15_15-59-43.jpeg
 
If you're gonna run a stupid 4"+ drop arm you should do something like this. Knowing you you probably have everything but the fine thread rod nut sitting around.

 
I'll have to check out that video later, can't view it at work.

The more i think about it, the more i think i should just rework that tube again :homer:


Edit: yup , just picked up 3, 180* bends with about a 2" radius. Should be well more than enough to make stock steering clear
 
Last edited:
Further proof that i'm a terrible estimator of price or value of anything, I managed to sell my two good running vehicles. Got $5k for the suburban and really figured i'd get closer to $6k, but the guy showed up, had cash and caught me before I left town so i'm happy he has it, and he is happy to have it. Figured it would go for more, didn't even get much interest.

Then when we got back into town sold the van to a gal who had looked at many others and had a better grasp on the market. She was excited to give me $5k for it and I had figured it would sell for closer to $4k. Heck, she called me up later to ask a couple questions, we talked about it a bit and she is still happy with it and even mentioned how the exhaust get's positive responses from all "the guys" :laughing: guess it's not just a panty dropper, but also a dude panty dropper as well :smokin: had a whole bunch of interest, she was the first to actually show up with cash (after i added the second muffler, it was too loud for the general public before apparently)

Either way, ended up meeting my goal just not in the way I thought I would.

also, I get to return the 4" drop pitman arm, so that will net me $100 as well :) It would absolutely not work, it was just a bit too long and hit the tie rod. oh well, wouldn't be an issue on a 4wd, is a big issue on a 2wd

made up some exhaust hangers out of 1/4"? rod maybe 3/16?


IMG_2021-05-05_13-52-05.jpeg


and painted all those stupid cheap-o clamps and hangers


IMG_2021-05-05_13-52-10.jpeg


and then as if by magic, the exhaust is now holding itself in place. Using 6 hangers made for a pretty stout setup.

IMG_2021-05-05_15-14-43.jpeg


and then a couple pictures of the current problem child, where it interferes
IMG_2021-05-05_15-18-57.jpeg


IMG_2021-05-05_15-19-05.jpeg
 
Last edited:
there has GOT to be a better way to manipulate tubes than the way that i'm doing it :laughing: but hell, if it works, i'm sticking with it

IMG_2021-05-05_16-40-43.jpeg


and i FCAW welded it while in place as much as reasonable so that it wouldn't shift on me, then snipped it off and took it to the bench to weld what I couldn't reach. It is important to note the new routing with cylinder 7 going under 8 at the top and no farther forward than 8 at the bottom, those two moves are key. To get the inside of the lower joint, i had to take off my mig lense and run an inch and a half or better stickout and pray and spray but it doesn't seem to leak.


IMG_2021-05-05_18-10-11.jpeg


and then installed shot with stock steering hooked up, it now runs and drives again. steering wheel is a bit off center :laughing: but otherwise, it seems good :rasta:

IMG_2021-05-05_19-33-15 lightened.jpeg
 
there has GOT to be a better way to manipulate tubes than the way that i'm doing it :laughing: but hell, if it works, i'm sticking with it
seem to leak.

I end up doing the same when I can't get the bends to work out. The only difference is I try to keep the slices on the inside of the bend. When you bend the pipe/tube it closes the gap tighter instead of opening it up on the outside of the bend.
 
Further proof that i'm a terrible estimator of price or value of anything, I managed to sell my two good running vehicles. Got $5k for the suburban and really figured i'd get closer to $6k, but the guy showed up, had cash and caught me before I left town so i'm happy he has it, and he is happy to have it. Figured it would go for more, didn't even get much interest.

Then when we got back into town sold the van to a gal who had looked at many others and had a better grasp on the market. She was excited to give me $5k for it and I had figured it would sell for closer to $4k. Heck, she called me up later to ask a couple questions, we talked about it a bit and she is still happy with it and even mentioned how the exhaust get's positive responses from all "the guys" :laughing: guess it's not just a panty dropper, but also a dude panty dropper as well :smokin: had a whole bunch of interest, she was the first to actually show up with cash (after i added the second muffler, it was too loud for the general public before apparently)

you're a glutton for punishment... :lmao:
 
I end up doing the same when I can't get the bends to work out. The only difference is I try to keep the slices on the inside of the bend. When you bend the pipe/tube it closes the gap tighter instead of opening it up on the outside of the bend.
should have done more of that, but sadly i also needed to stretch this tube a tiny bit :homer: so i had a handful on the inside and the majority on the outside.

but hell, if that is the thing to do when free forming is out, i'll keep doing it. I didn't want the deformation that i got when using the torch
 
you're a glutton for punishment... :lmao:
wife came out while I was under this thing and sits on the driveway "oh wow, looks like the radiator was leaking at some point....oh wow, whatever these lines are in the bottom are really cracked up....oh wow, how are those bushing still in place?" she hadn't looked under it before

:laughing:
 
wife came out while I was under this thing and sits on the driveway "oh wow, looks like the radiator was leaking at some point....oh wow, whatever these lines are in the bottom are really cracked up....oh wow, how are those bushing still in place?" she hadn't looked under it before
If my wife showed that much interest and understanding of what was going on under my truck, I would be dragging her to the bedroom before she could have finished critiquing the bushings!
 
If my wife showed that much interest and understanding of what was going on under my truck, I would be dragging her to the bedroom before she could have finished critiquing the bushings!
she certainly knows enough to find all the issues :laughing:

getting her to see any positive is the hard part :rasta:
 
wife came out while I was under this thing and sits on the driveway "oh wow, looks like the radiator was leaking at some point....oh wow, whatever these lines are in the bottom are really cracked up....oh wow, how are those bushing still in place?" she hadn't looked under it before

:laughing:

she wasn't talking about the truck... :flipoff2:
 
Top Back Refresh